
B.O.S. Lock Fusion Safety, Operation, and Installation Manual
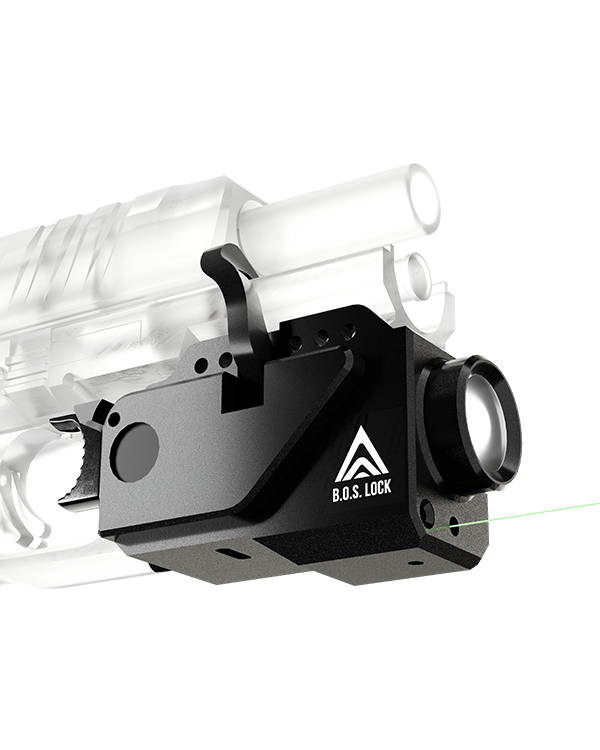
Company identification: Biometric Optimized Safety LLC (DBA B.O.S. Lock)
Patent Information can be found at: https://boslock.com/patents/
Important Notices – READ BEFORE USE
WARNING NOTICE: This manual is intended to provide general product guidance only. It does not replace firearm safety training, legal advice, or professional instruction.
WARNING LASER NOTICE: This product contains a laser device. Avoid direct eye exposure. LED RADIATION (RG-2). DO NOT STARE INTO BEAM. MAY BE HARMFUL TO EYES. PER IEC 62471 ED 1.0:2006-07.
WARNING
Important battery update for early Fusion owners
Table of Contents
- Company Mission and Vision Statement
- Foundational Safety
- Intended Use and Operating Limitations
- What’s Included
- Product Identification and Control Points
- Fingerprint Registration
- Installation on Firearm Procedure
- Familiarization
- Operating Instructions and Controls
- Laser Zeroing and Calibration
- Battery Safety and Maintenance
- Troubleshooting
- Maintenance and Optical Care
- Technical Specifications
- Warranty Information
- Regulatory and Legal Notices
- Standard of Care and User Responsibility
1. Company Mission and Vision Statement
1.1 Mission Statement
B.O.S. Lock exists to redefine firearm safety through innovative technology that integrates seamlessly with modern firearms, giving responsible owners smarter ways to secure their firearms without sacrificing performance.
1.2 Vision Statement
At B.O.S. Lock, we believe firearm security should meaningfully restrict unauthorized use without forcing responsible owners to give up practical access. Fusion combines local biometric authentication with a firearm-mounted retention system, integrated white light, and an adjustable green laser. Our goal is to create a more practical balance between security, readiness, and responsible ownership.
1.3 Note From Our Founder
When I became an uncle, I found myself looking for a solution that didn’t seem to exist. I wanted my firearms to be truly secured from my curious nephew’s hands, but I also needed them ready the moment a threat became real. Every device I tried forced a compromise: you could have speed or safety, but not both.
I started B.O.S. Lock so that you would never have to make that choice.
By replacing keys and codes with technology that recognizes you specifically, we’ve removed the guesswork from security. Our goal is to make you more capable the moment you are needed, while providing complete peace of mind when you are not. Thank you for trusting us to help you protect what matters most.
— Keith Bombaugh, Founder, B.O.S. Lock

2. Foundational Safety
2.1 Save These Instructions
This manual contains important safety, operating, charging, maintenance, and product handling instructions for the B.O.S. Lock Fusion (“the device”).
2.2 Core Firearm Safety Rules
The B.O.S. Lock Fusion does not replace the fundamental rules of firearm safety:
- Treat every firearm as if it is loaded.
- Keep your finger off the trigger until ready to fire.
- Never point a firearm at anything you are not willing to destroy.
- Be sure of your target and what is beyond it.
2.3 Mandatory Safety Check Before Any Setup or Handling
Before programming, installing, adjusting, removing, charging near, or maintaining the device:
- Point the firearm in a safe direction.
- Remove the magazine.
- Lock the slide to the rear.
- Confirm the chamber is empty.
- Keep the breech open during installation and setup.
CAUTION The device is a supplemental safety product only. No accessory can eliminate the risks associated with firearm ownership, storage, transport, or use.
3. Intended Use and Operating Limitations
3.1 Intended Use
The B.O.S. Lock Fusion is a firearm-mounted biometric safety device designed to help restrict unauthorized operation while preserving practical access for an enrolled owner. It is intended for controlled residential and similar indoor environments.
Fusion holds the slide to the rear and releases it after successful fingerprint authentication. The resulting slide movement depends on the firearm model, configuration, mounting position, and setup. When properly configured on certain compatible firearms, release may allow the slide to strip and chamber a round from a loaded magazine. Compact and subcompact firearms may produce different slide positions or outcomes. Do not assume that Fusion will chamber a round on every compatible firearm. First complete installation and basic function checks with the firearm unloaded and all live ammunition removed from the testing area. To evaluate model-specific feeding and chambering behavior, use only commercially manufactured, caliber-correct inert dummy rounds or snap caps specifically designed for feeding and function testing. Keep the firearm pointed in a safe direction, follow the firearm and training-cartridge manufacturers’ instructions, and never use live ammunition during setup or function testing.
3.2 Operating Limitations
- Compatibility varies by firearm model, Picatinny rail, and accessory rail design. Use only firearms and rail interfaces confirmed compatible by B.O.S. Lock.
- Not waterproof or submersible.
- Light exterior moisture may not affect function, but water ingress through openings may damage internal electronics.
- Not intended for use in combat or other scenarios with prolonged exposure to outdoor elements
- Not designed for prolonged exposure to severe outdoor conditions.
- Not intended to replace responsible firearm handling or professional training.
NOTICE Product performance of the device may vary based on firearm configuration, mounting position, user technique, environmental conditions, battery condition, and maintenance. Never leave a loaded firearm unattended.
4. What’s Included
4.1 Package Contents Overview
This section identifies the components supplied with the B.O.S. Lock Fusion. Package contents may vary by configuration and are subject to change. Verify all items are present before beginning installation or programming.
4.2 Components Supplied in the Box
The package is intended to include the following items:
- B.O.S. Lock Fusion device (1 unit)
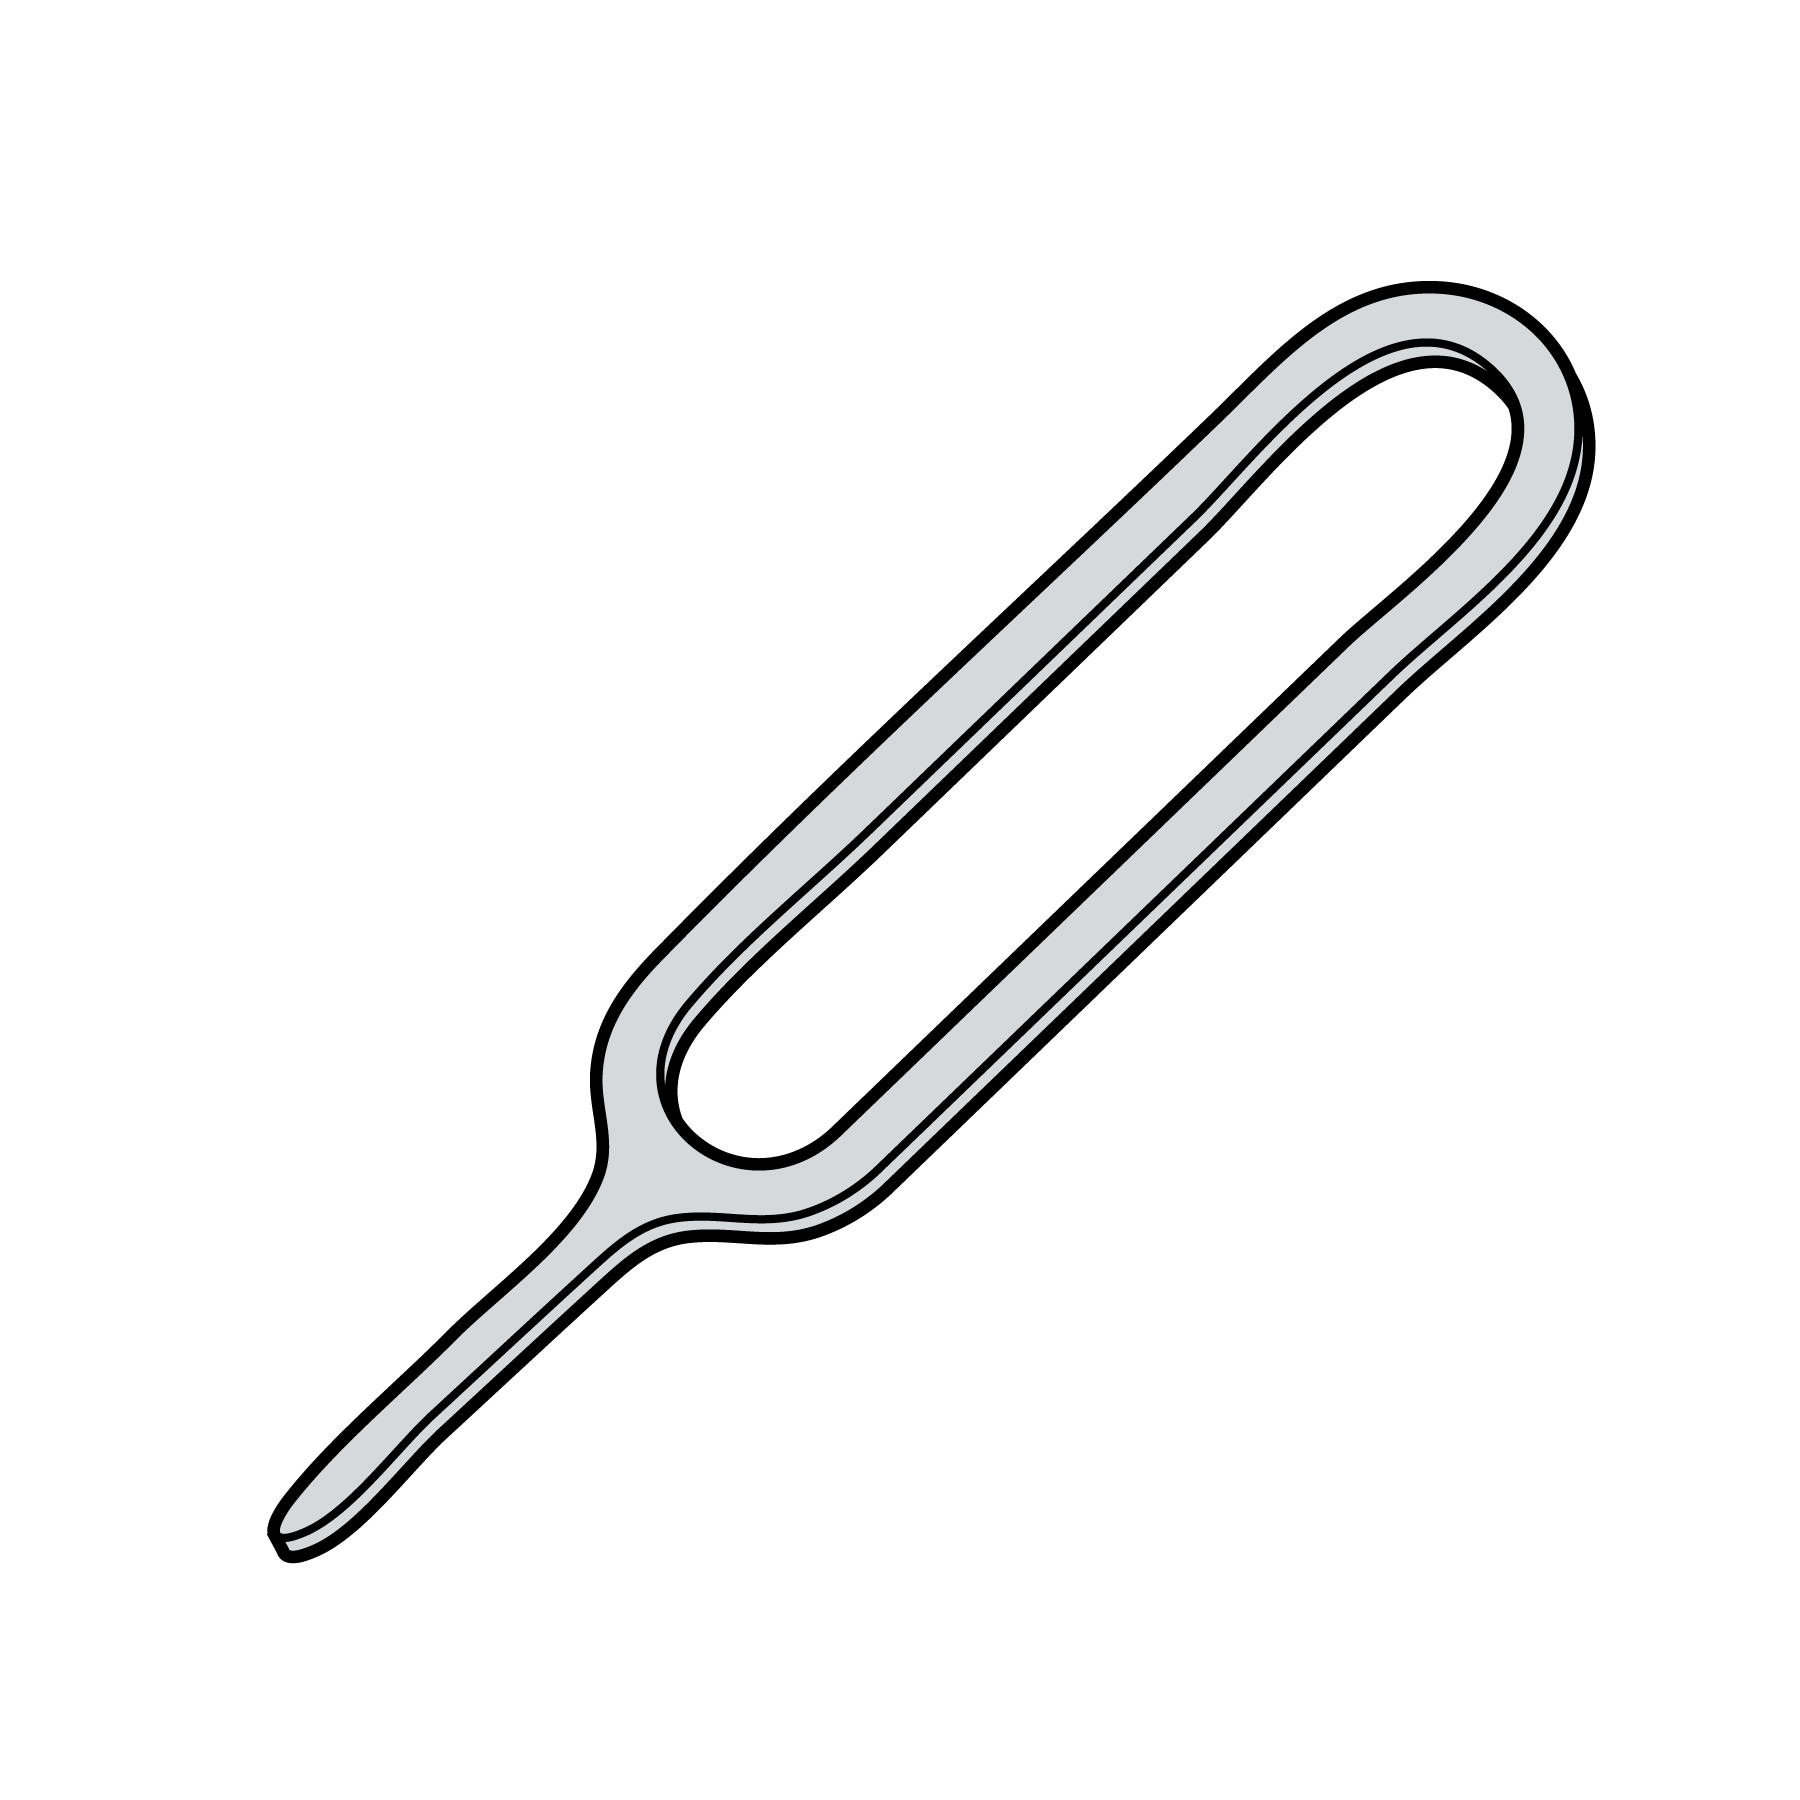
- Programming tool
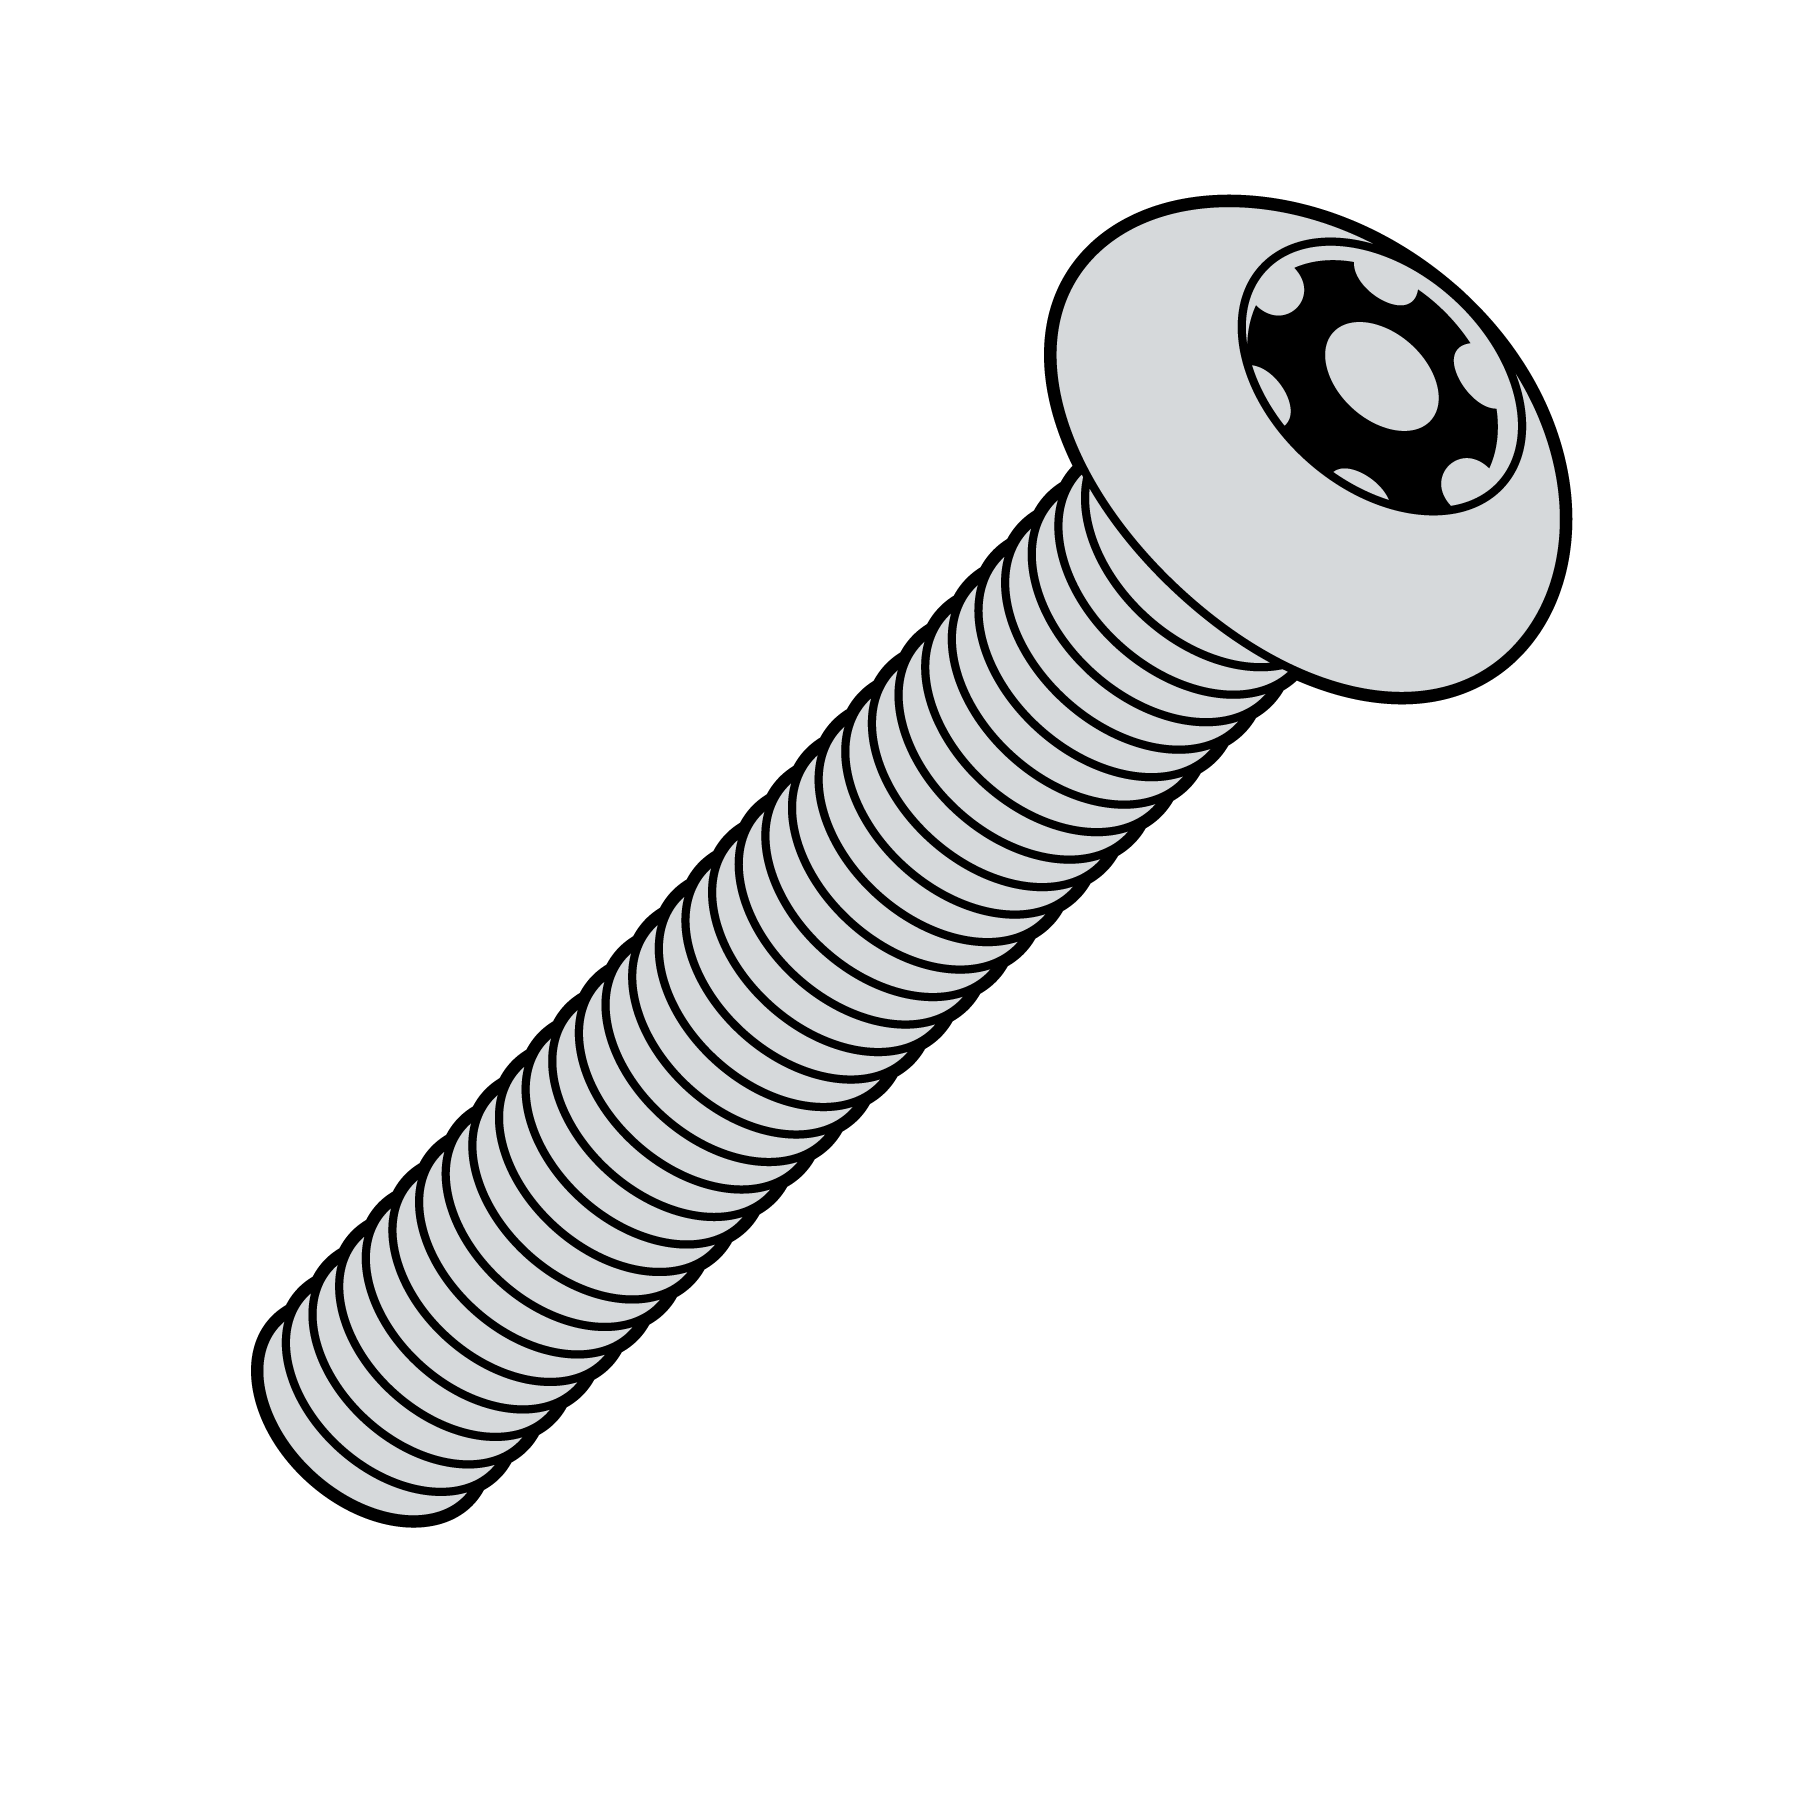
- Proprietary locking bolt
- Proprietary bolt driver
- M4 Retention Screws
- Laser Adjustment Allen Wrench
- Quick Start Guide and QR code to digital manual
- Resources from our partners
- B.O.S. Lock protective case

A
B
C
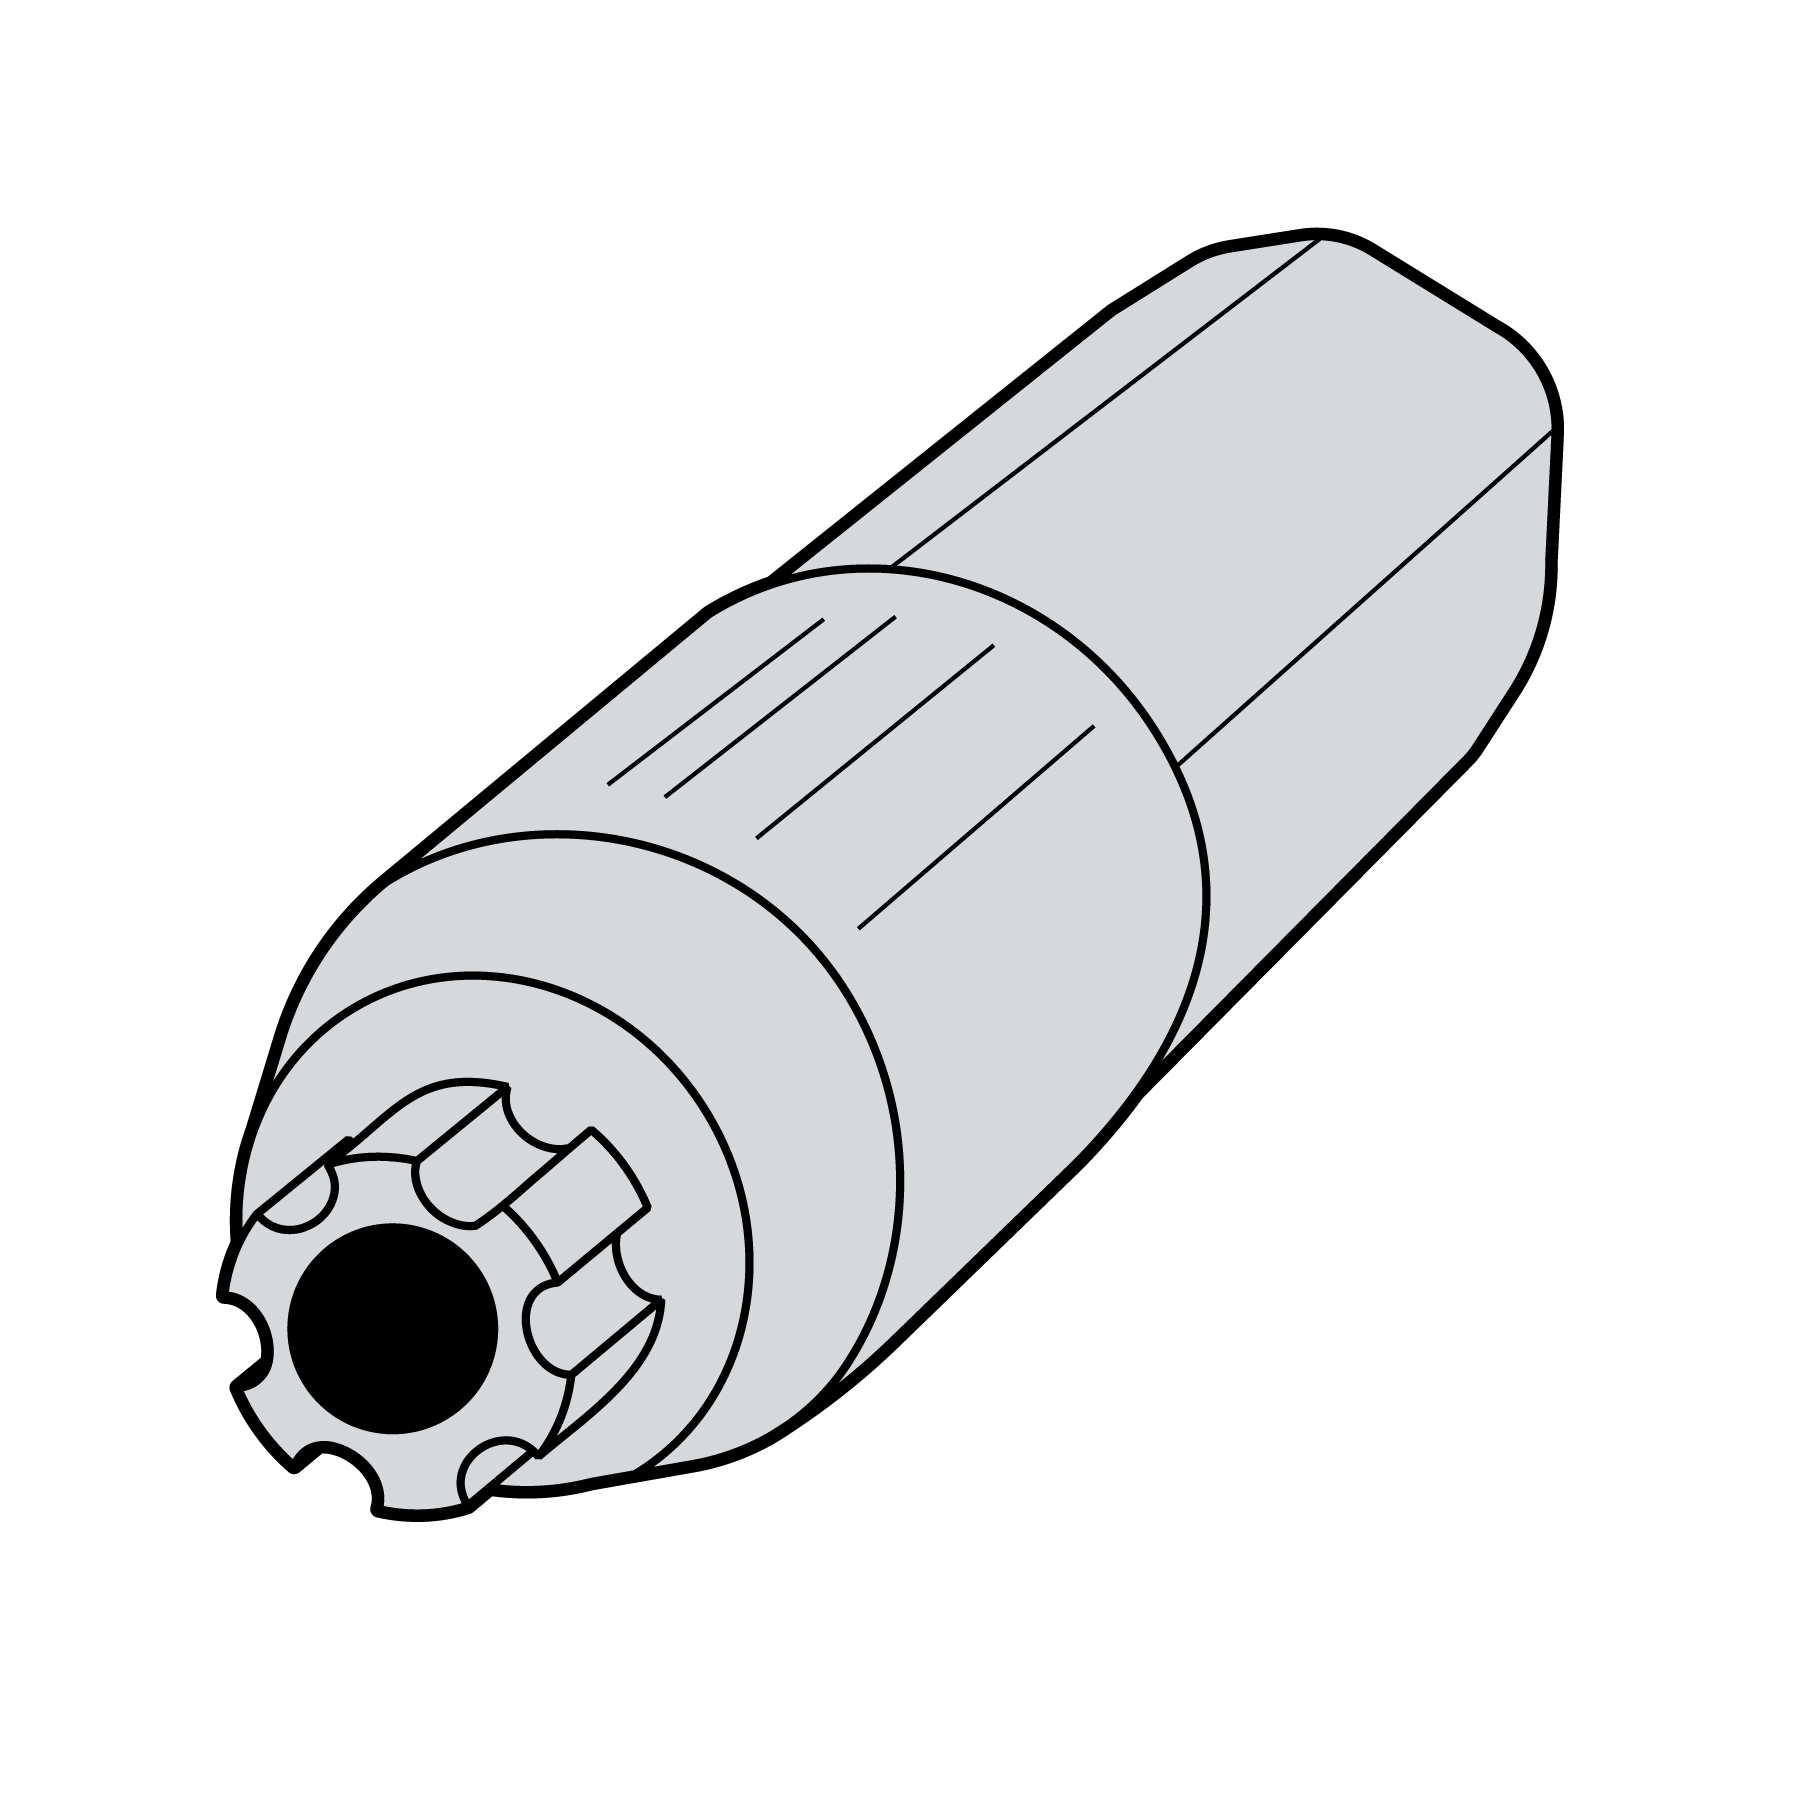
D
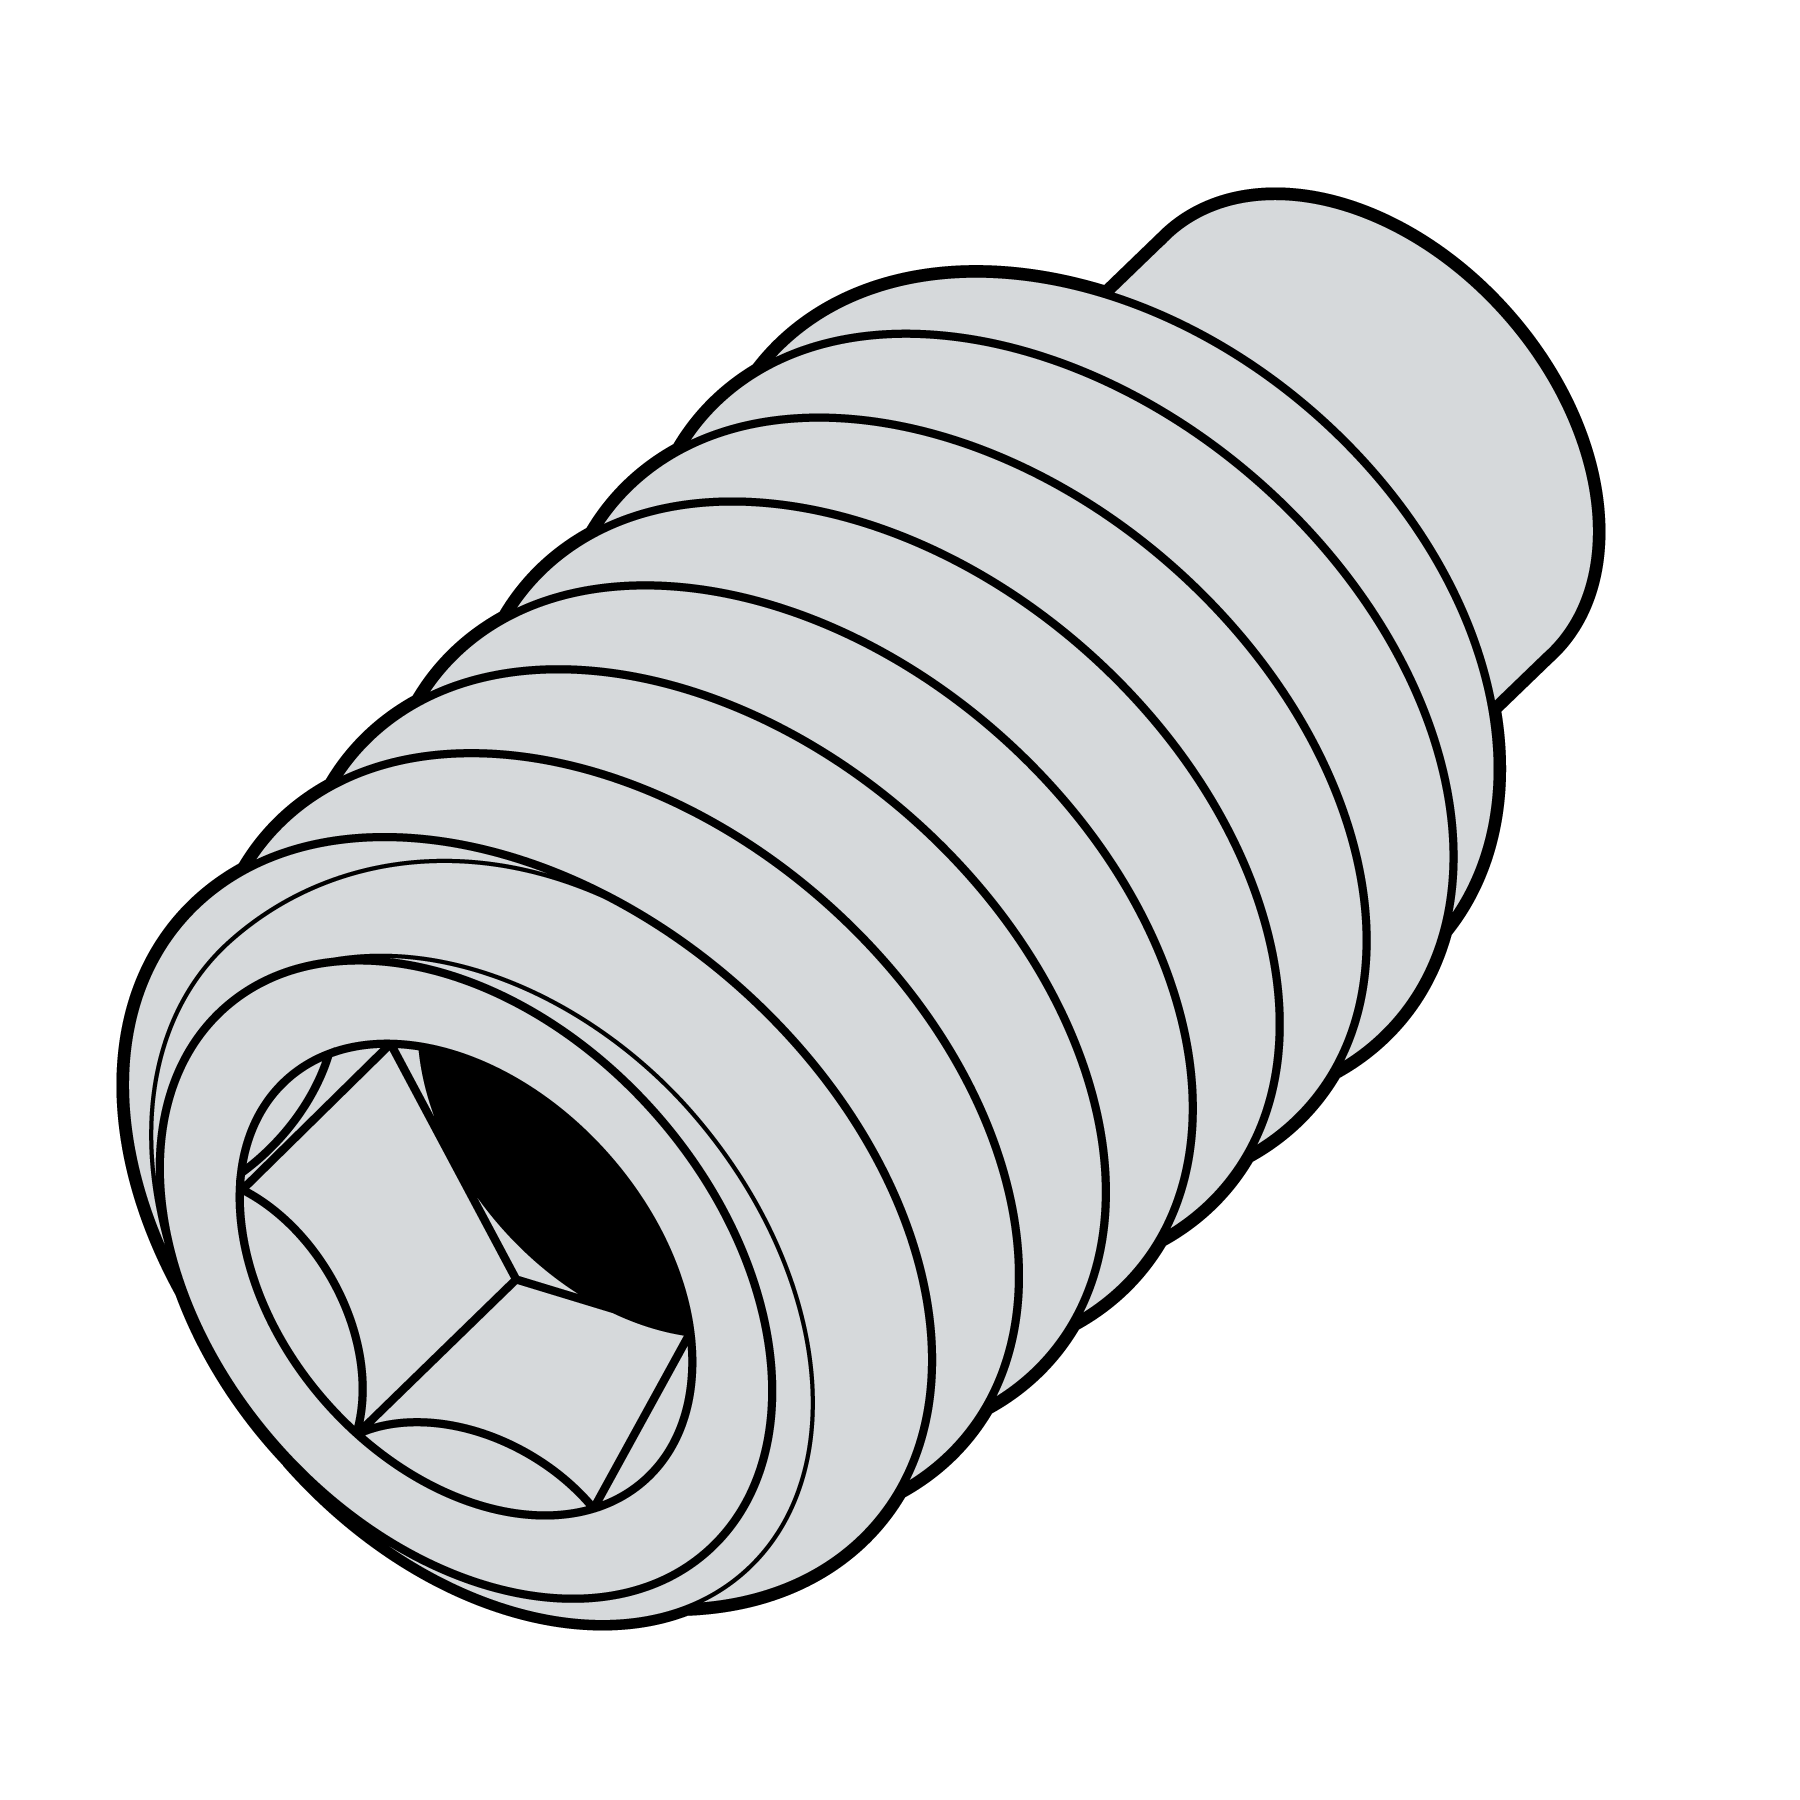
E
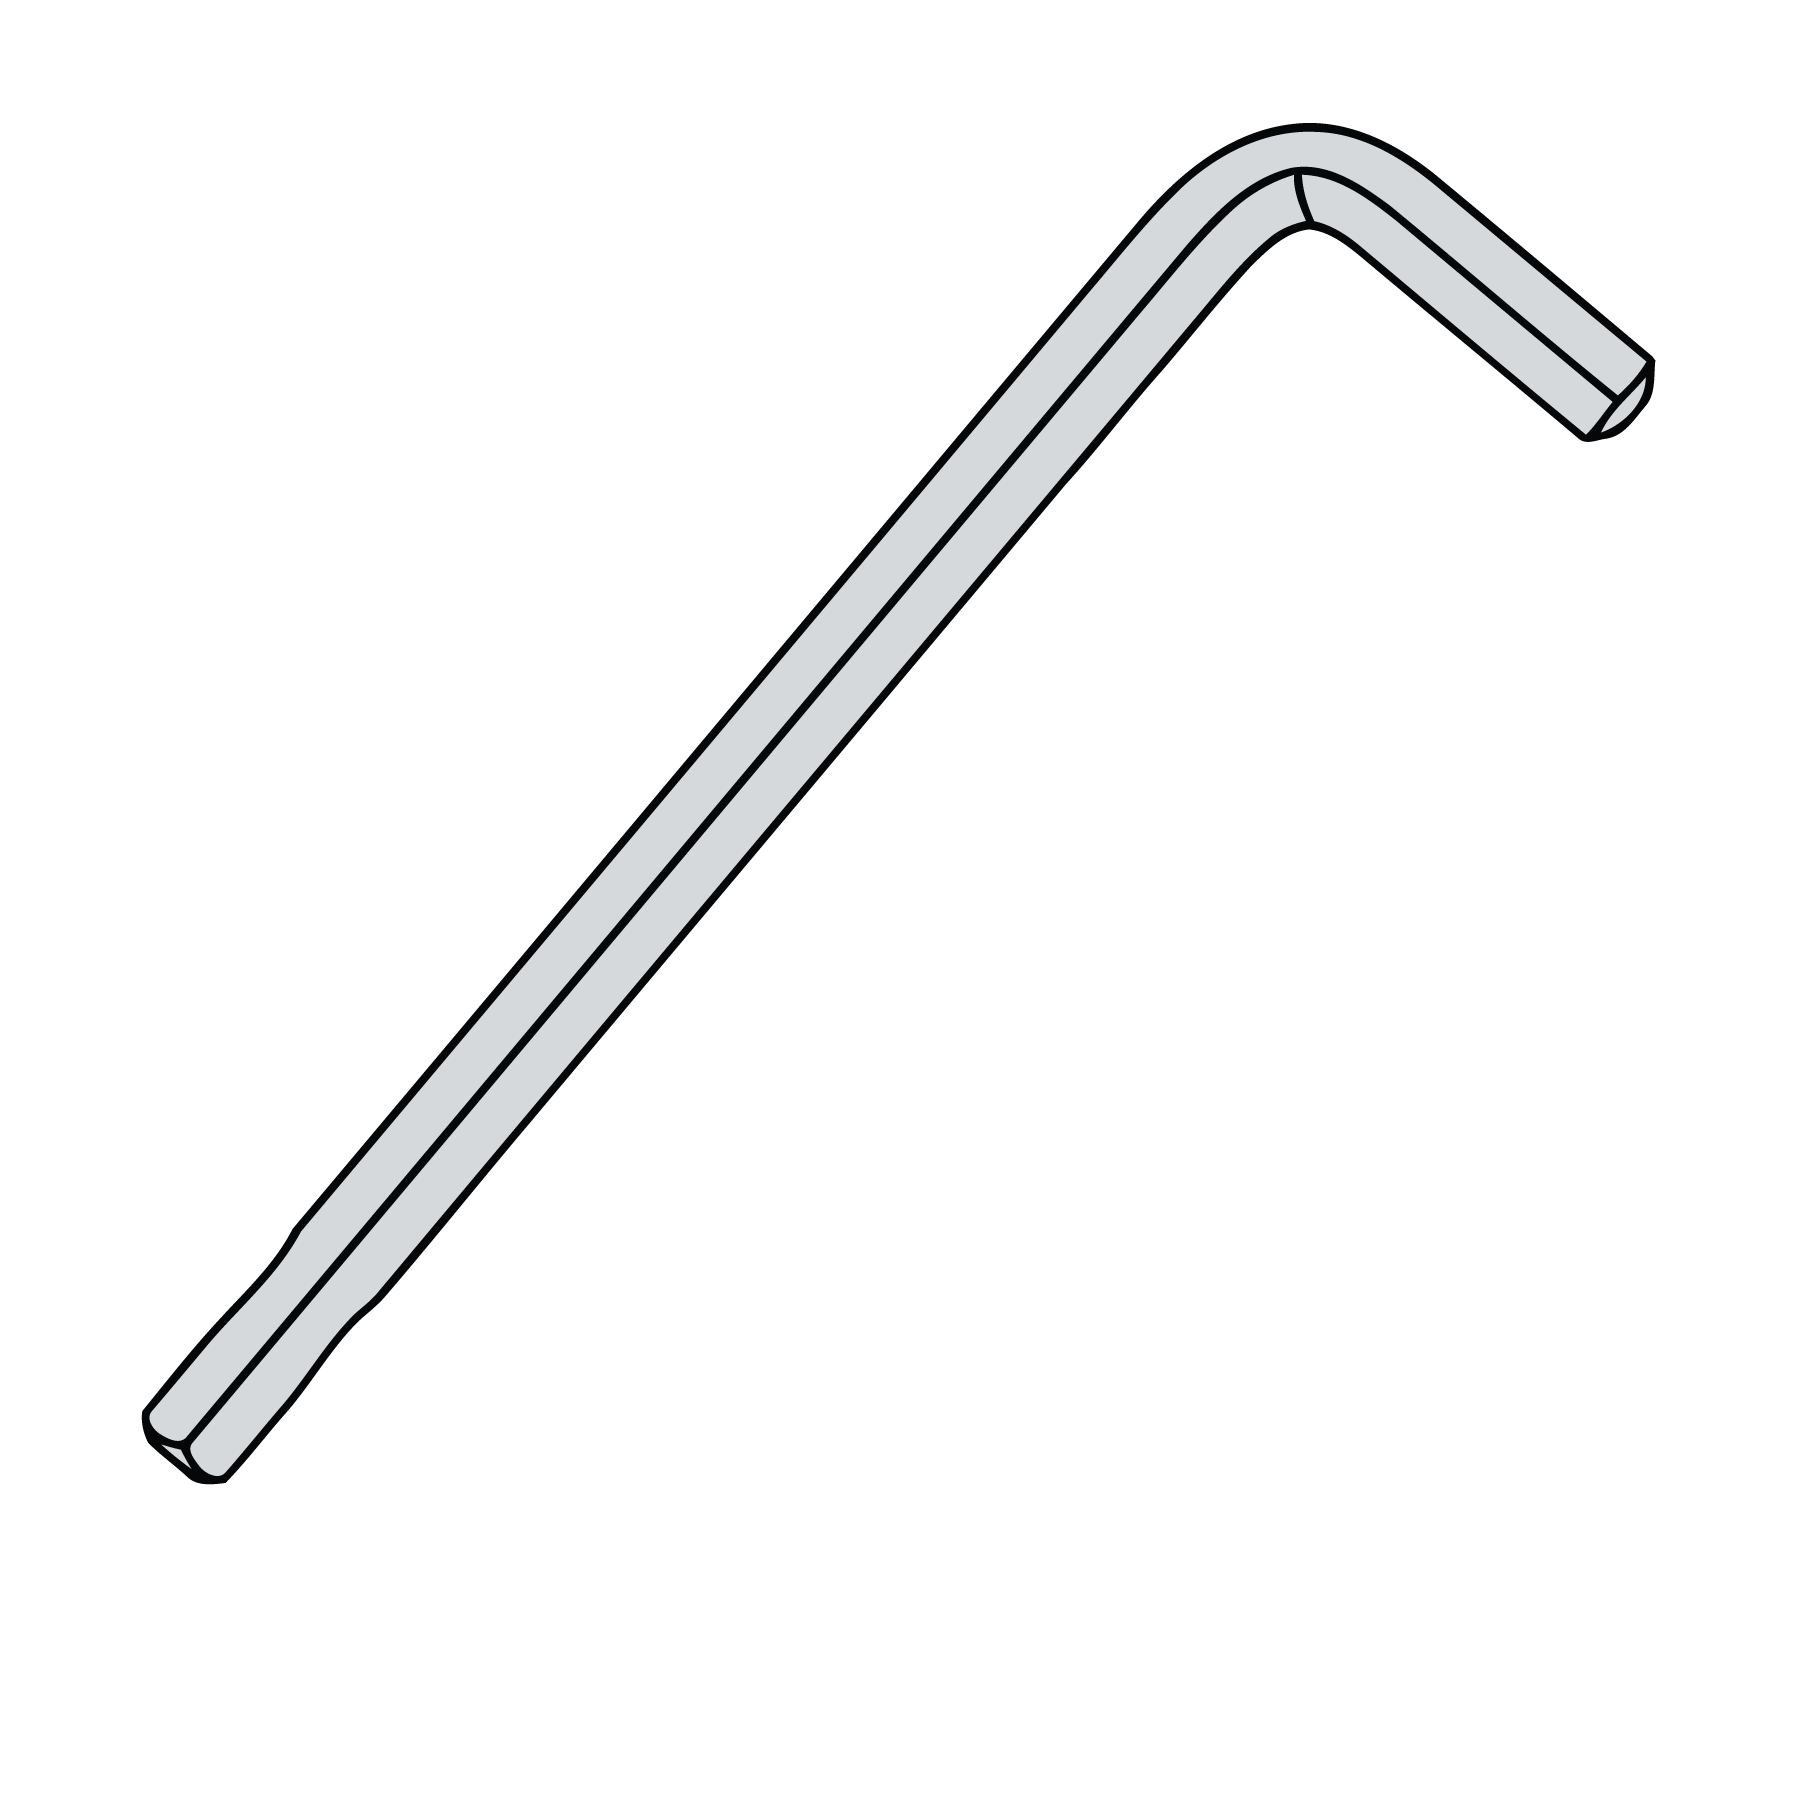
F
4.3 Items Not Supplied
The following items are not supplied unless explicitly listed in Section 4.2:
- Firearm
- Additional accessories not expressly identified as included
4.4 Inspection Prior to Use
Inspect all components upon opening the package. If any item is missing or appears damaged, do not proceed with installation. Contact B.O.S. Lock customer support at support@boslock.com for assistance.
5. Product Identification and Control Points
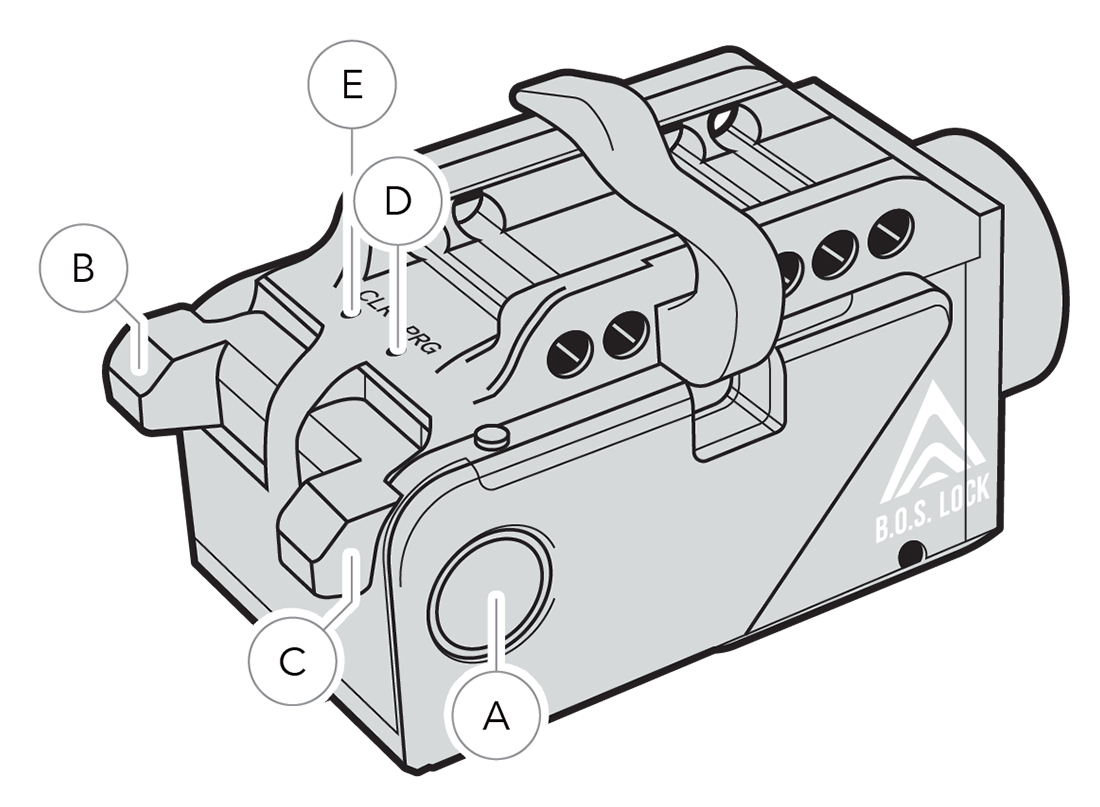
- Biometric sensor
- Retention arm
- A paddle
- B paddle
- P Port (Program; fingerprint enrollment and power reset)
- C Port (Clear; fingerprint clearing and factory reset)
- Mounting bolt hole locations
- LED light
- Windage adjustment point
- Elevation adjustment point
- USB-C charging port
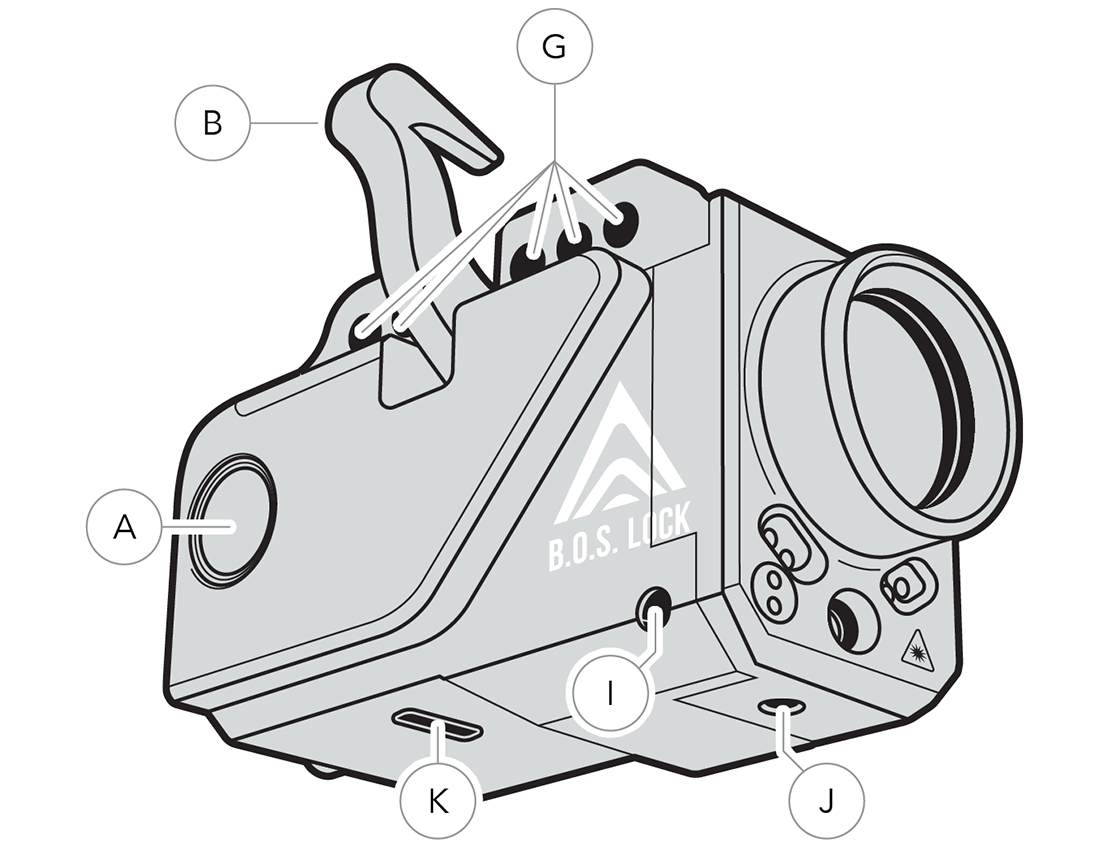

6. Fingerprint Registration
Compatibility Check — Complete Before Setup
Fusion is designed for select compatible striker-fired handguns with supported accessory-rail geometry. It is not compatible with revolvers. Before programming or installation, confirm your exact firearm make and model at boslock.com/compatibility. Do not proceed if the firearm is not listed or if the rail is modified, damaged, or out of specification.
6.1 Fingerprint Registration Procedure
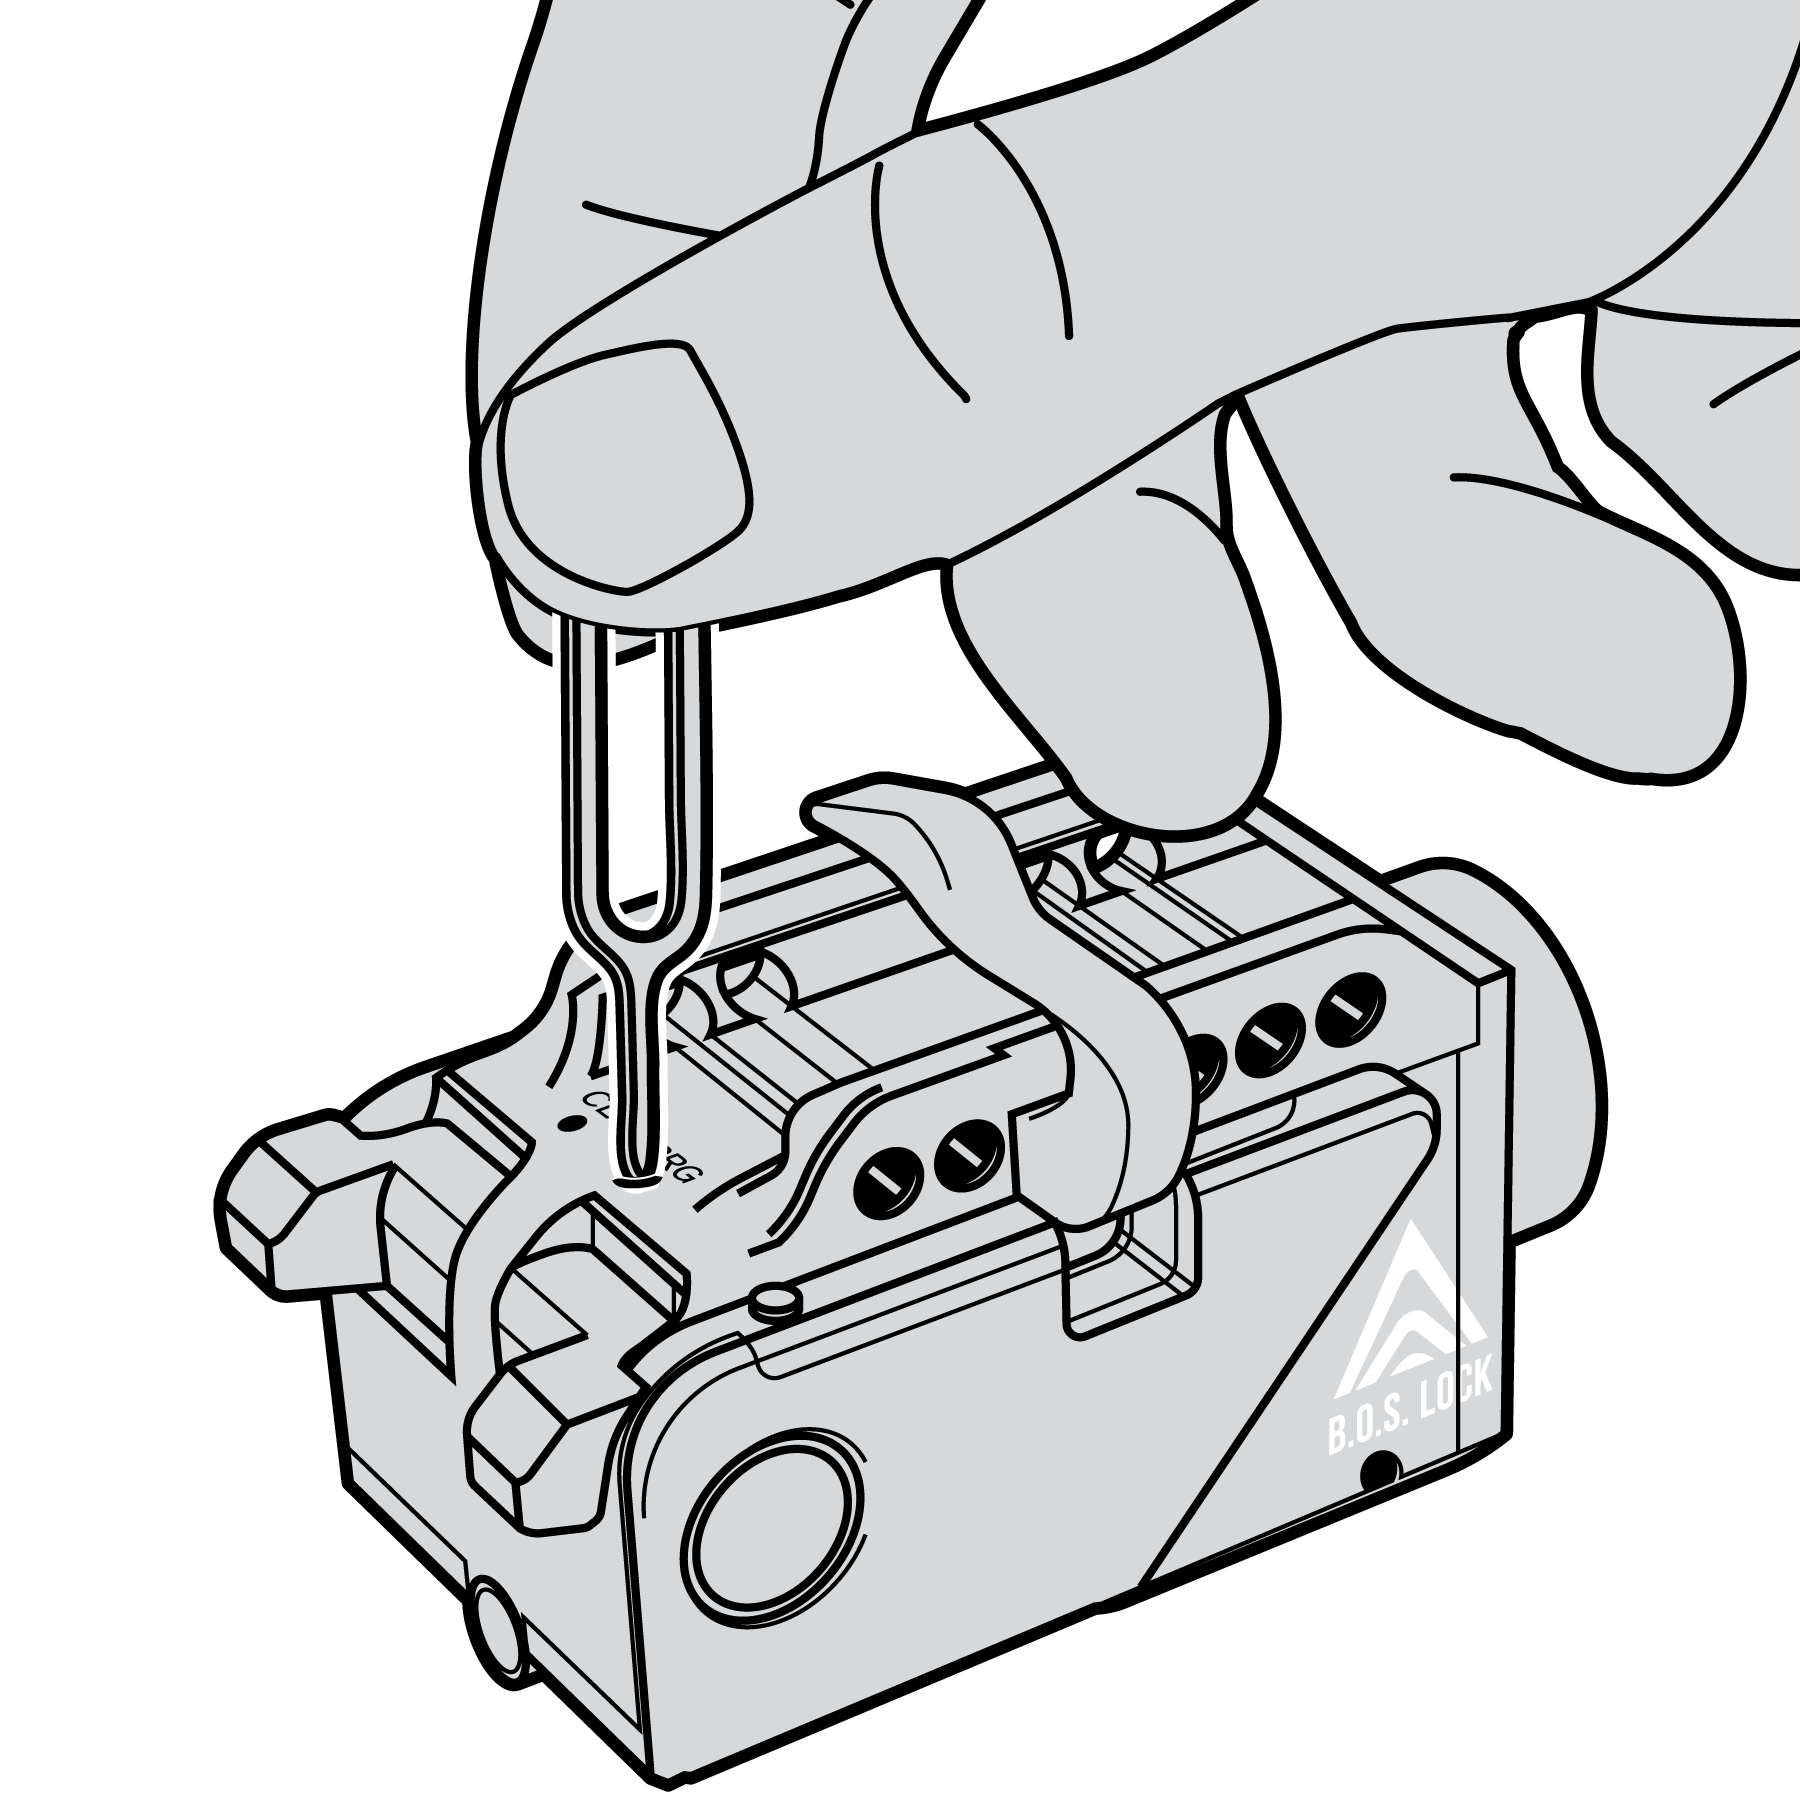
1. Insert the programming tool into the P Port.
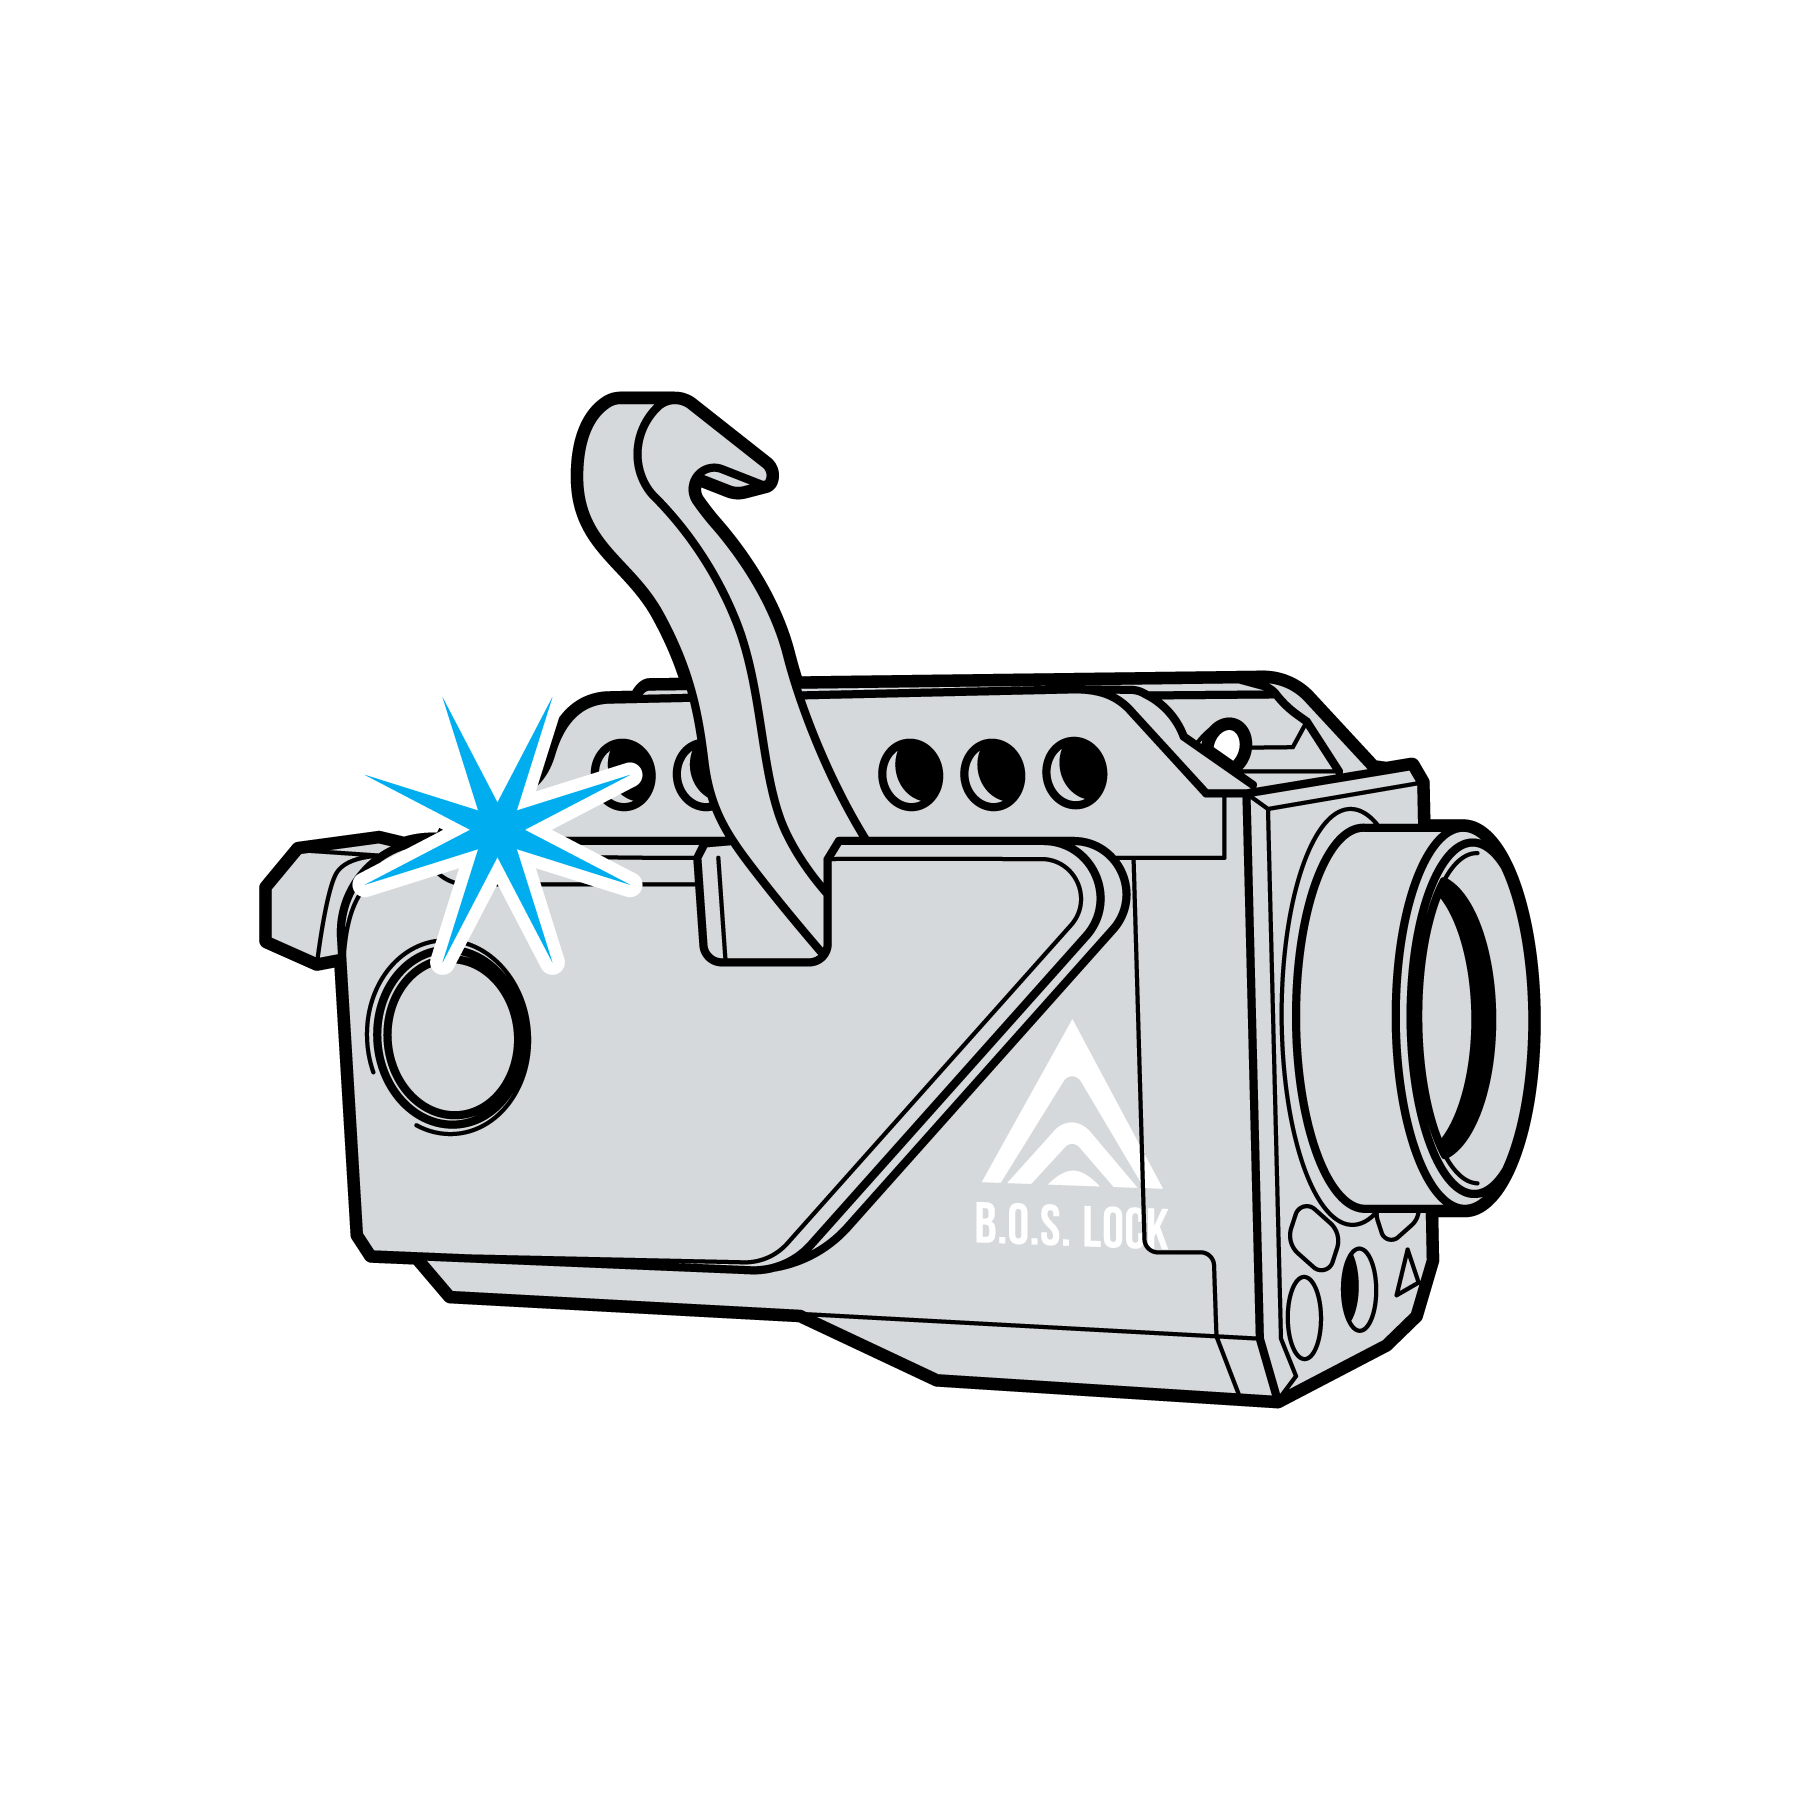
2. Confirm the LED light is blinking blue (fingerprint registration is active).
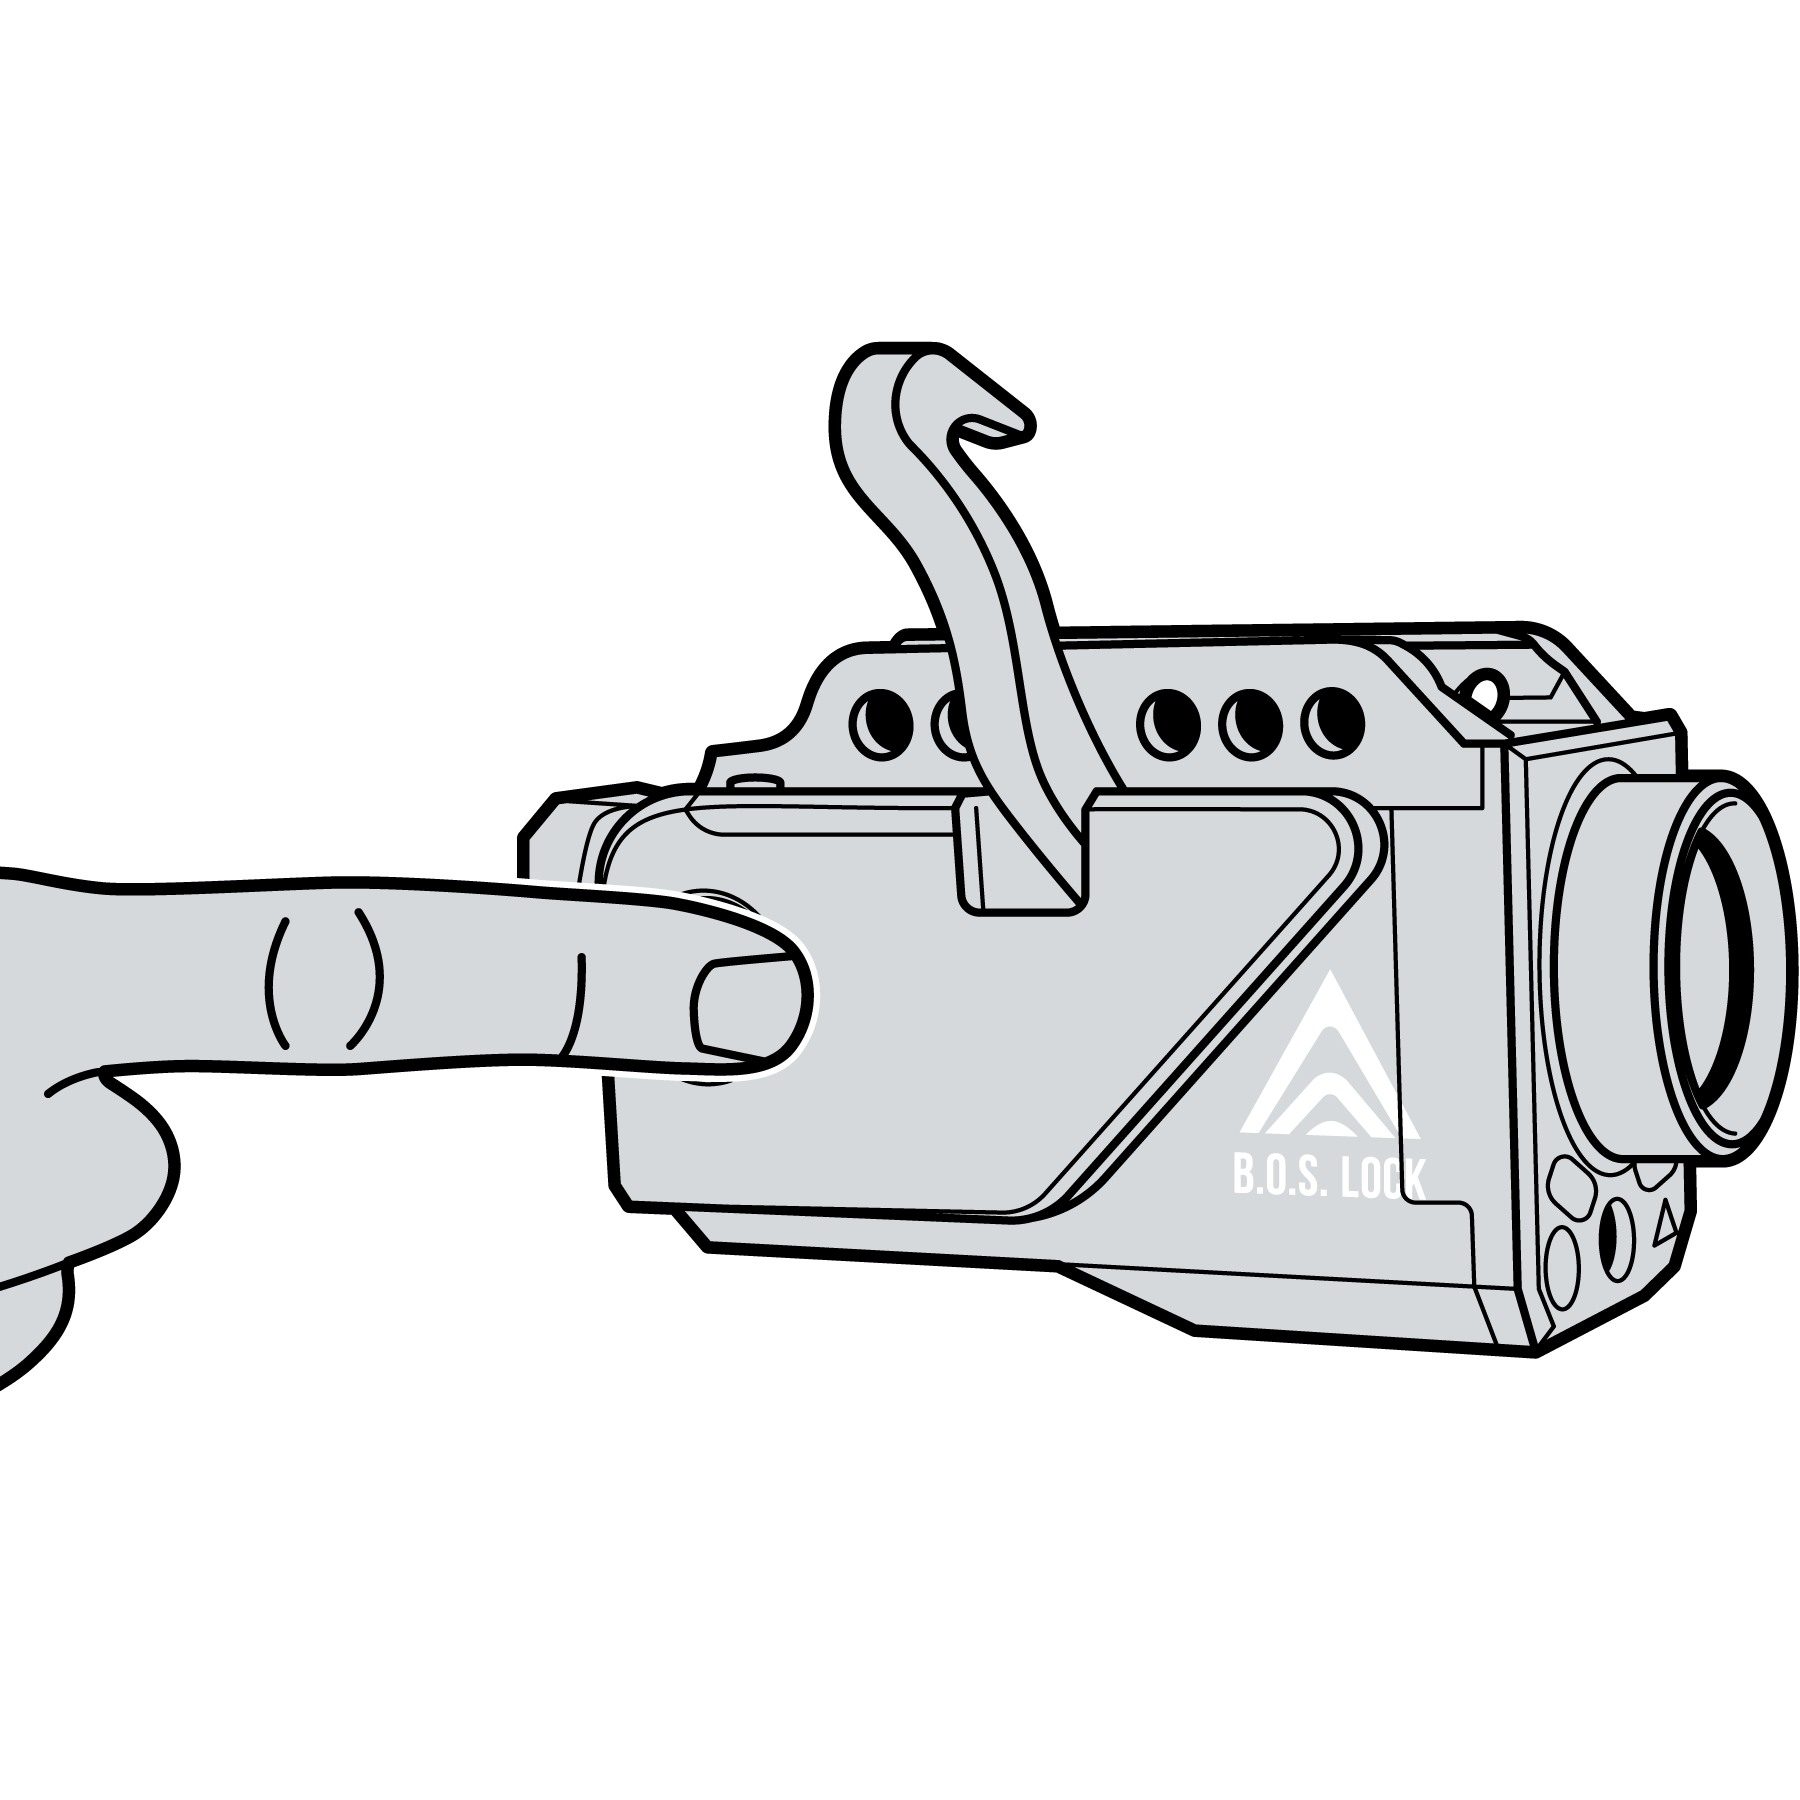
3. Place the pad of the desired finger flat on the biometric sensor for about 1 second.

4. Lift the finger for about 1/2 second. If the LED is green, the fingerprint was accepted. If the LED is red, try again.
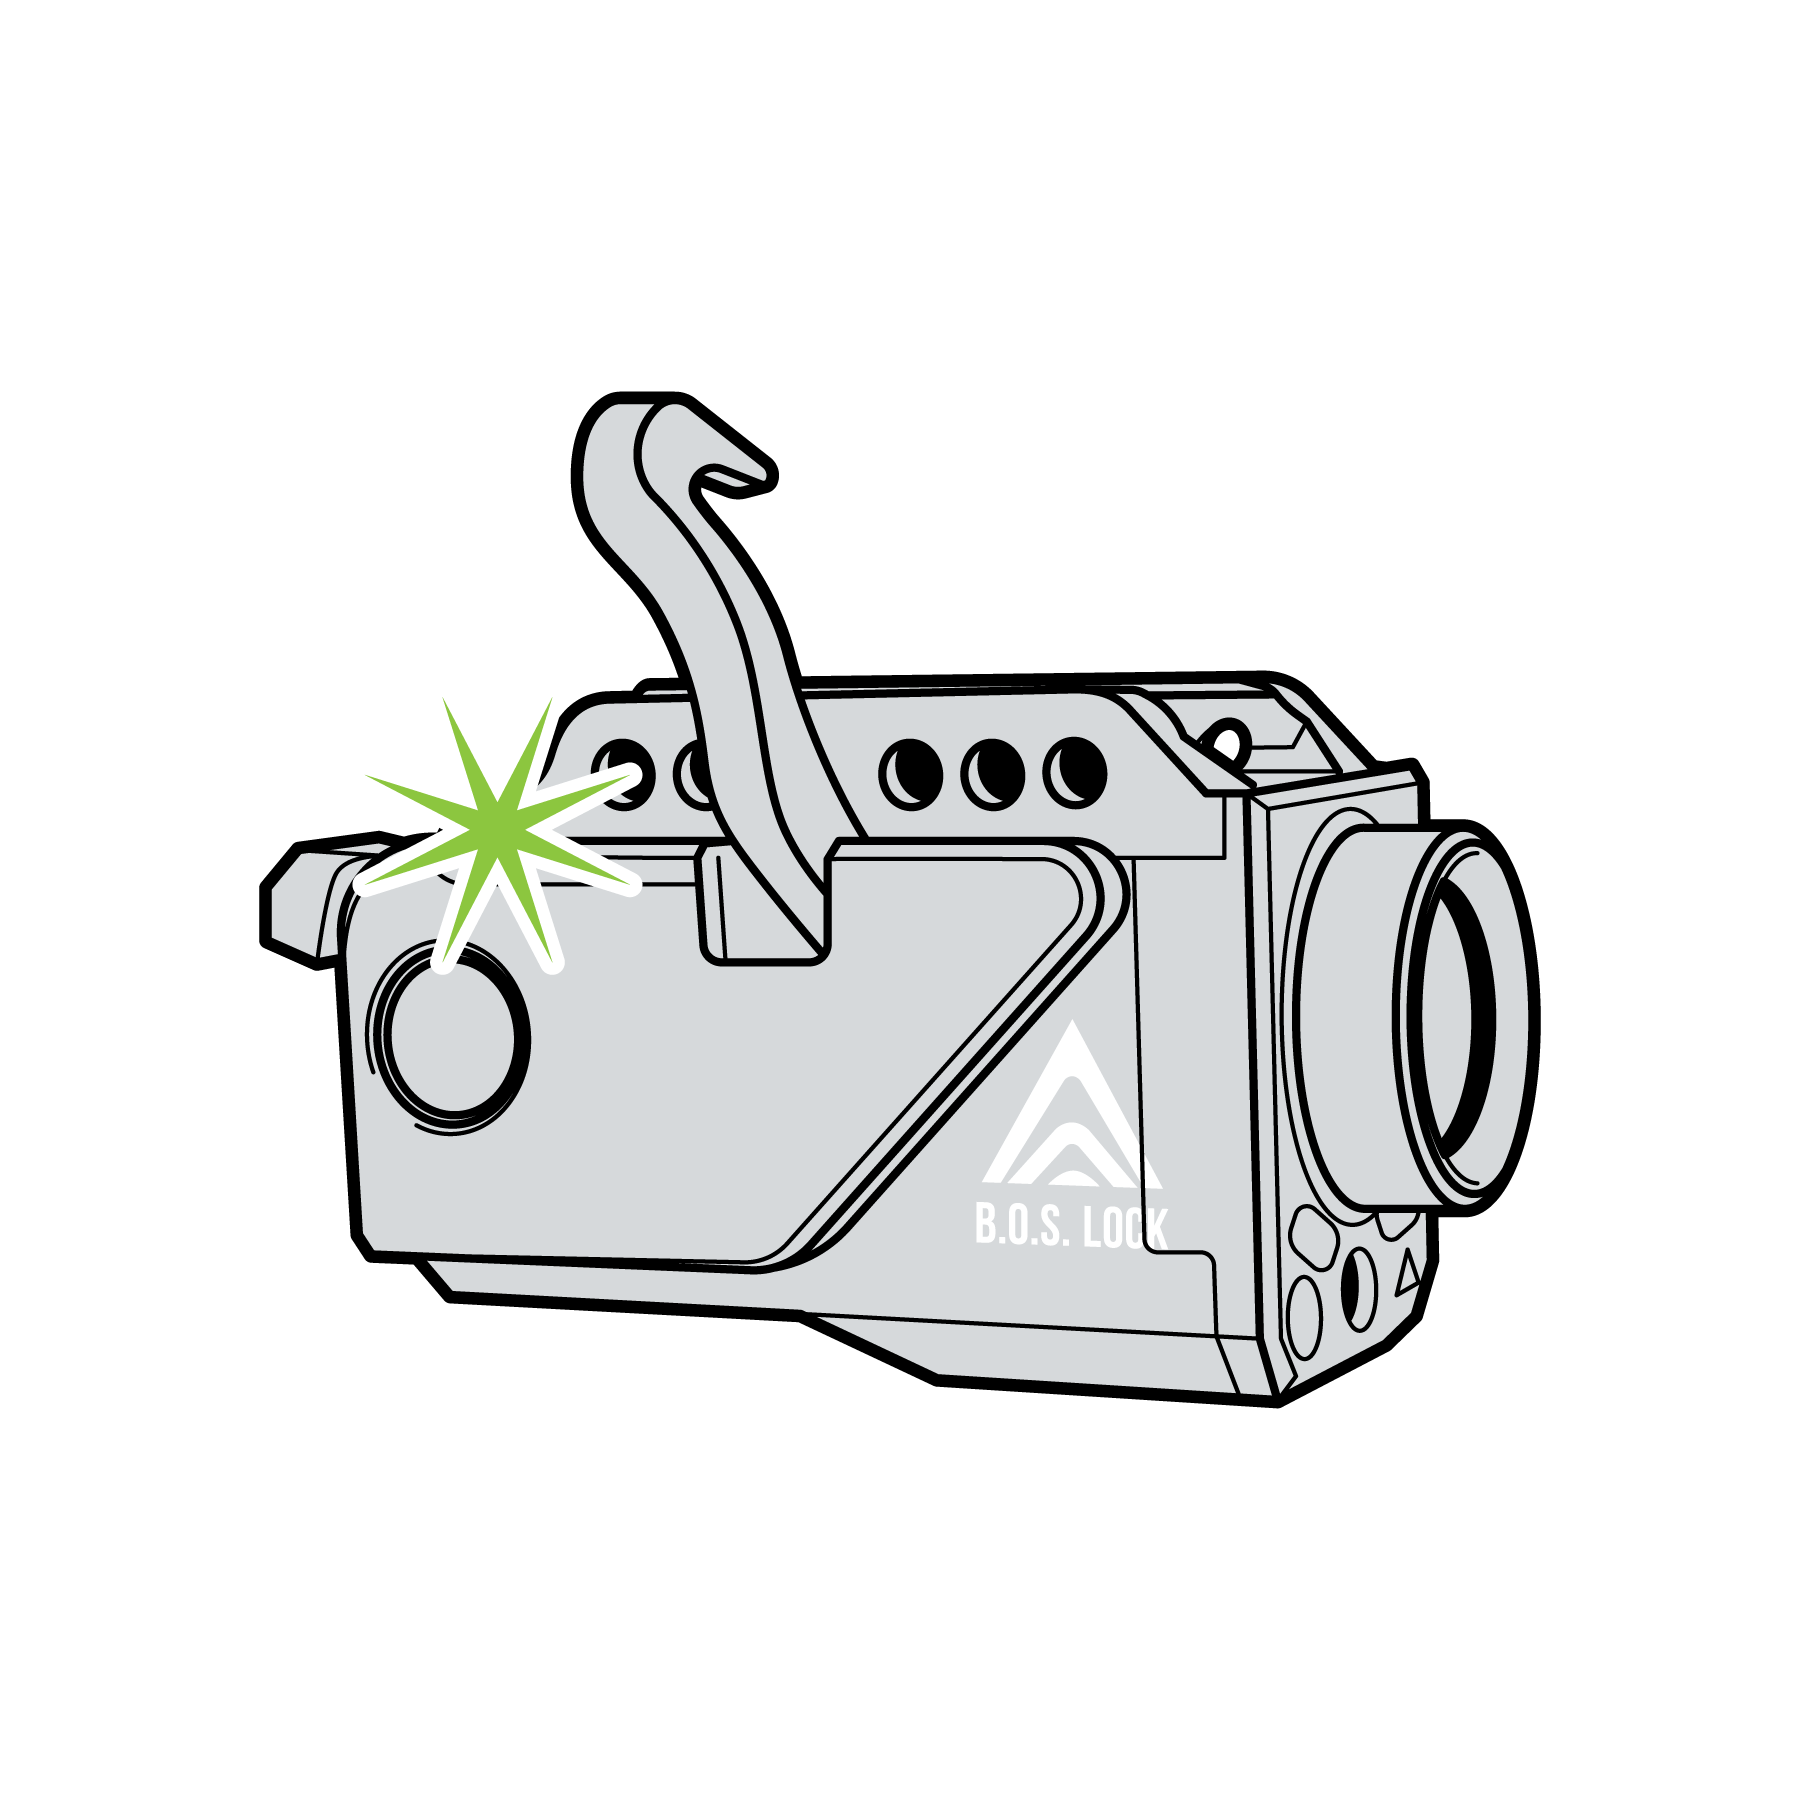
5. Repeat steps 3-4 until registration is complete. Enrollment normally requires 12 to 16 accepted touches, depending on finger mobility and image quality. When registration is complete, the light and laser will turn on and the retention arm will open.
NOTICE New fingerprints default to flashlight medium and laser on.
6.2 Registration Best Practices
- Enroll the finger you can place most naturally and consistently on the biometric sensor while establishing your normal firing grip. For most right-handed shooters, this may be the dominant-hand trigger finger. Because of the sensor position, left-handed shooters may find that a finger on the support hand provides better reach. Enrollment order affects authentication speed, so enroll the finger you expect to use most often first.
- Use a clean finger with normal or slight skin moisture.
- Center the fingerprint on the biometric sensor.
- Slightly rotate the finger for multiple angles between scans to capture print variation.
- Register additional fingers only after confirming reliable operation with the primary print.
- Re-enrolling fingerprints shortly after washing your hands may improve recognition across everyday conditions, such as perspiration or minor moisture. Wipe away excess water first; the finger does not need to be completely dry.
NOTICE Fusion can accommodate normal skin moisture and light perspiration. Pooled water or a continuous layer of liquid between the finger and the biometric sensor can interfere with image capture. If the finger or sensor is very wet, wipe away the excess moisture and try again. Recognition may also be affected by debris, skin condition, injury, pressure, contact angle, and placement consistency.
6.3 Removing a Fingerprint (Clear)
- Insert the programming tool into the C port.
- Confirm the LED light is blinking white. This deletes the most recently enrolled fingerprint.
- Repeat to remove additional fingerprints.
NOTICE After clearing, if there are any remaining fingerprints, the device will count them in green blinks. If there are no fingerprints, a single yellow light will flash.
7. Installation on Firearm Procedure
7.1 Pre-Installation Safety Requirements
Before installation:
- Point the firearm in a safe direction.
- Remove the magazine.
- Clear the chamber.
- Lock the slide to the rear.
- Confirm the firearm remains unloaded throughout installation.
7.2 Installation Restrictions
- Use only the supplied hardware and driver.
- Do not use power tools.
- Do not modify the housing, hardware, or firearm rail.
- Do not install on modified, damaged, or out-of-specification rails.
- Stop installation if fitment appears improper or forced.
WARNING Improper installation may reduce product performance or create unsafe conditions. After installation and before live use, confirm the device is secure and does not shift.
7.3 Installation Steps
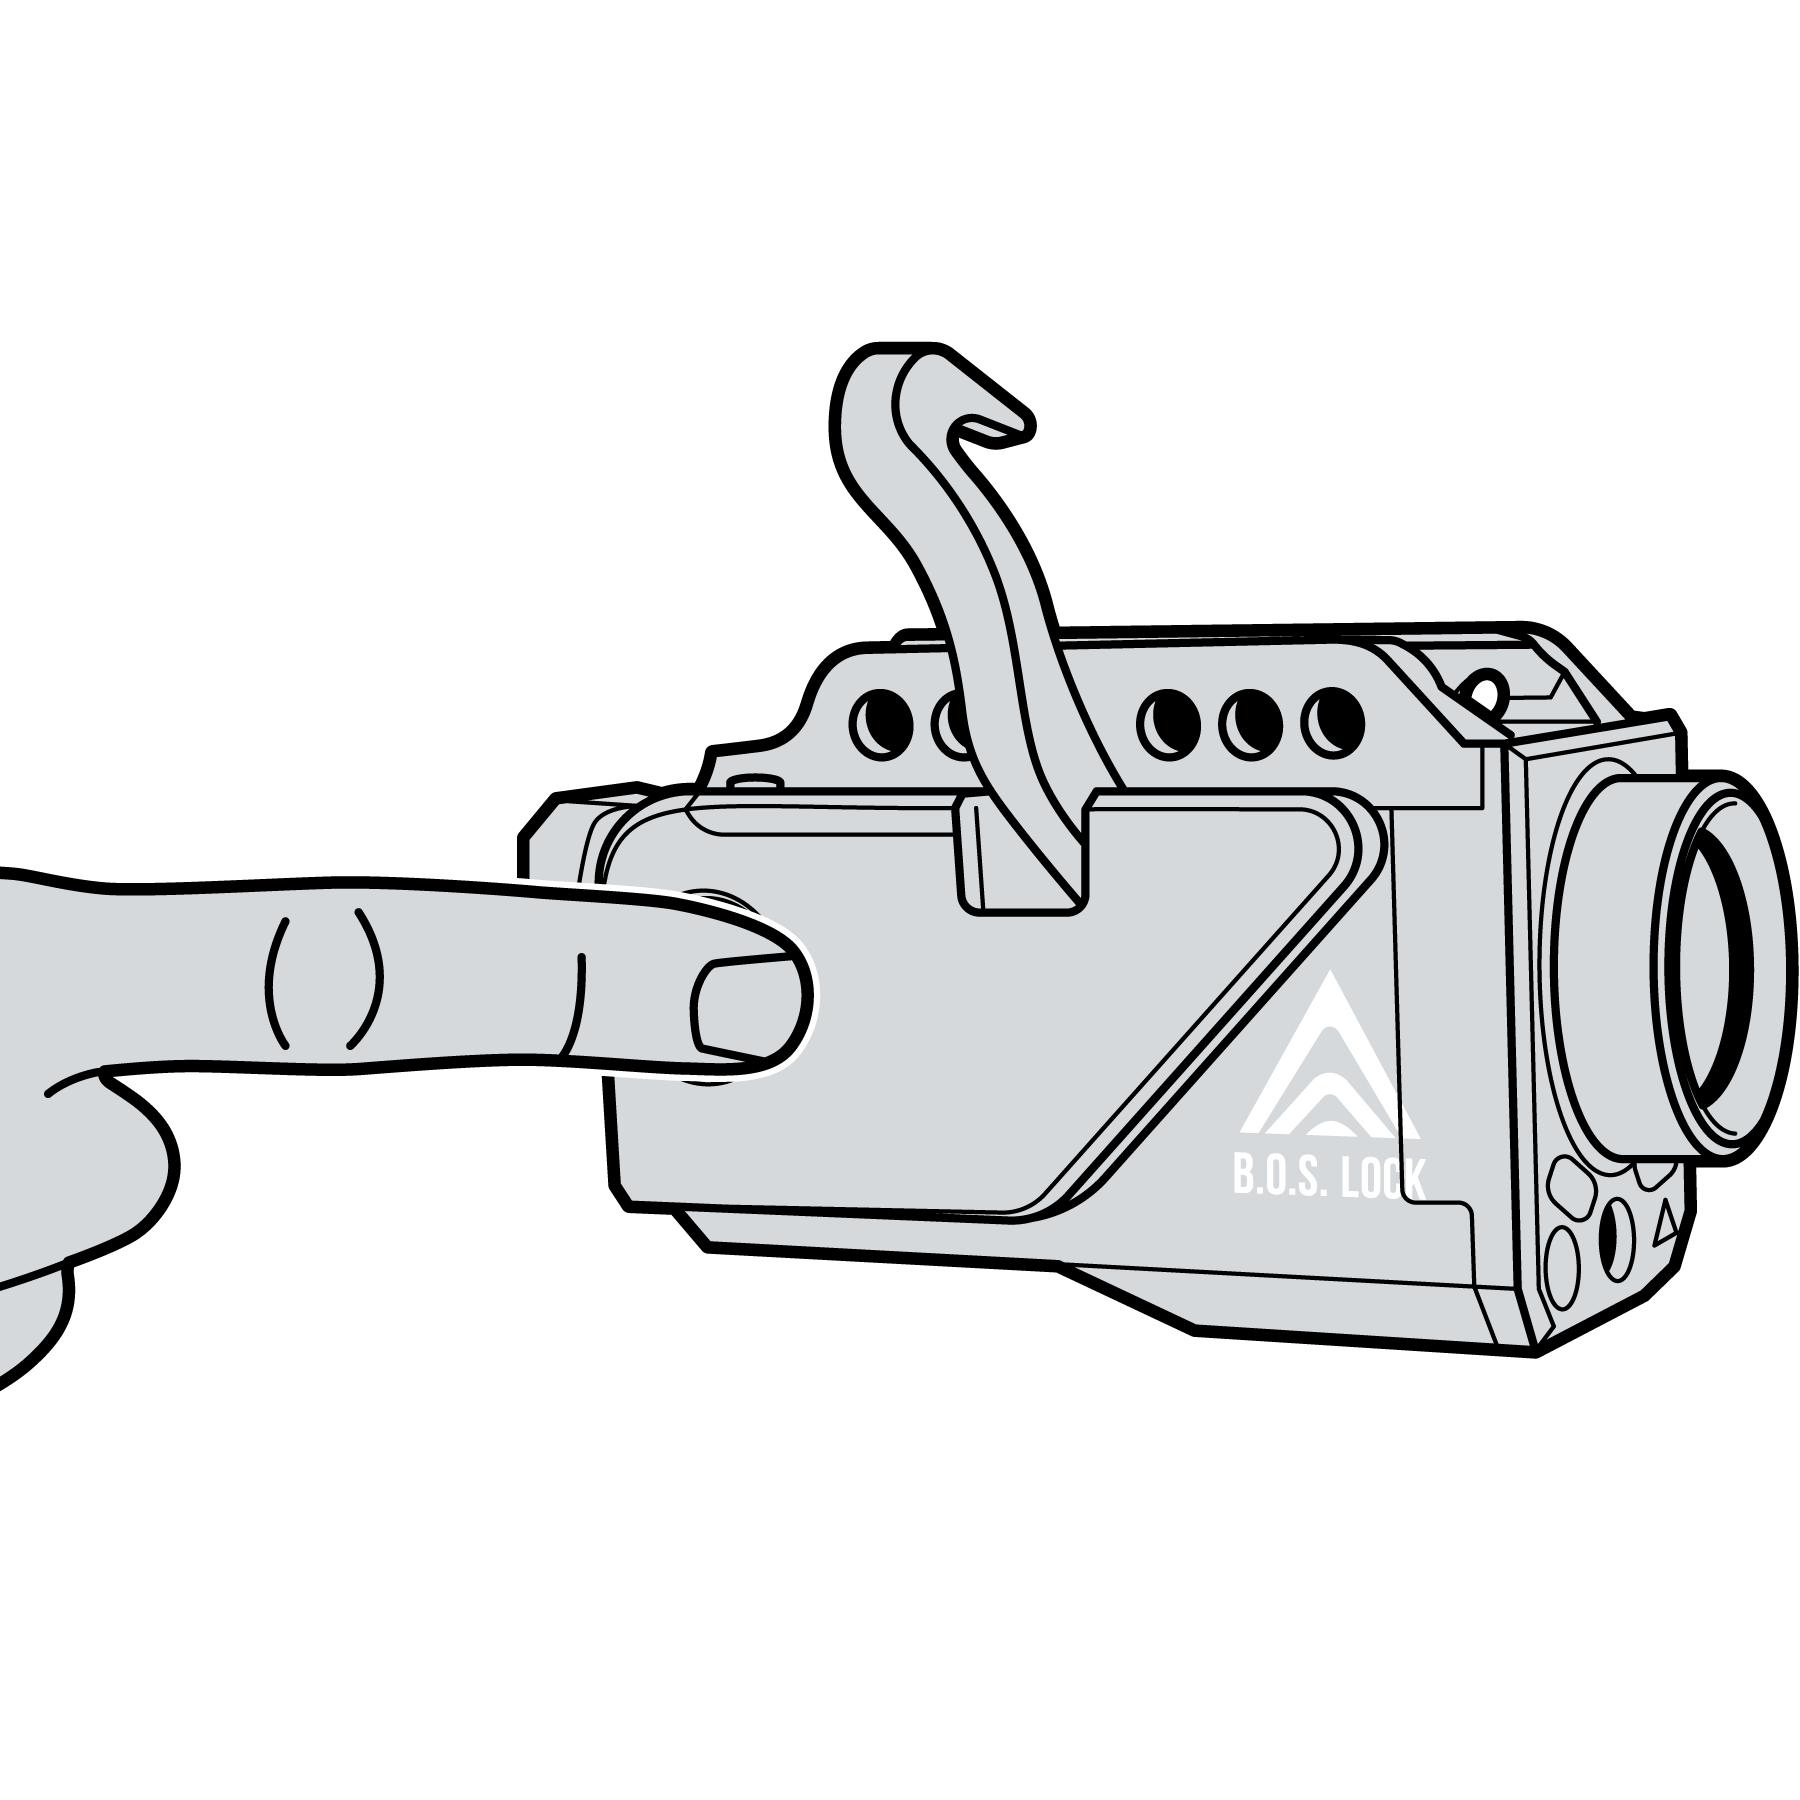
1. Authenticate and open the retention arm.

2. Slide the device fully onto the firearm rail.

3. Position the device as far rearward as possible by firmly pressing it into place while preserving safe and comfortable paddle access.

4. Align the mounting bolt hole with the appropriate rail slot of the firearm.
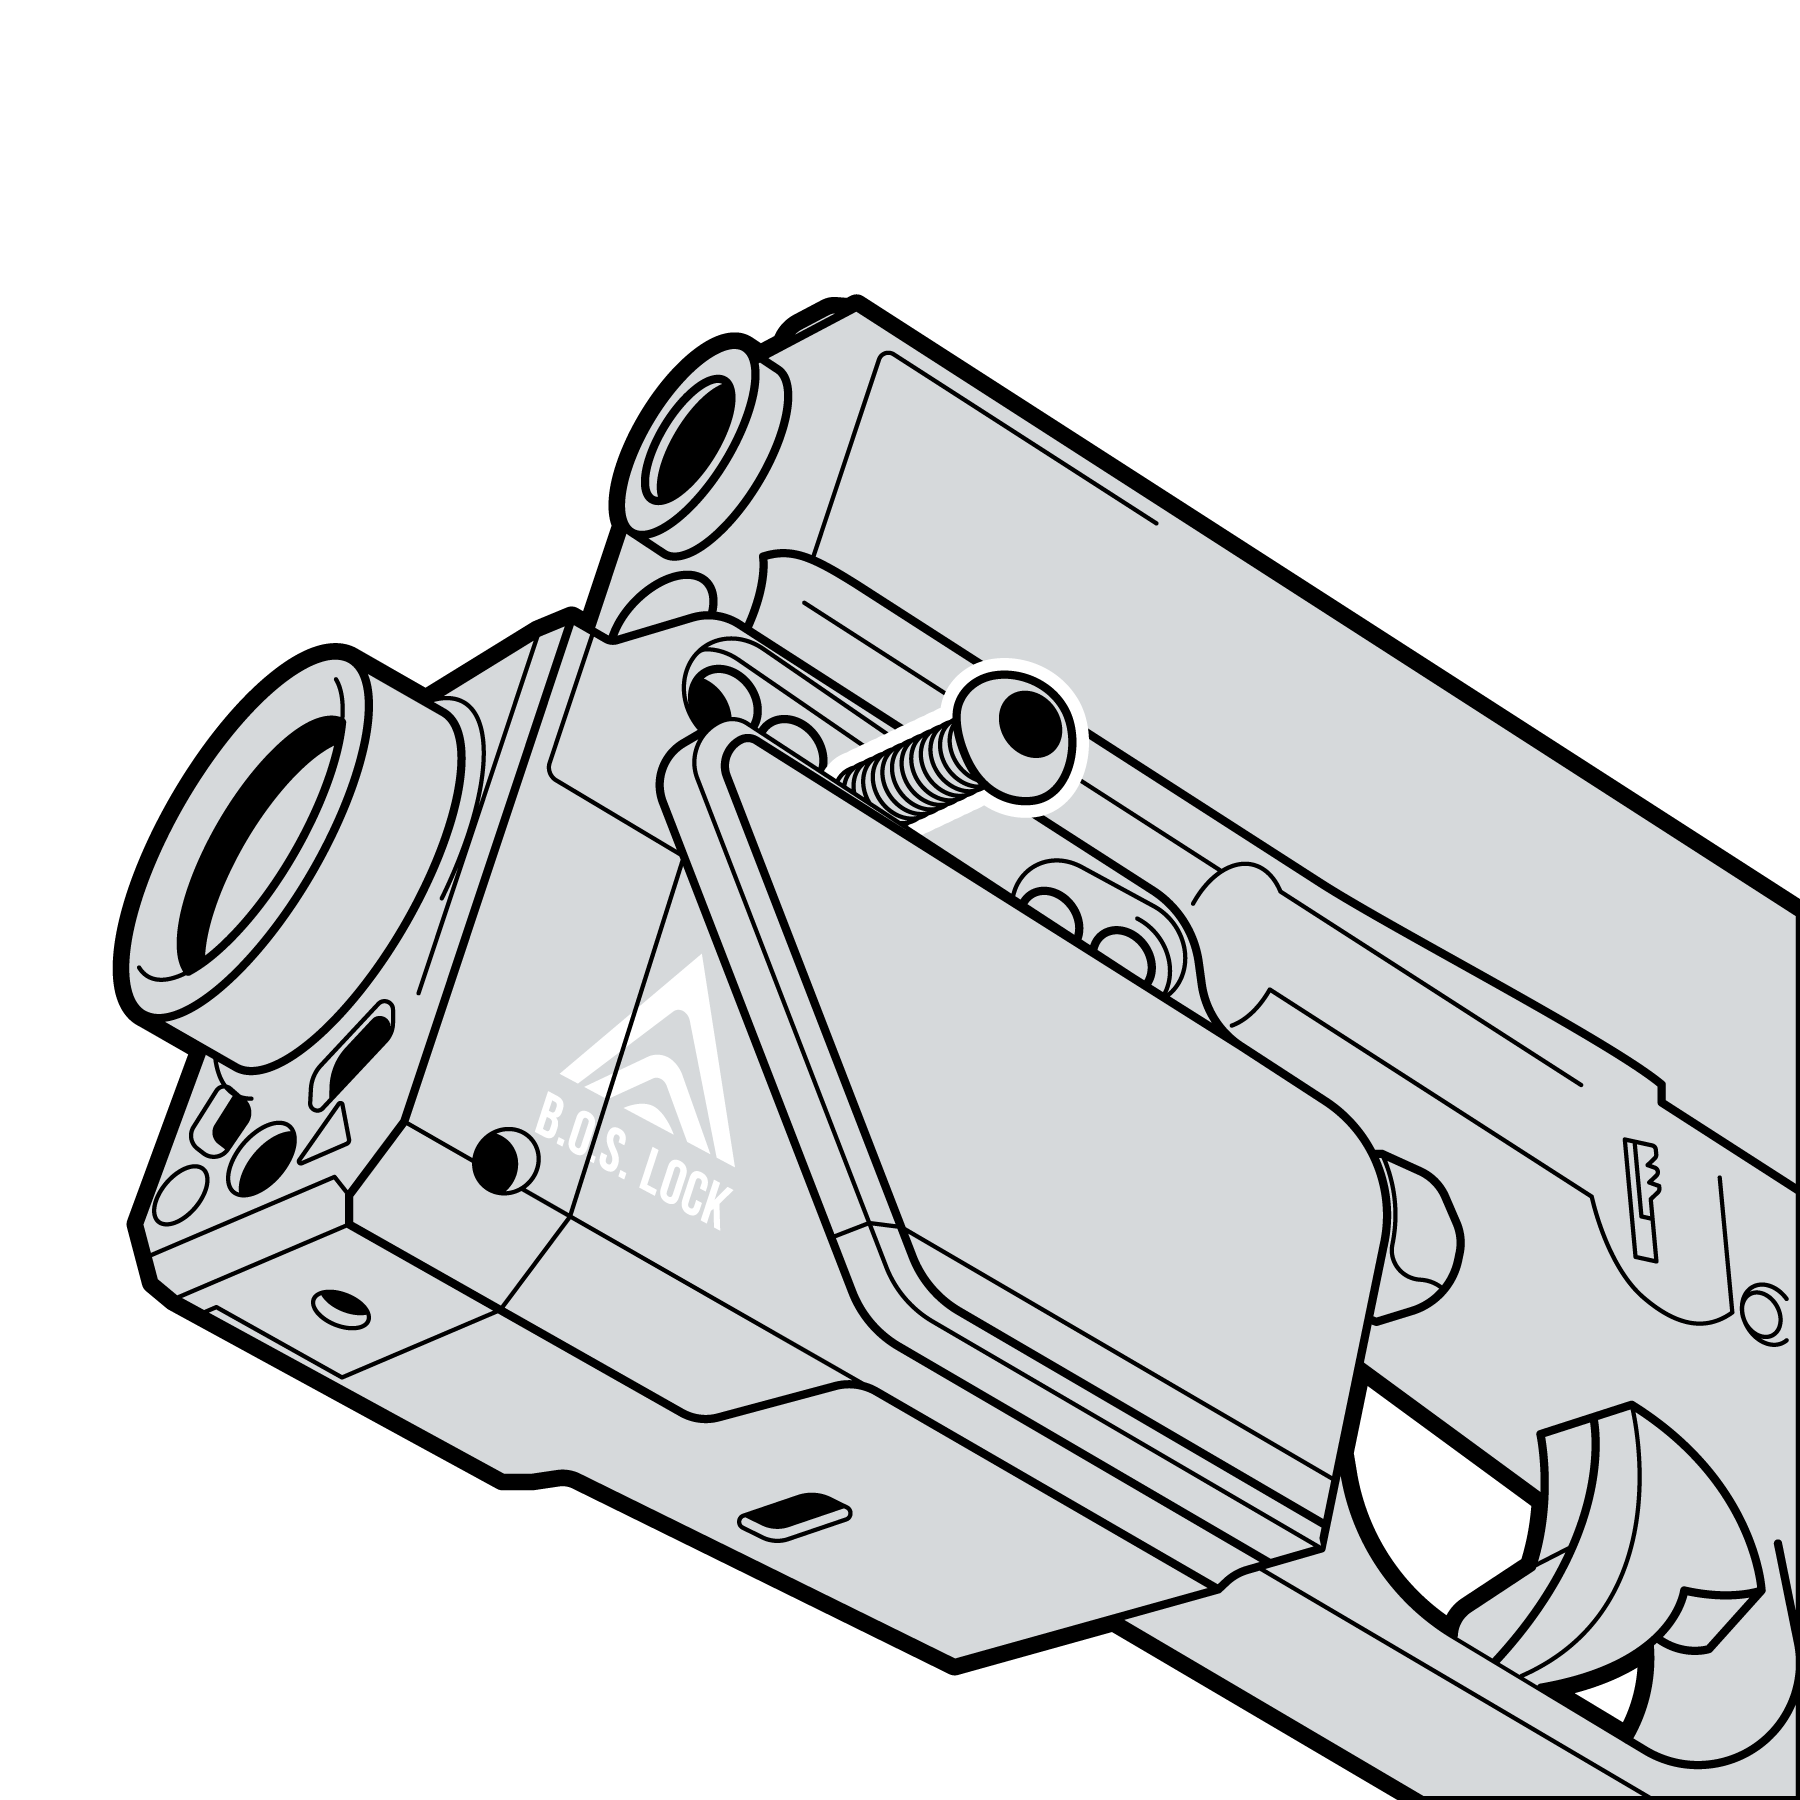
5. On the side of the Fusion opposite of the retention arm, thread the provided proprietary locking bolt through the housing and rail slot.
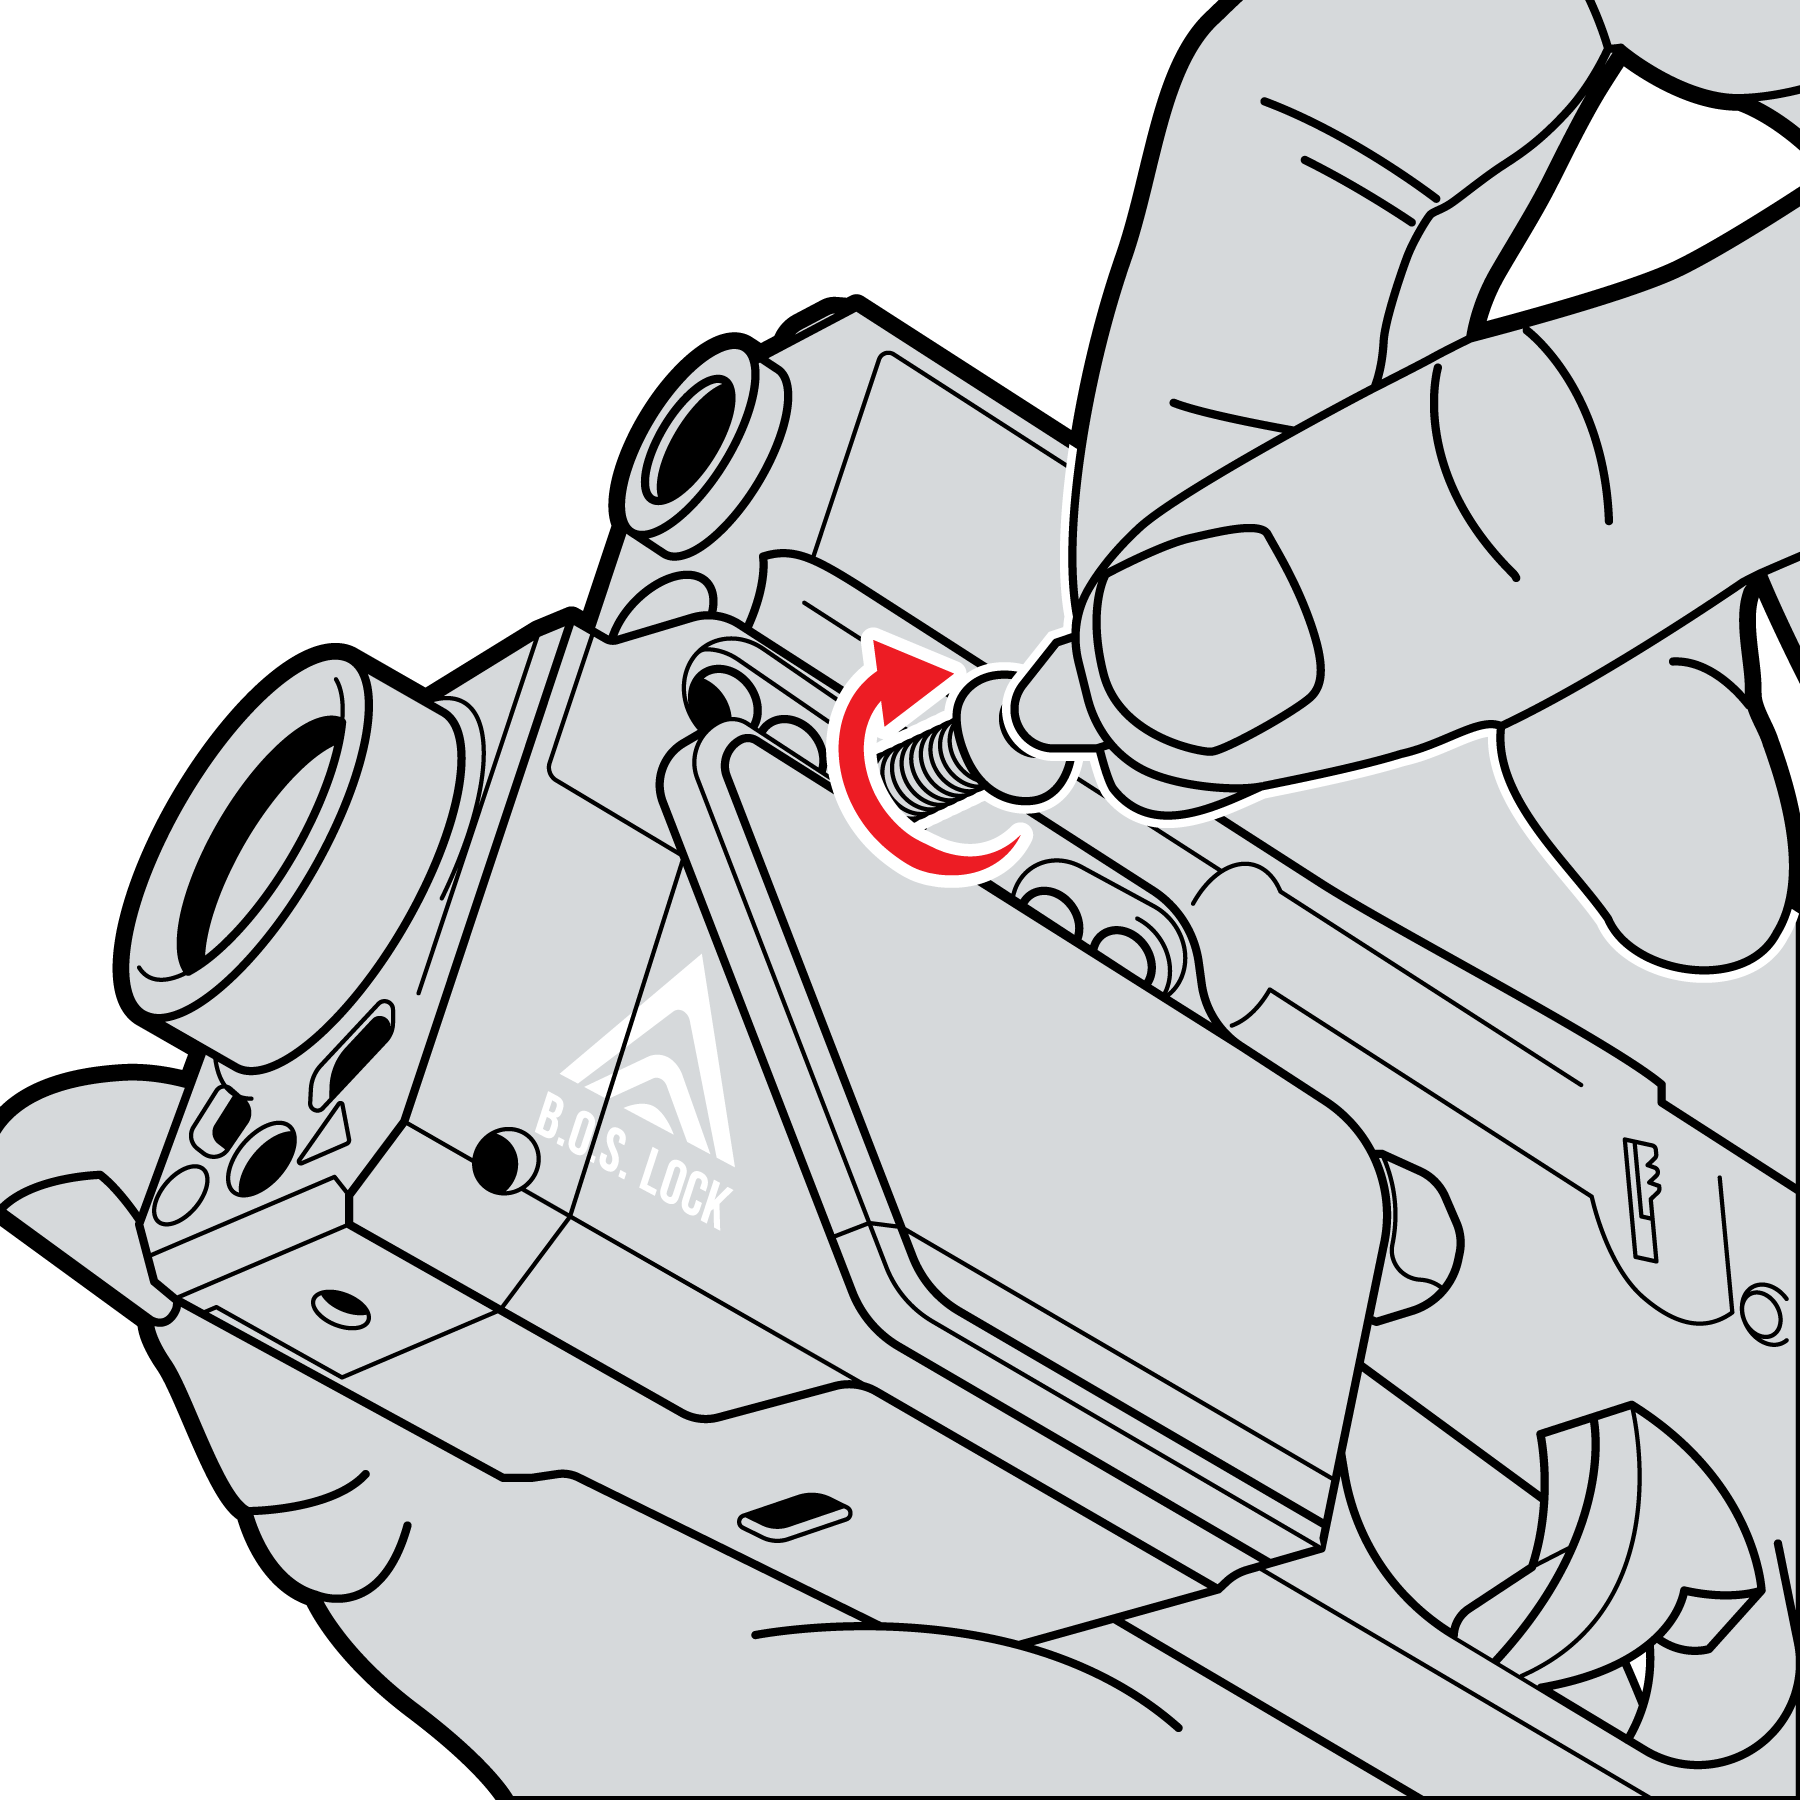
6. Hand-tighten only using the provided proprietary bolt driver.
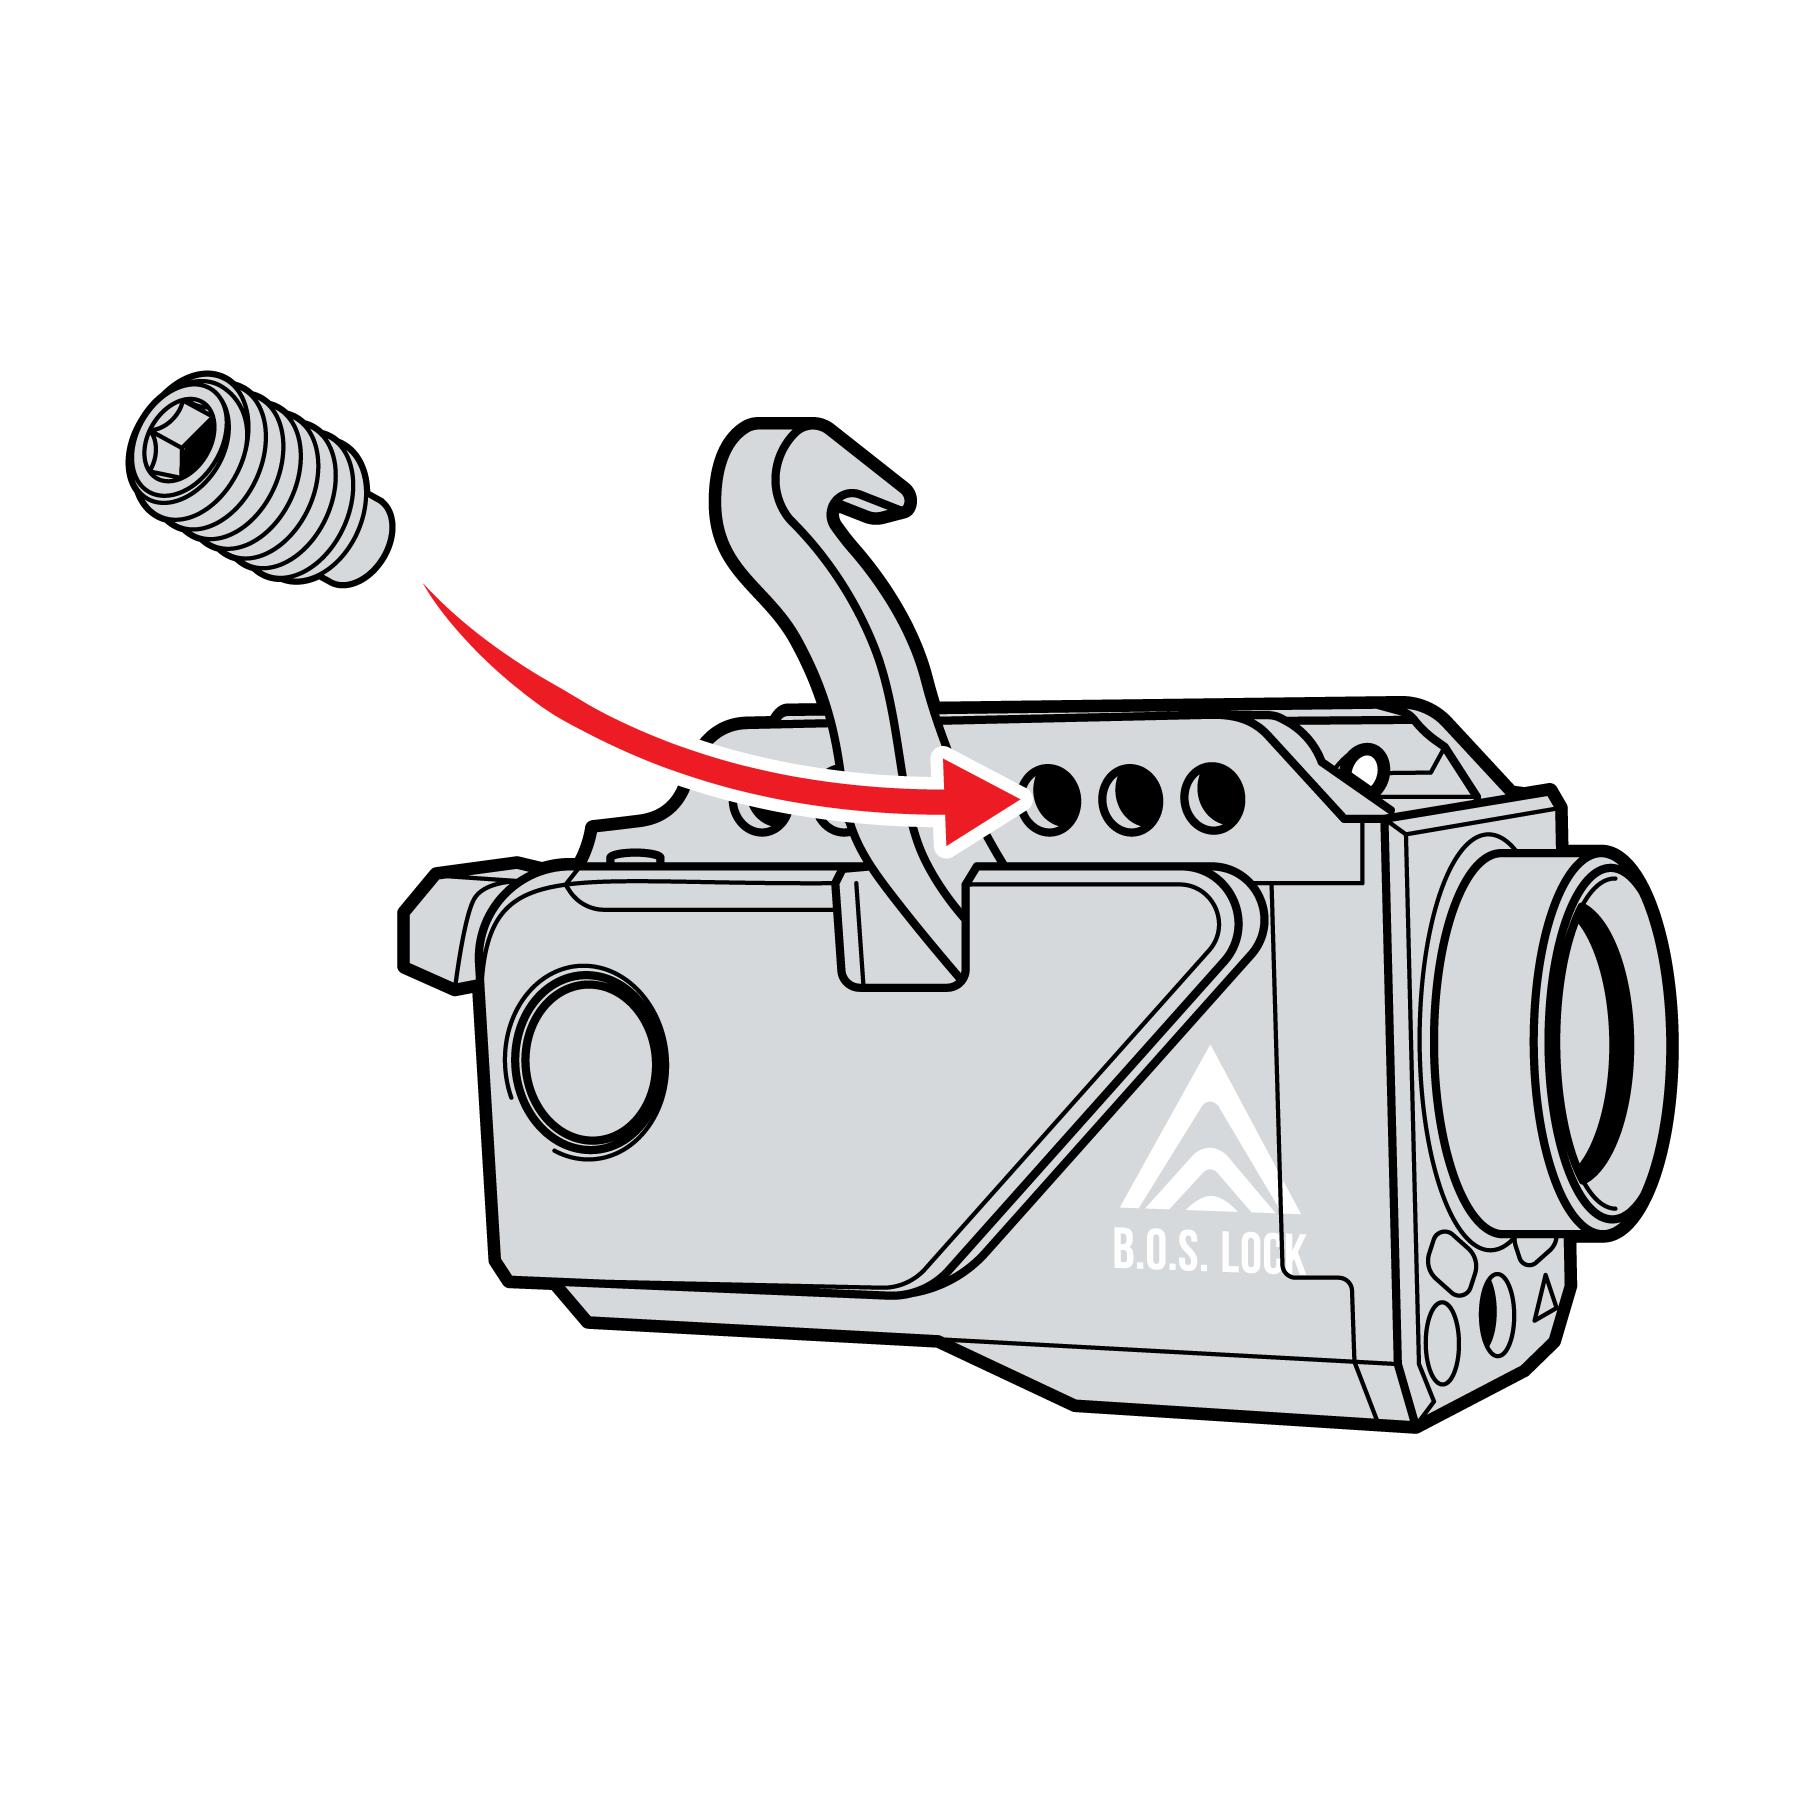
7. On the side of the Fusion opposite of the locking bolt, thread the provided M4 Retention Screw into the designated hole and hand-tighten until snug.
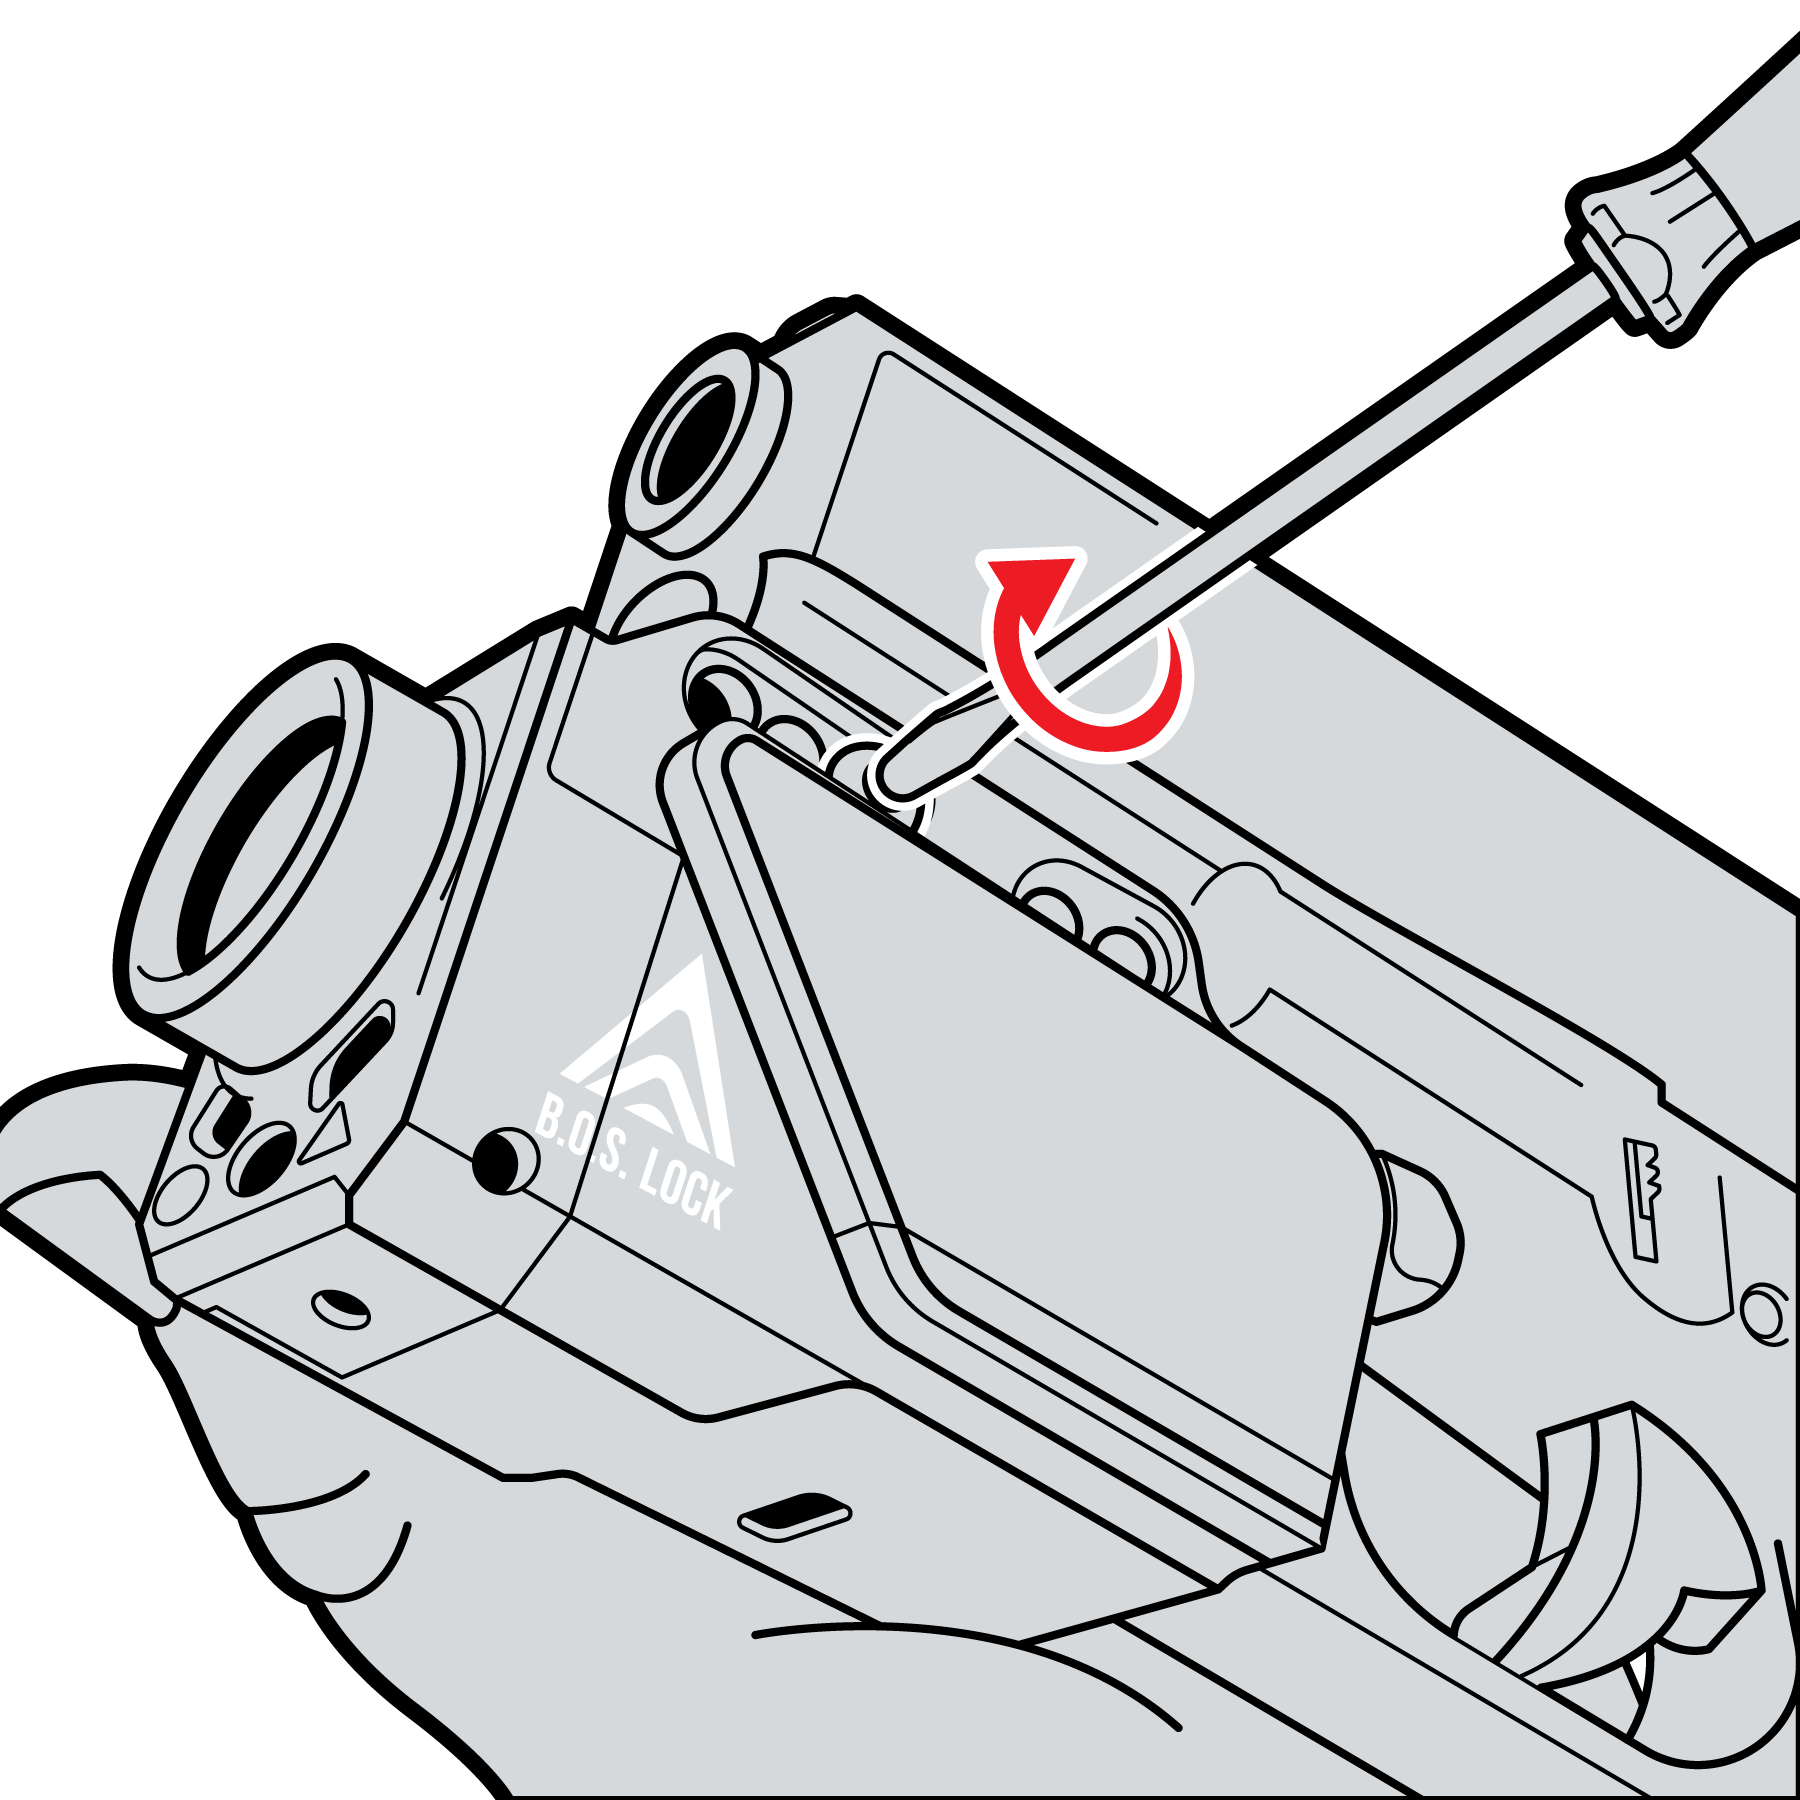
8. Tighten the set screw as needed to prevent movement.
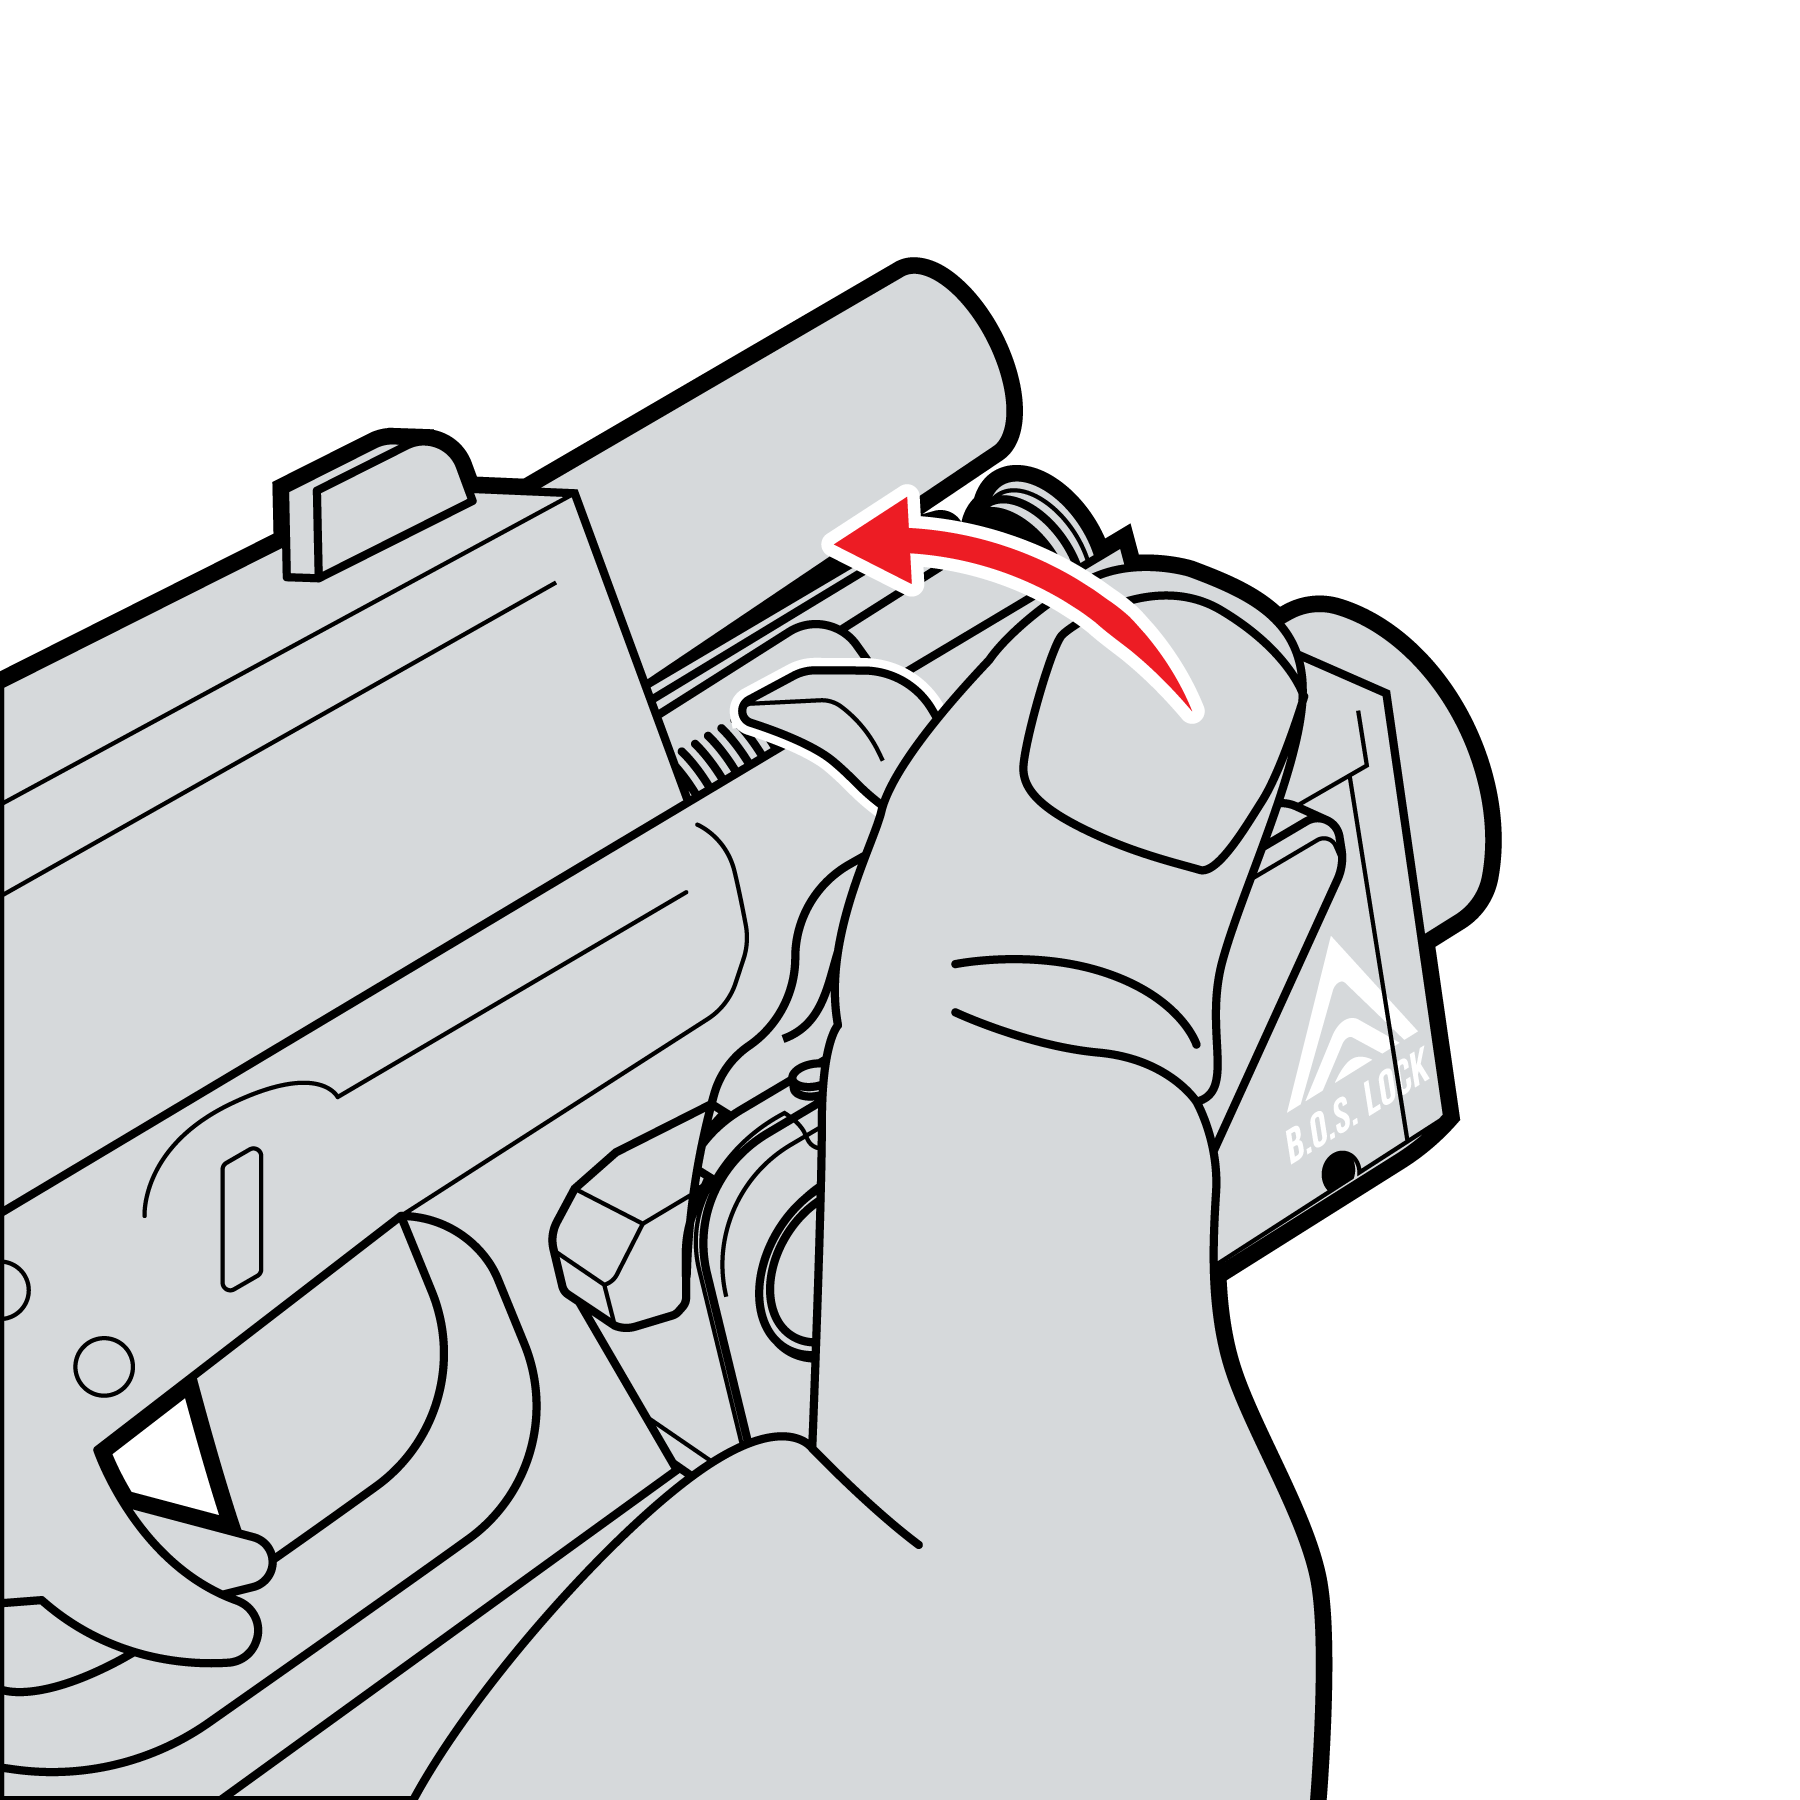
9. With the slide of the firearm locked to the rear, push the retention arm into position until it locks.
IMPORTANT: Mounting Torque Specification
To ensure a secure mount without damaging the firearm or the B.O.S. Lock hardware, please follow these specific torque guidelines.
- The Metric Limit
- Target Torque Setting: 0.5 Nm. (approximately 4.4lb-in.)
- Maximum: 0.5 Nm.
- WARNING Do not exceed this limit. Standard M4 torque settings or tightening with a full-palm grip or power tools will apply excessive force, immediately stripping the mounting threads.
- Threadlocker (Optional)
- Threadlocker is a liquid compound applied to screw threads to help resist loosening from vibration and recoil. Fusion can be properly installed without it by following the torque and manual-installation instructions below. Because 0.5 Nm is a light torque setting, medium-strength blue threadlocker is recommended for added retention.
- Recommended type, if used: Medium-strength blue threadlocker.
- Application, if used: Apply one small drop to the screw threads before installation.
- Cure time: Follow the threadlocker manufacturer’s application and cure-time instructions before live fire.
- Manual Installation (The “Two-Finger” Rule)
- If a precision torque driver calibrated to 0.5 Nm is not available:
- Thread the screw in until the head is flush.
- Grip the screwdriver handle using only your thumb and index finger.
- Turn until you feel the very first sign of resistance, then stop. Do not “crank” the screw.
For Complete Stability: Take the provided brass-tipped M4 set screw and tighten by hand into the designated hole on the opposite side (arm side) of the firearm.
NOTICE After Fusion is installed, it is ready for laser adjustment. Before use, follow the laser zeroing procedure to confirm the green laser is properly adjusted for your firearm and intended setup. Full instructions are provided in Section 10: Laser Zeroing and Calibration.
7.4 Personal Settings (Light and Laser Preferences)
Personal settings are saved to a fingerprint, not to a person. Each registered print carries its own light and laser configuration, so one user can enroll several fingers and give each a different activation. Your index finger might bring the device up with the light on high and the laser live; your middle finger might bring it up with the light on low and the laser off. Which finger you present decides how the device comes on — you choose your configuration in the act of unlocking, with no extra step and nothing to toggle.
Personal settings require at least one registered fingerprint. Every change applies only to the print that authorized it, so no one can alter your configuration without your finger on the sensor.
Every newly programmed print starts at the factory setting: light on medium with the laser on. A print is fully usable the moment it is enrolled — you do not have to customize anything. Personal settings simply change what the print activates. Until you program it otherwise, every registered finger brings the device up the same way.
NOTICE Before you begin: Remove the magazine, lock the slide to the rear, and visually and physically confirm the chamber is empty.
Programming a print
The order matters. You are not selecting settings from a menu — you are telling the device to remember the state it is currently in. Set that state first, then save it.
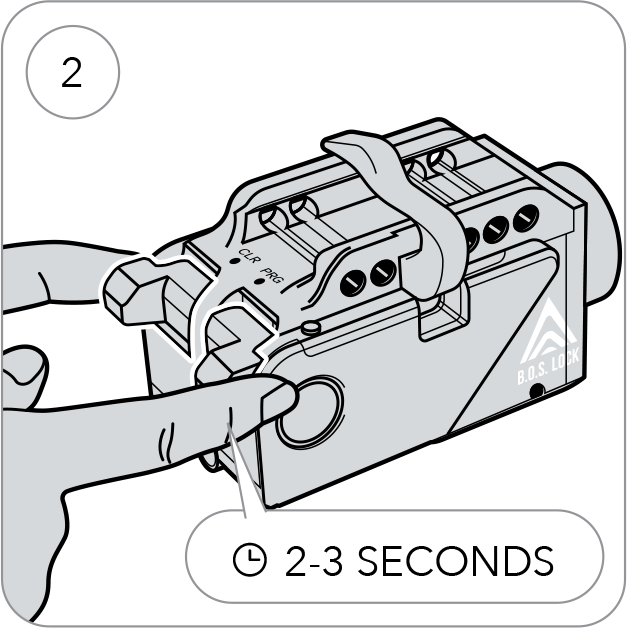
- Using the A paddle and B paddle, bring the light and laser to exactly the configuration you want. (For example, light on high with the laser on.)
- Press and hold both the A and B paddles for 2 to 3 seconds. The LED blinks white slowly to confirm you are in personal settings mode.
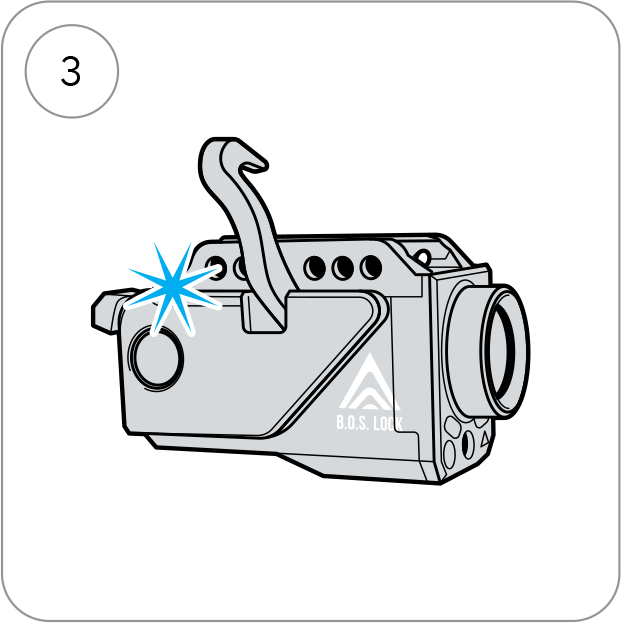
- Single-tap the A paddle. The LED begins blinking blue, meaning the device is waiting for a fingerprint.
- Place the finger you want these settings assigned to on the sensor. The LED flashes green to confirm the save, and personal settings mode exits.
Because you set the state before you save it, you can see and hear exactly what you are programming before it is committed.



Leaving settings mode
To exit without saving, press both paddles. The LED runs a yellow sequence and the device leaves settings mode with no changes made.
NOTICE Watch the color before you touch the sensor. Inside settings mode, tapping the A paddle turns the LED blue and the next print you scan is saved. Tapping the B paddle turns the LED yellow and the next print you scan is paused for 48 hours by the Walk the Talk America Cause a Pause feature (see Section 9.3). The scan is what commits either one—a paddle tap on its own changes nothing. If the LED is yellow, do not place your finger on the sensor unless you intend to pause that print. To back out safely, press both paddles to leave settings mode without saving or pausing anything.
Changing a setting later
Repeat the process at any time and assign the new configuration to the same finger. The new setting replaces the old one for that print. Programming one finger never affects any other print, yours or anyone else’s. This personalization is also a security feature so you can be sure that nobody but you can change your preferred settings.
7.5 Removal / Uninstallation Procedure
WARNING Before removing the device, follow the Mandatory Safety Check (Section 2.3). Confirm the firearm is unloaded, the magazine is removed, and the slide is locked to the rear and not sitting on the Retention Arm.
- Take the proprietary bolt driver and remove the proprietary locking bolt.
- After the locking bolt is removed, loosen the M4 Retention screw on the other side (arm side) of the device.
- Once the M4 Retention screw is loosened, slide the Fusion off of the firearm.
NOTICE Do not use power tools for removal. If hardware is stripped, damaged, or cannot be removed using normal hand force, discontinue and contact B.O.S. Lock customer support.
8. Familiarization
8.1 Localized Device Operation and Data Storage
Fusion is offline by design. It operates as a self-contained device without relying on an app, a network connection, a subscription, or an external service.
- No Wi-Fi connection is required.
- No Bluetooth connection is required.
- No cloud account or cloud storage is required for normal operation.
- Fingerprint data and user settings are stored locally on the device.
8.2 Initial Familiarization
Before relying on the device, complete repeated dry-practice runs with an unloaded firearm. Release behavior varies by firearm model and setup, and compact or subcompact firearms may produce different slide positions or outcomes. Confirm the expected operation for your firearm without live ammunition.
Recommended familiarization:
- Confirm the firearm is unloaded, the chamber is empty, and the breech is open.
- Practice acquiring a proper grip while maintaining trigger discipline.
- Practice placing the registered finger naturally on the sensor.
- Practice accessing the paddles and sensor without shifting into an unsafe grip.
- Repeat dry runs until operation is consistent and deliberate.
8.3 Ongoing Familiarity
Fusion uses adaptive biometric matching. Successful authentications can update the enrolled biometric template, allowing the system to account for minor changes in fingerprint presentation over time. Regular, accurate scans can therefore support consistent recognition while also helping the user maintain familiarity with finger placement and device response. Adaptive updating does not replace consistent placement and cannot compensate for significant injury, debris, poor sensor contact, or pooled moisture.
NOTICE Users remain responsible for obtaining competent firearm safety training and for practicing safe handling at all times.
9. Operating Instructions and Controls
9.1 Retail Demo Mode
Retail Demo Mode is designed primarily for controlled in-store demonstrations by FFLs and firearm retailers, allowing customers to experience Fusion’s biometric interaction before fingerprints are enrolled. Owners may also use Demo Mode to let friends or family try Fusion in a controlled environment, provided the firearm is unloaded, all live ammunition is removed from the demonstration area, and the device remains under the owner’s direct supervision.
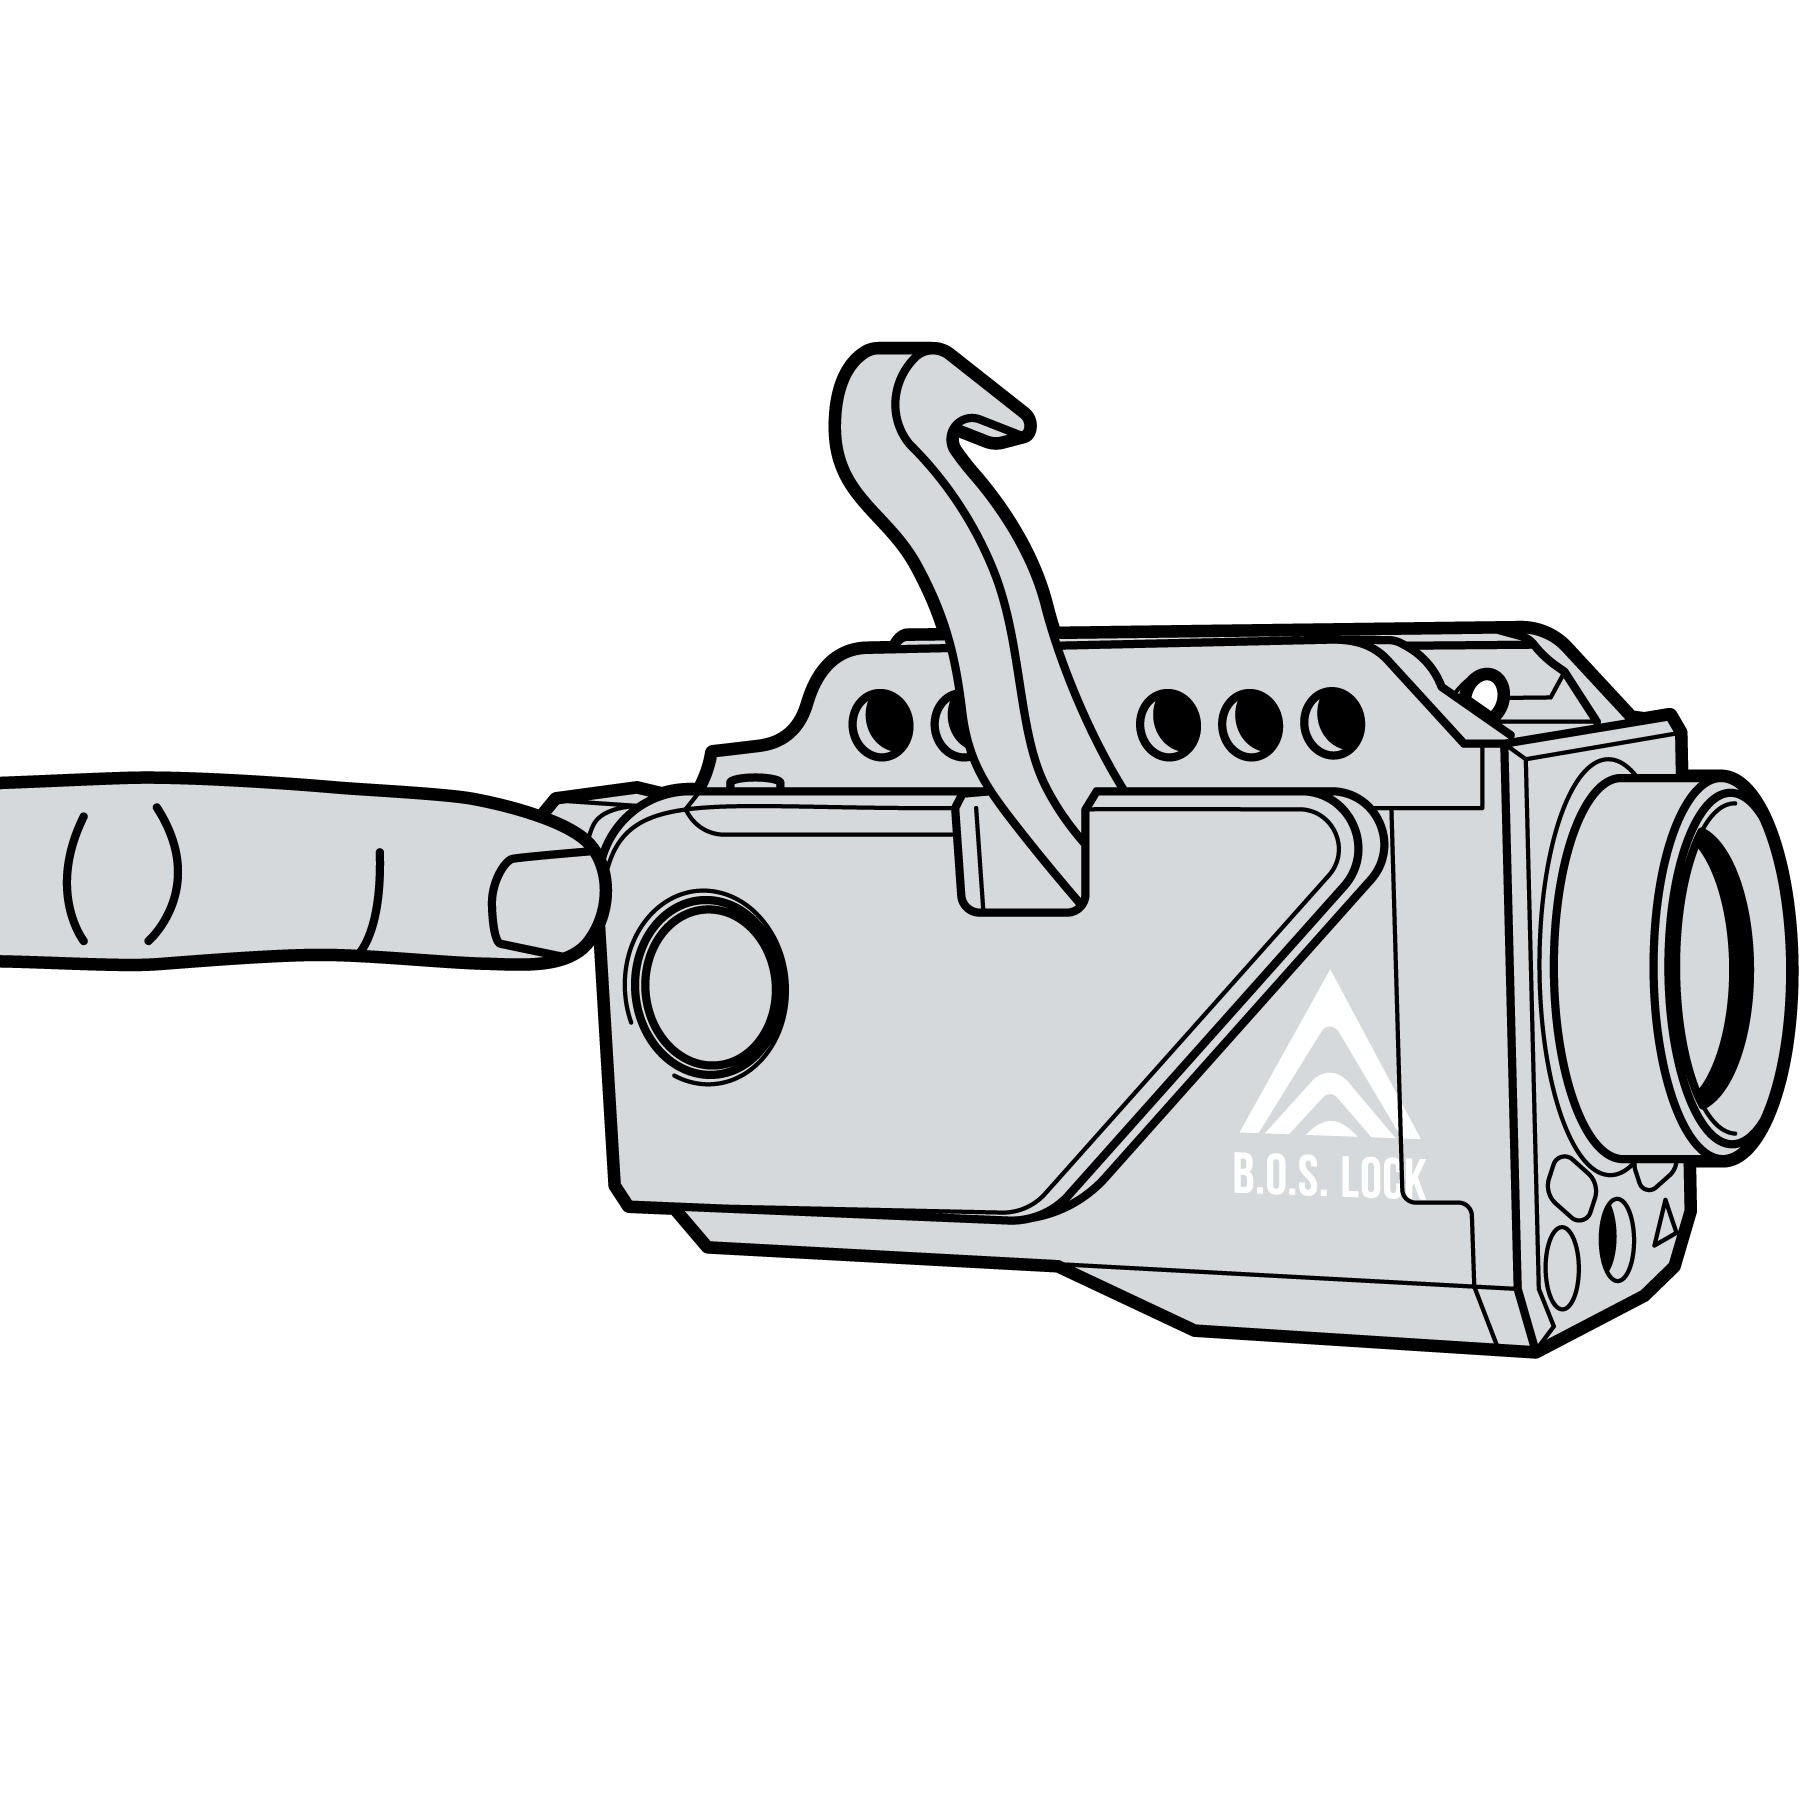
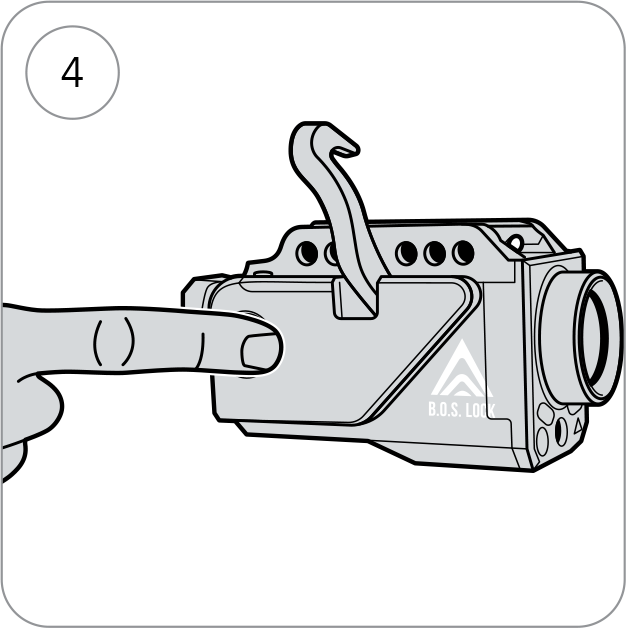
1. Press and hold the B paddle for 3 seconds to enter “unlocked” demo mode.

2. Confirm the LED light is blinking yellow for demo unlocked mode. In this state, any fingerprint interaction may unlock the B.O.S. Lock Fusion for up to 60 seconds.
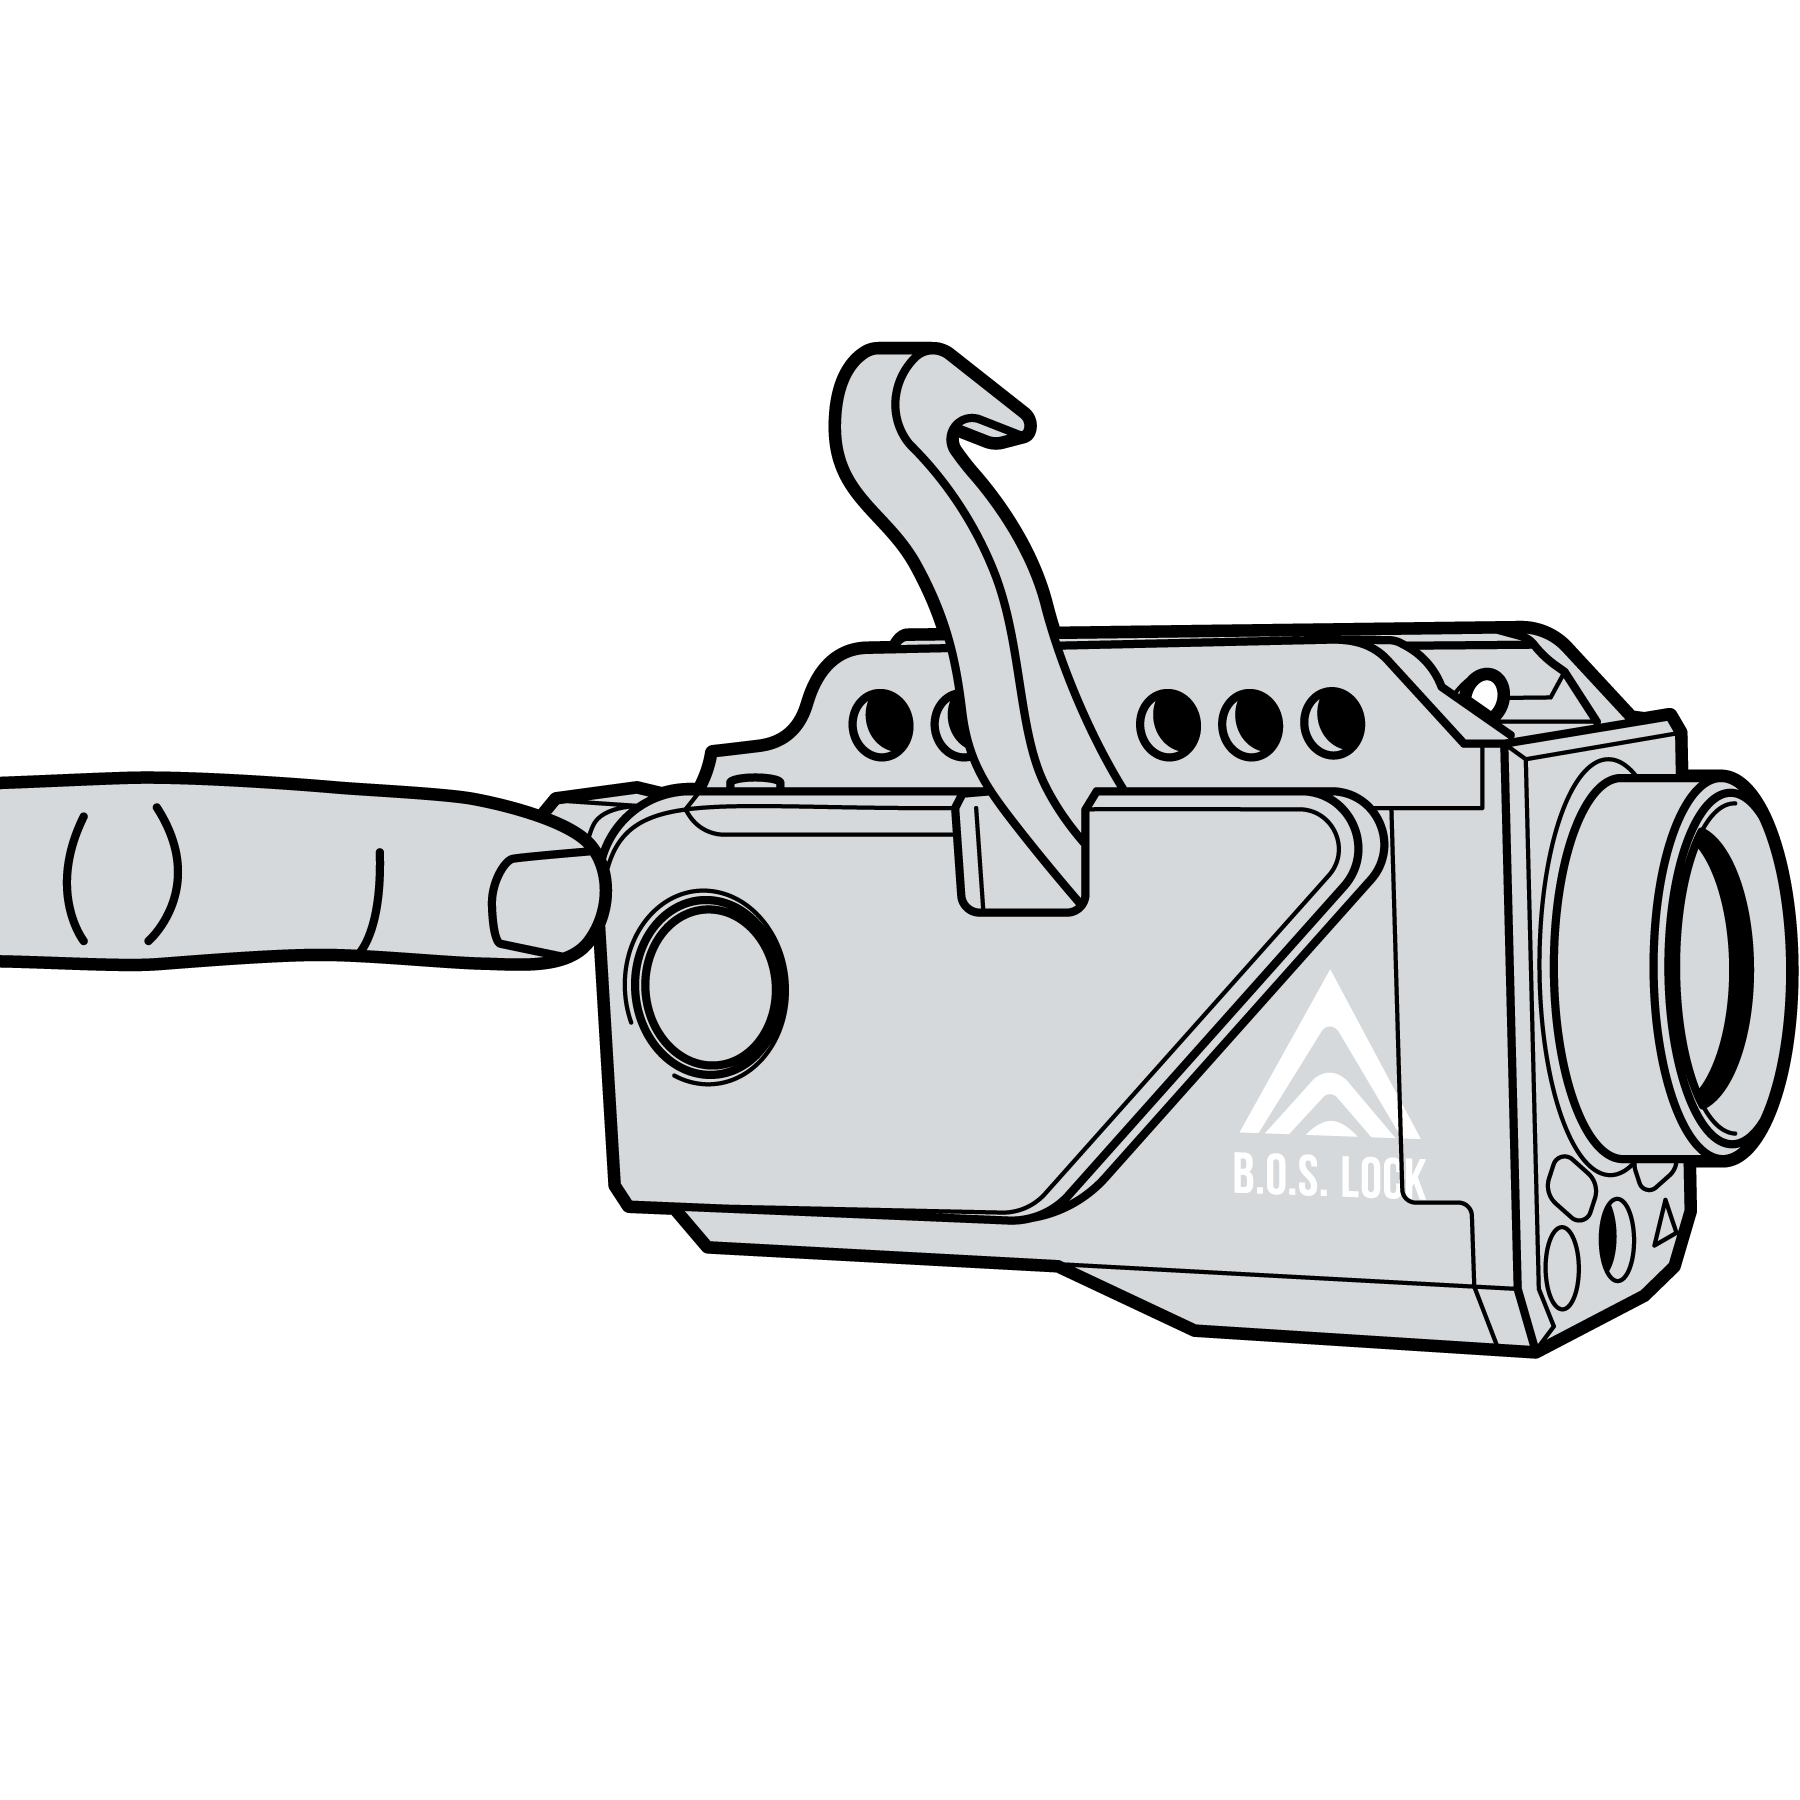
3. Press and hold the B paddle for 3 seconds again to return to “locked” demo mode.
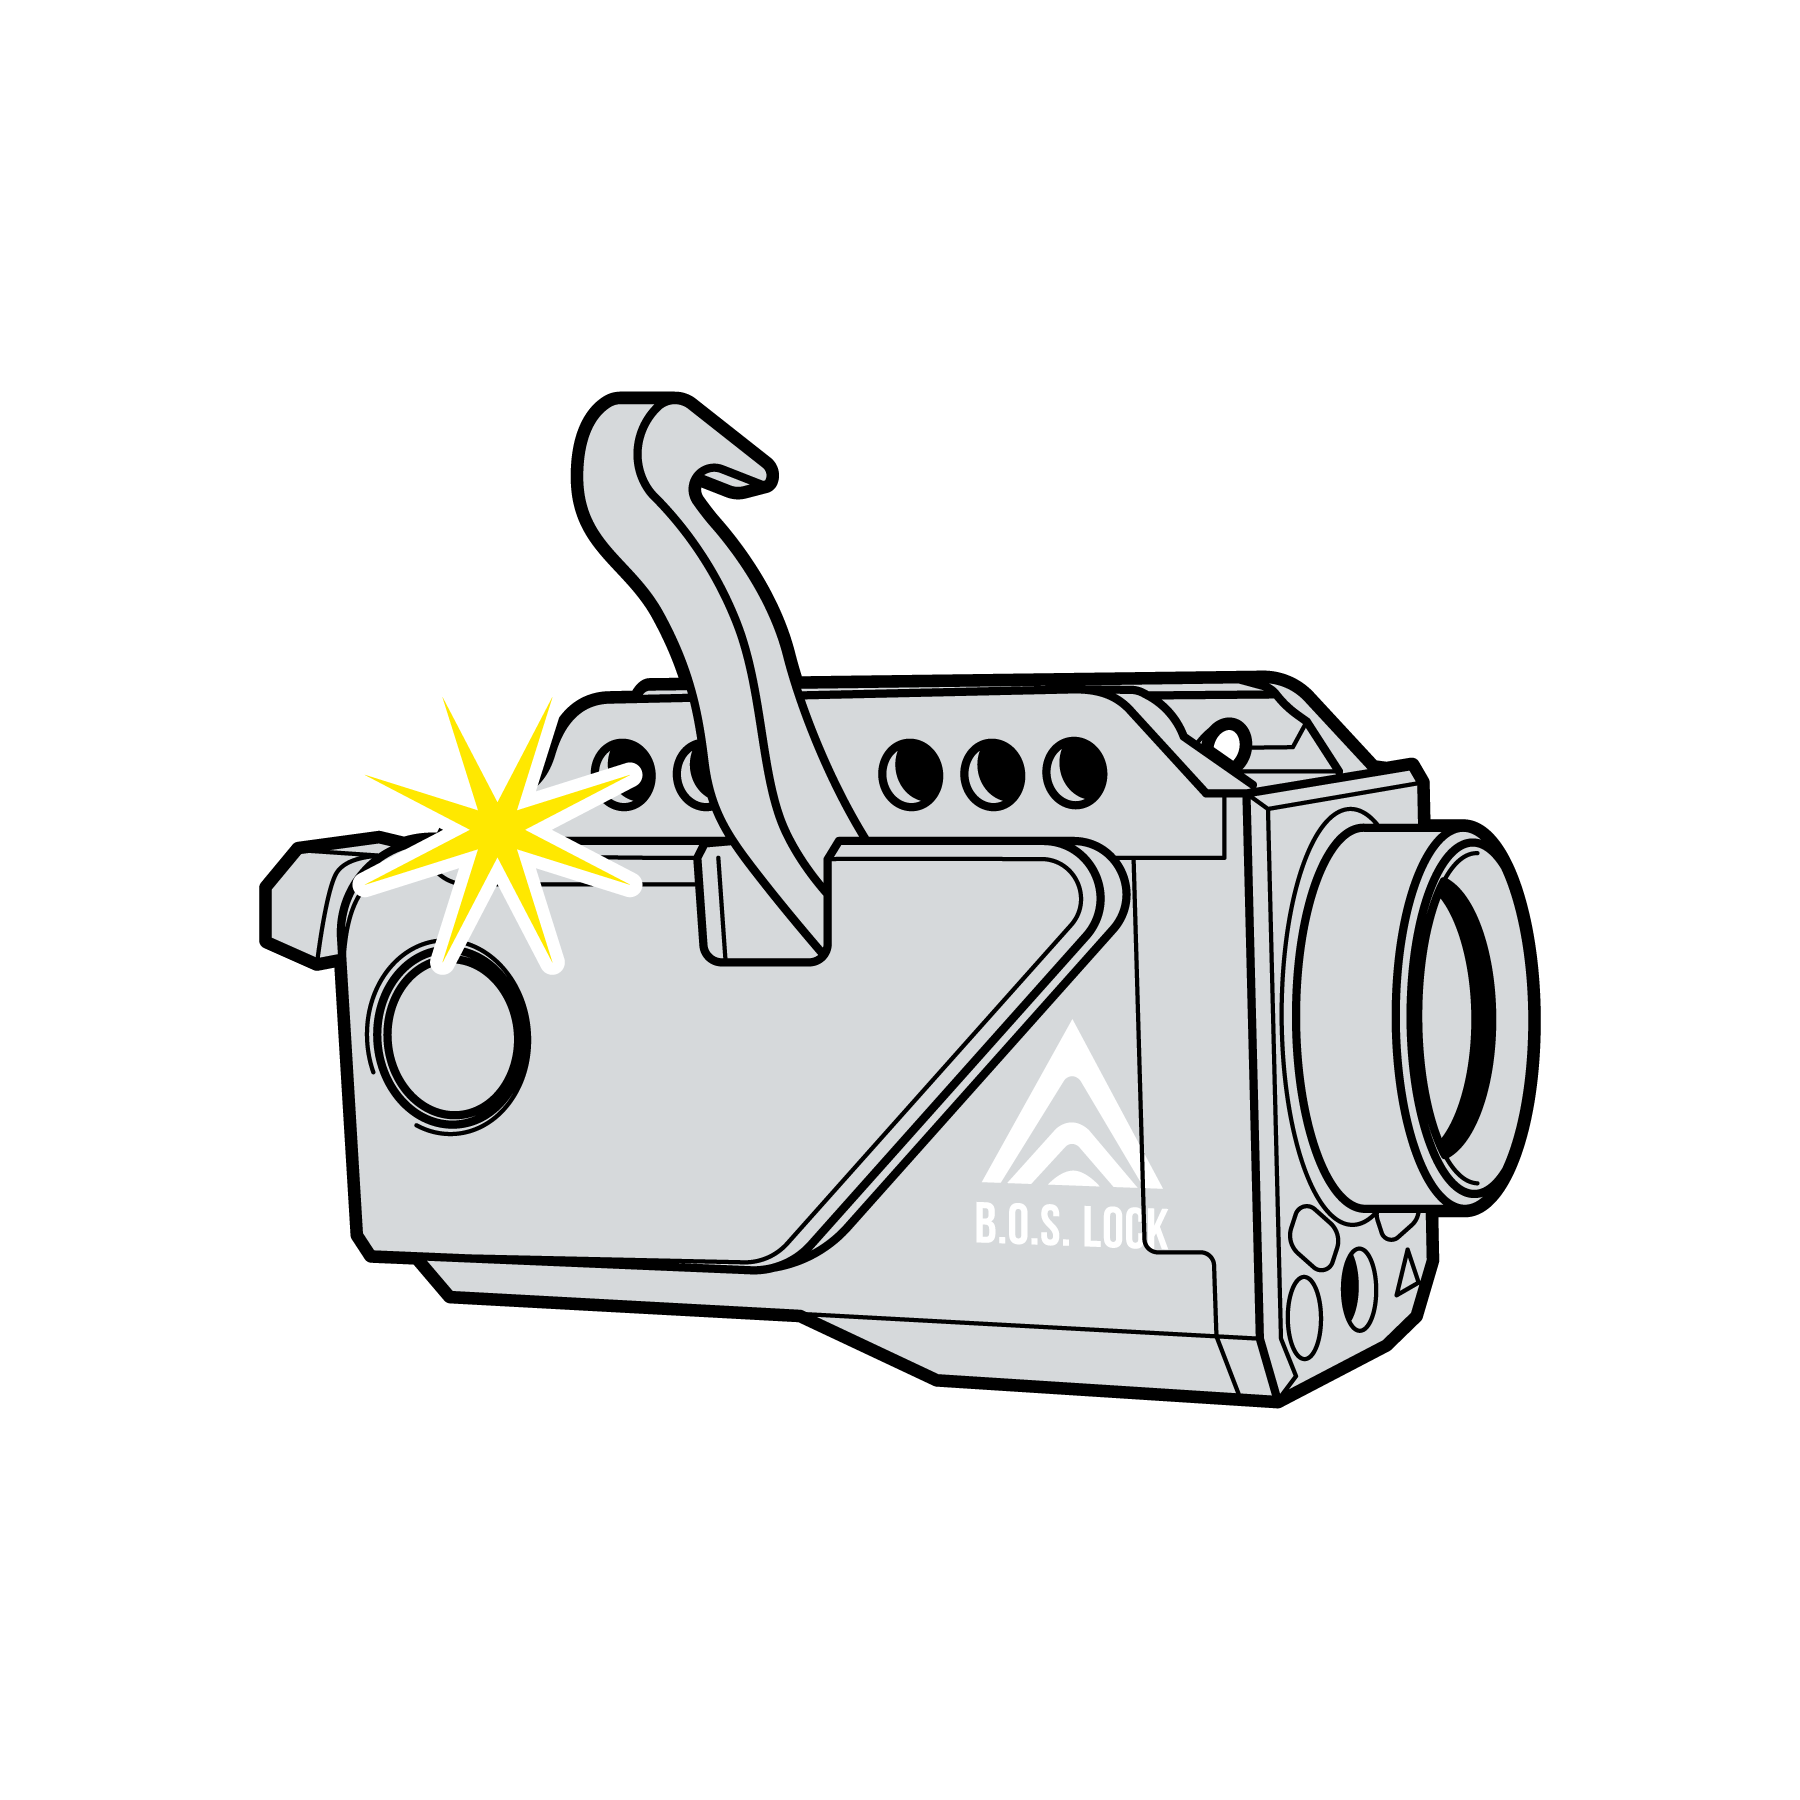
4. Confirm the LED light is blinking yellow for demo locked mode. In this state, the B.O.S. Lock Fusion will not unlock with fingerprint interaction.
WARNING Demo unlocked mode does not restrict access by fingerprint. Use it only with an unloaded firearm, with all live ammunition removed from the demonstration area, and under direct supervision. Return Fusion to Demo locked mode when the demonstration ends. Never use Demo unlocked mode for storage or access control.
NOTICE Demo modes are only available when zero fingerprints are registered. Once fingerprints are registered, demo modes are not available unless the device is reset.
9.2 Quick Operation Reference
- Biometric Sensor: Authorized touch unlocks the retention arm.
- A Paddle: Single tap changes the light mode. Double-tap toggles the light on or off. Press and hold to activate the strobe feature.
- B Paddle: Controls laser settings. Double-tap to toggle laser on/off.
- P Port: Fingerprint registration mode.
- C Port: Factory reset and memory clearing. See Section 9.4.
Battery Check
Know your remaining charge at a glance. Tap the B paddle once and Fusion’s LED will flash three times. Use the first two digits of the serial number to follow the correct indicator sequence:
- Serial numbers beginning with 00 or 01
- Green – 3 flashes: 75%–100% remaining battery charge
- Yellow – 3 flashes: 25%–74% remaining battery charge
- Red – 3 flashes: 6%–24% remaining battery charge
- Serial numbers beginning with 02 or later
- Green – 3 flashes: 35%–100% remaining battery charge
- Yellow – 3 flashes: 20%–34% remaining battery charge
- Red – 3 flashes: 6%–19% remaining battery charge
- Critical battery – solid red
- At 5% remaining battery charge, the flashlight and laser are disabled, and the retention arm will not relock until Fusion is charged.
Power Reset
Insert the programming tool into the P port and hold down for a few seconds. The LED will flash 3 times, and the device will reset without deleting any stored fingerprints.
9.3 Walk the Talk America® Cause a Pause Feature
The Cause a Pause feature was developed in partnership with Walk the Talk America to provide firearm owners with a voluntary way to temporarily pause their own access to a firearm when needed.
When activated, Cause a Pause temporarily pauses biometric authentication for the selected enrolled fingerprint for 48 hours. During this period, that fingerprint will not be an authorized user. Other enrolled fingerprints remain active unless they are paused separately.
This feature is intended for situations where an authorized user wishes to create additional time and space before accessing a firearm for any personal reason. The feature is completely voluntary and can be used whenever the user determines it may be beneficial.
An owner may activate Cause a Pause for one or more enrolled fingerprints individually. An owner who wants to pause authentication for all of their enrolled fingerprints must activate the feature separately for each fingerprint.
Once activated, the 48-hour pause period cannot be electronically overridden or canceled. Access to the affected fingerprint will be automatically restored when the 48-hour period expires.
WARNING: Voluntary Lockout Is Not Emergency Protection.
Cause A Pause Activation Procedure
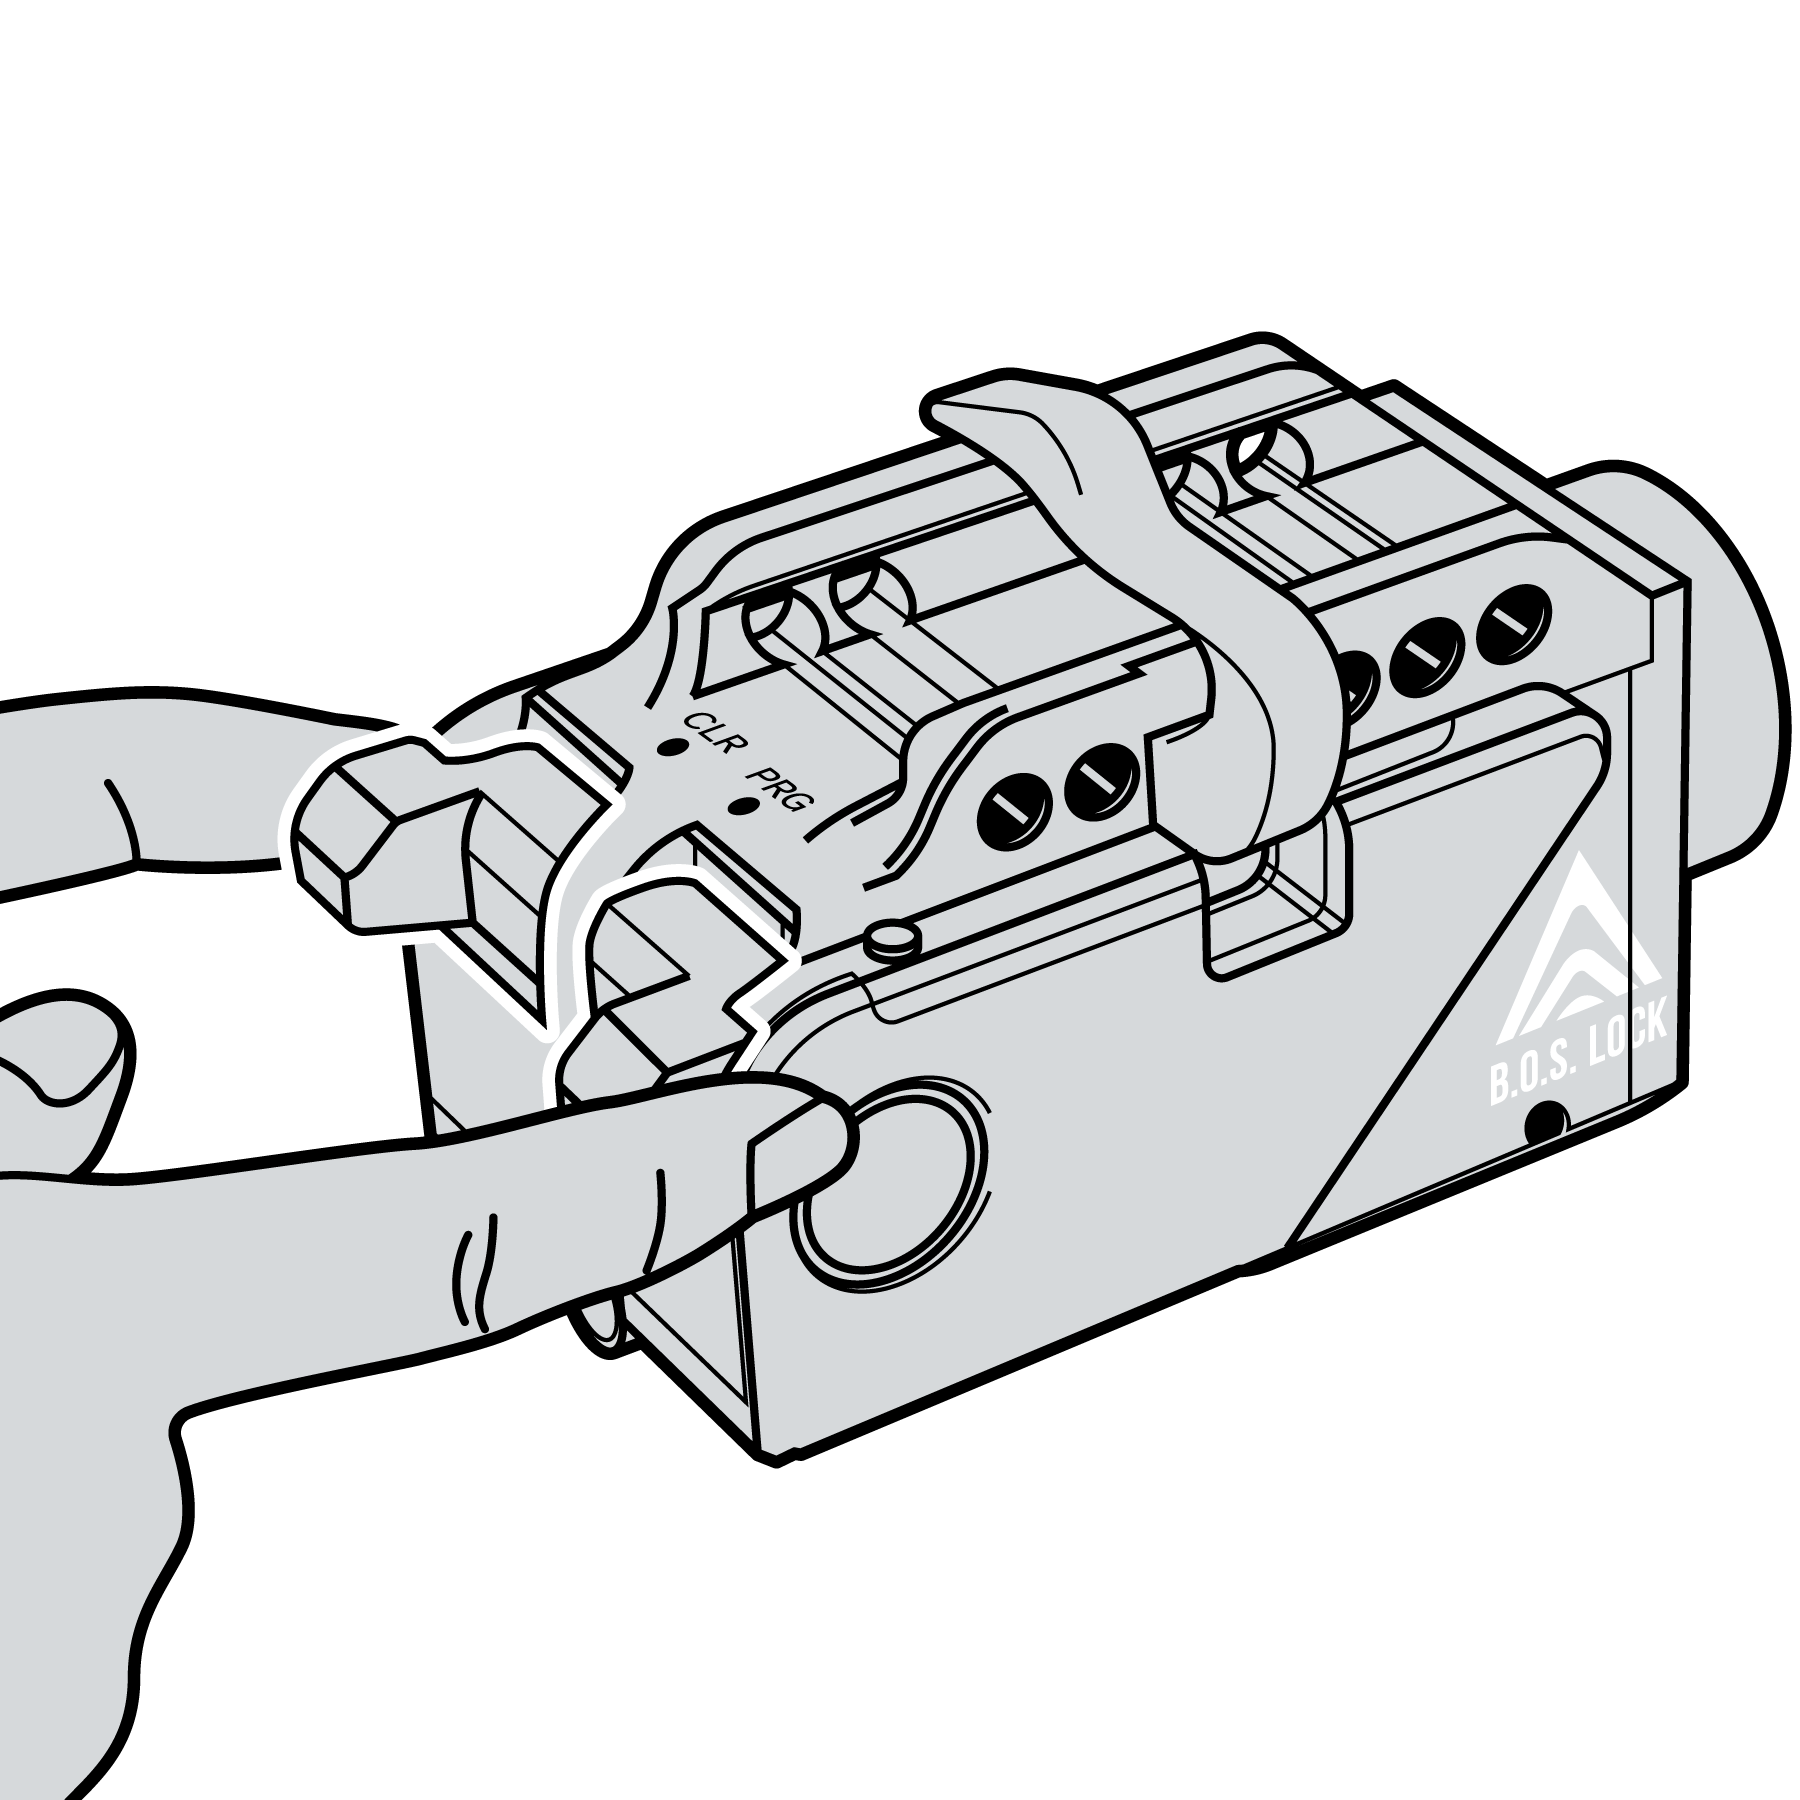
1. Enter personal settings mode by pressing and holding both the A paddle and the B paddle for about 2-3 seconds until the LED blinks white.
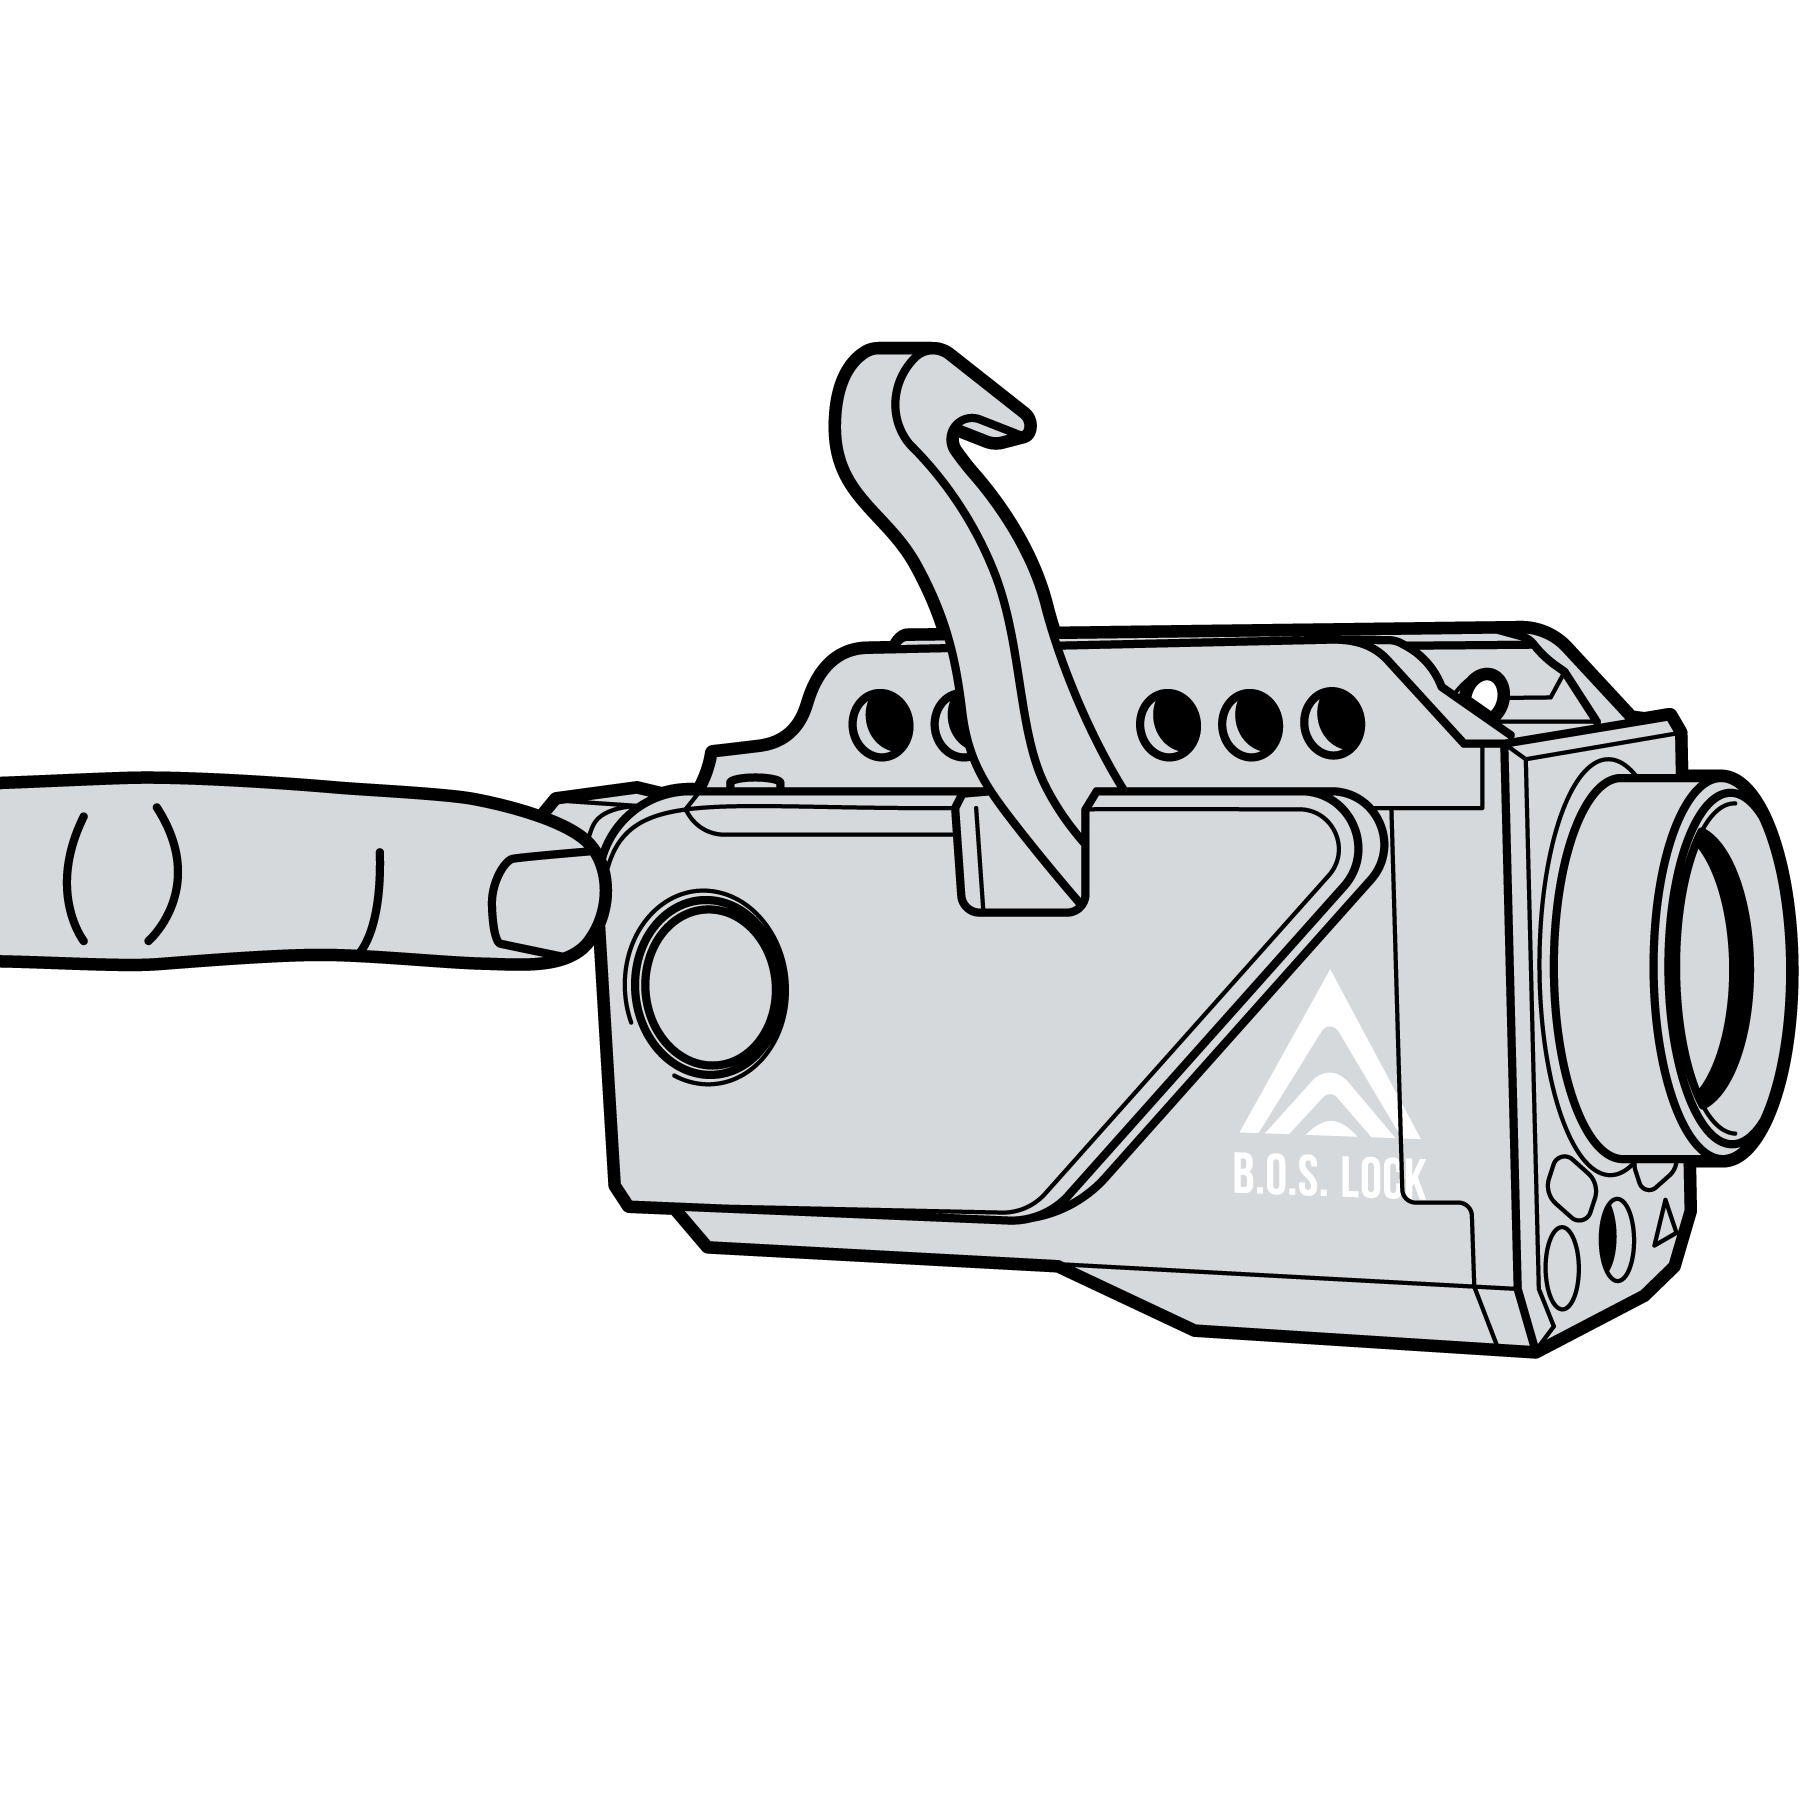
2. While in Settings mode, press the B paddle.

3. Confirm the LED light is flashing yellow rapidly.

4. Tap the fingerprint you wish to pause on the biometric scanner.

5. The LED will flash green, confirming the fingerprint is paused.
- Authentication for the selected fingerprint is now paused for 48 hours. If that fingerprint is scanned during the pause, the LED will flash yellow three times and the device will remain locked.
IMPORTANT NOTICE
The Voluntary Cause a Pause feature (“the feature”) is intended only as a voluntary, user-initiated delay feature for an already authorized user.
It is NOT: a medical device, a crisis intervention service, a substitute for professional mental health treatment, or a guarantee against self-harm, violence, unauthorized access, or injury.
Limitation of Liability
To the maximum extent permitted by applicable law, B.O.S. Lock and its affiliates disclaim responsibility for injury, death, self-harm, misuse, delayed access, or other loss occurring during or after activation of the Cause a Pause feature.
By activating the feature, the user acknowledges that they are voluntarily restricting their own access and that the feature may delay access in urgent circumstances.
Emergency Override Notice
In the event of accidental lockout, restoring access may require manual removal of the device using the proprietary tool, followed by reset and reprogramming procedures.
This process is intentionally not immediate.
If there is an immediate risk of self-harm or harm to others, contact emergency services or the 988 Suicide and Crisis Lifeline.
9.4 Factory Reset and Memory Clearing (C Port)
Factory reset clears stored fingerprint profiles and user settings. Use this procedure before transfer, troubleshooting, or if a reset is required for service.
WARNING Perform this procedure only after removing the device from the firearm.
Factory Reset Procedure
- Clearing all prints is recommended prior to resetting the device.
- On the bottom of the device, insert the Programming tool into the P port.
- Press and hold for 5 seconds until the LED light flashes, indicating that the device has been successfully reset.
NOTICE Factory reset permanently deletes all stored fingerprint profiles and user settings. B.O.S. Lock cannot recover deleted fingerprint data. If you need to do a power reset without deleting fingerprints, see Section 9.2.
10. Laser Zeroing and Calibration
10.1 General Guidance
The laser is factory-centered for initial setup. Establish the final zero for your specific firearm, ammunition, and preferred point of aim.
Before you begin: Remove the magazine, lock the slide to the rear, and visually and physically confirm that the chamber is empty. Keep the firearm pointed in a safe direction. Never look into the laser aperture or direct the beam toward any person. Perform live-fire confirmation only at an appropriate range.
10.2 Verify the mount before you zero
Fusion is secured to the rail at two points. The proprietary security bolt provides the primary attachment . The brass-tipped M4 set screw provides a second point of contact against a flat section of the rail, helping reduce movement under recoil. The brass tip is designed to conform under pressure without cutting or marring the rail. Do not substitute a steel set screw.
Because Fusion may be removed for fingerprint enrollment, verify the mount every time you reinstall it:
- Seat Fusion squarely on the rail. Using the supplied driver, tighten the proprietary security bolt until it is firmly seated. Do not over-torque it.
- Tighten the brass-tipped M4 set screw against the specified rail contact surface until the device is secure with no noticeable movement.
- Grip the device and check for movement fore and aft, side to side, and in rotation. If you detect any play, loosen both fasteners, reseat the device, and repeat the installation steps.
Recheck both fasteners after the first range session following installation or a new zero. Movement at the rail interface is a common cause of a dot that appears to shift.
NOTICE If the supplied driver is lost or damaged, contact B.O.S. Lock for a replacement. Each driver uses a key pattern paired with the device. Be prepared to provide a registered product record, a receipt and serial number, or the order number from a purchase made through our website.
Adjusting the Windage & Elevation for the laser
See section 10.6 & 10.7 for recommended steps.
10.3 Zero for your intended environment
Choose a zero distance that reflects your intended use and the distances in your environment. For a home-defense setup, measure practical distances such as a hallway, doorway-to-entry path, widest room, or staircase. Use those measurements to select a realistic zero rather than relying on a generic distance.
This manual provides approximate offset tables for 5-yard (15-foot), 10-yard (30-foot), and 15-yard (45-foot) zeros. Because the laser sits below the bore, the dot and point of impact separate as you move away from the selected convergence distance. A shorter zero generally reduces offset across a hallway or single room, while a longer zero may better match an open floor plan or longer interior distance but creates more offset up close. Select the option that best reflects your environment, then confirm it at the range.
10.4 Intended use of the laser
The integrated green laser provides a rapid aiming reference at close distances, including in low light or from positions where obtaining a traditional sight picture may be difficult. It is intended to supplement, not replace, proper sight use and safe firearm handling.
The laser is not a substitute for your sights or a precision aiming system. Because it is mounted below the bore, the point of impact will be above the dot at distances closer than your selected zero. At very close range, that offset may be roughly the full distance between the bore and laser. The amount varies by firearm and setup, and it matters most when the target area is small or when other people or objects are near or beyond it. When greater precision is required, use a proper sight picture and confirm alignment through your sights.
Use the table for your selected zero as a starting point, then confirm the actual offset with your firearm and ammunition.
You are responsible for every round fired. A laser does not change the need to identify your target, understand what is around and beyond it, and follow all firearm-safety rules.
10.5 Understanding laser zero and offset
Your selected zero is the distance at which the laser dot and the expected point of impact coincide.
- Closer than your convergence distance, the bullet strikes above the dot.
- At your convergence distance, dot and impact coincide.
- Beyond it, the bullet strikes below the dot, and the gap widens quickly.
The size of the offset depends largely on the vertical distance between the bore and the laser, which varies by firearm and installation. At very close range, the point of impact may be above the dot by approximately that full distance. The offset narrows as the target approaches your selected zero distance. Measuring from the center of the bore to the center of the laser aperture provides a useful estimate of the maximum close-range offset, but live-fire confirmation is still required.
The tables below are calculated for a Glock 19, where the laser sits about 67 mm (2.6 inches) below the bore. Treat them as approximate. A firearm with a higher or lower bore will shift every figure proportionally.
15-yard (45-foot) zero — approximate
| Distance to target | Bullet impact relative to the dot |
|---|---|
| 3 ft | 2.5″ above |
| 9 ft | 2.1″ above |
| 15 ft (5 yd) | 1.8″ above |
| 21 ft | 1.4″ above |
| 30 ft (10 yd) | 0.9″ above |
| 45 ft (15 yd) | On the dot — convergence |
10-yard (30-foot) zero — approximate
| Distance to target | Bullet impact relative to the dot |
|---|---|
| 3 ft | 2.4″ above |
| 9 ft | 1.8″ above |
| 15 ft (5 yd) | 1.3″ above |
| 21 ft | 0.8″ above |
| 30 ft (10 yd) | On the dot — convergence |
| 45 ft (15 yd) | 1.3″ below |
5-yard (15-foot) zero — approximate
| Distance to target | Bullet impact relative to the dot |
|---|---|
| 3 ft | 2.1″ above |
| 9 ft | 1.1″ above |
| 15 ft (5 yd) | On the dot — convergence |
| 21 ft | 1.1″ below |
| 30 ft (10 yd) | 2.6″ below |
| 45 ft (15 yd) | 5.3″ below |
These figures are approximate. Results will vary with bore height, ammunition, firearm configuration, and how Fusion sits on the rail. Confirm your actual zero and offsets on paper at an appropriate range before relying on the laser.
10.6 Making adjustments
The laser module is supported by opposed springs and rubber-tipped adjustment screws. The side screw controls windage, and the bottom screw controls elevation. Turning a screw inward moves the module against its spring; backing it out allows the spring to move the module in the opposite direction.
- Windage adjustment is located on the side of the device. Turn clockwise to move the dot right and counterclockwise to move it left.
- Elevation adjustment is located on the bottom of the device. Turn clockwise to move the dot down and counterclockwise to move it up.
Make small adjustments and confirm the result after each change.

10.7 Securing your zero
Once the laser is zeroed, mark the position of each adjustment screw. If you choose to use threadlocker {we advise using Threadlocker 242 or 243 loctite), work on one axis at a time so you retain the other reference point:
- Back out one adjustment screw.
- Apply a small amount of blue, medium-strength, non-permanent threadlocker, such as Loctite 242 or 243, to the threads.
- Return the screw to its mark and reconfirm the zero.
- Repeat with the opposite screw.
Note: neither 242 nor 243 is a permanent threadlocker; both can be adjusted once set, if needed.
Keep threadlocker away from the springs, lens, and exterior of the laser module. Follow the threadlocker manufacturer’s application and cure instructions. When using Loctite 242 or 243 on anodized aluminum, allow 24 hours to cure before live fire.
Any time the device is removed, the screws are adjusted, tightened, or loosened, or the interface between the Fusion and the firearm’s rail is not completely secure, the laser will not hold zero. If the whole device is able to move, the laser diode will move with the housing. The diode and recoil spring support system will settle best after the first 50 rounds.
11. Battery Safety and Maintenance
11.1 General Battery Safety
The B.O.S. Lock Fusion uses a lithium-polymer battery.
A Note for Owners of Earlier Fusion Units
Since earlier Fusion units were produced, we have improved Fusion’s power-management programming, extending standby battery life to approximately nine months. We are offering this performance upgrade at no cost for eligible earlier units.
Fusion is intentionally a closed, offline device. It does not connect to Wi-Fi, Bluetooth, an app, or the cloud. This helps keep your biometric information and device operation local, but it also means we cannot install updates remotely. The unit must be returned to B.O.S. Lock so our team can complete the upgrade.
How to check eligibility: Find the serial number on your Fusion. Units with the prefix BOSL-FS-26- and one of the following five-digit suffixes qualify for the no-cost upgrade:
- 00007–00009, 00012–00013, 00018–00035, 00037–00047
- 00049, 00051–00059, 00061–00076, 00079–00080, 00082–00083, 00085–00087, 00089
- 00092, 00094, 00096, 00098–00099, 00103–00104, 00107–00109, 00111, 00114, 00116–00117, 00123–00127, 00129–00134, 00138–00139, 00141, 00143, 00145, 00149–00150
If your unit is listed, contact B.O.S. Lock Support at support@boslock.com to confirm eligibility and receive shipping instructions. If you are unsure, provide your complete serial number and our team will verify it.
Please note: Nothing is wrong with the batteries in these earlier Fusion units. They are operating as designed, and provide approximately six months of standby battery life.
11.2 Battery Precautions
- Charge Fusion only between 32°F and 110°F (0°C to 43°C). If the device has been exposed to freezing temperatures, allow it to warm to room temperature before charging.
- Extreme heat: Do not operate Fusion above 140°F (60°C), the upper limit of its rated operating range. Do not leave the device where temperatures may exceed this limit.
- Stop using the device if the housing is severely crushed, deformed, or damaged.
- For long-term storage over 30 days, maintain a partial charge.
11.3 Low-Battery Behavior
When the battery is below 25%, flashlight brightness is limited to conserve power. The battery-status color depends on the unit’s serial-number group: units beginning with 00 or 01 display red from 6%–24%, while units beginning with 02 or later display red from 6%–19%. At 5%, critical battery protection engages; the flashlight and laser are disabled until the device is charged.
At 5% charge, automatic closing is suppressed and the retention arm will not relock until the device is charged. Check the battery indicator regularly and recharge Fusion before it reaches the critical state.
WARNING Damaged lithium-polymer batteries may present fire, heat, or failure hazards.
11.4 Checking Battery Level
Know your remaining charge at a glance. Tap the B paddle once and Fusion’s LED will flash three times. Use the first two digits of the serial number to follow the correct indicator sequence:
- Serial numbers beginning with 00 or 01
- Green – 3 flashes: 75%–100% remaining battery charge
- Yellow – 3 flashes: 25%–74% remaining battery charge
- Red – 3 flashes: 6%–24% remaining battery charge
- Serial numbers beginning with 02 or later
- Green – 3 flashes: 35%–100% remaining battery charge
- Yellow – 3 flashes: 20%–34% remaining battery charge
- Red – 3 flashes: 6%–19% remaining battery charge
- Critical battery – solid red
- At 5% remaining battery charge, the flashlight and laser are disabled, and the retention arm will not relock until Fusion is charged.
Why the indicator sequence changed
On earlier Fusion units, the yellow indicator covered a broad range beginning at 75% remaining charge. Some customers understandably interpreted the early yellow signal as a low-battery warning. Based on that feedback, we refined the indicator thresholds on later units so the green range remains active longer and yellow represents a narrower recharge window.
This change affects only how the remaining charge is displayed. It does not indicate a problem with earlier units or change their battery capacity, operation, or critical low-battery protections.
Charging feedback
- When a charger is connected or disconnected, the device will report battery status. Tapping the B Paddle at any time will trigger a battery status report.
- When fully charged, the LED shows solid green briefly.
12. Troubleshooting
12.1 Common Issues
- Fingerprint denied:
- Use flat, consistent finger placement.
- Lift the finger completely, then reapply.
- Wipe away pooled water, heavy perspiration, oil, or debris from the finger and sensor. Slight moisture is acceptable. If recognition remains inconsistent, reenroll the fingerprint using a clean finger with normal or slight skin moisture.
- No response: Plug in the B.O.S. Lock Fusion to a charging cable. If using a rapid charge cable the activation will be instantaneous.
- Light or laser not staying on: Check battery level and inactivity timeout behavior.
- Cannot enter settings mode: Repeat the Settings Mode sequence and hold controls for the full required time.
- Laser alignment changes: Check mounting tightness.
- Paddles unresponsive: Recharge the device and inspect for low-battery safeguard behavior.
12.2 Sleep Behavior
The device sleeps when not in use. Any button press or fingerprint contact wakes it. In demo mode, the device returns to Demo Locked mode after 5 minutes of inactivity.
NOTICE If being used in mobile environments such as a vehicle, the device will detect that movement and will stay awake. This will impact battery life.
12.3 Service Notice
If the B.O.S. Lock Fusion appears damaged, does not mount correctly, or does not operate as expected after following this manual, discontinue use until inspected or serviced in accordance with the company’s warranty policy. To request services, please email us at support@boslock.com. If service is required, remove the device using the steps outlined in Section 7.5 before shipping or returning.
13. Maintenance and Optical Care
- Keep the biometric sensor clean and wipe away pooled water, oil, or debris. Normal or slight skin moisture is acceptable during fingerprint use.
- Clean optical surfaces with a soft, non-abrasive cloth.
- Do not use harsh chemicals or abrasive materials.
- Inspect mounting hardware regularly.
- Recharge the B.O.S. Lock Fusion as needed to maintain readiness.
- Use an approved power source and disconnect the charger if the device becomes unusually hot, damaged, or behaves unexpectedly. For long-term storage, check the battery periodically and recharge as needed.
- If the device has been exposed to water ingress or impact damage, discontinue use until inspected.

14. Technical Specifications
Biometric Engine
- Biometric Authentication: The FPC biometric module authenticates in approximately 0.25 seconds. The first enrolled (primary) profile may authenticate in under 0.2 seconds. Actual response can vary with finger placement, sensor condition, moisture, and environmental conditions.
- Storage: 20 Unique Fingerprint Profiles.
- Security: Air-Gapped / Zero Network Connectivity.
Light Specs
- Light Output: Rated up to 550 lumens.
- Modes: Low / Medium / High / Strobe.
- Beam Intensity: Maximum 4,900 candela.
Laser Specs
- Class 3R Green Laser (<5mW).
Battery Specs
- Battery: Rechargeable 650 mAh lithium-polymer battery; USB-C charging; up to nine months of standby operation. Certain earlier units provide approximately six months of standby operation and qualify for a no-cost performance upgrade; see Section 11.1 for eligibility. Actual battery life varies with unlock frequency, light and laser use, movement, temperature, battery condition, and selected settings.
Mechanical & Environmental
- Chassis: Precision-machined 6061-T6 anodized aluminum.
- Locking Mechanism: High-tensile DLC coated steel arm.
- Weight: 5.5 oz.
- Assembly: Assembled in the USA with many U.S.-made components.
- Thermal Range: -20°F to 140°F (Operational).
- Regulatory Listings: Tested and passed by a California DOJ-certified Firearm Safety Device laboratory, report #2380; listed on the California DOJ roster of certified safety devices; and included on the Massachusetts State Police list of approved firearm safety and locking devices under regulatory model BOS-FS1.
- Tensile Load: 225 lbs.
- Impact Resistance: 1-Meter drop test rated.
15. Warranty Information
THIS IS A LIMITED WARRANTY.
Effective Date: 12.6.2025 [EFFECTIVE DATE FOR VERSION 1.1]
Applicability: All B.O.S. Lock Products (Past, Present, & Future)
At B.O.S. Lock, we stand behind the quality, reliability, and durability of every product we create. Our mission is to deliver security solutions that offer both peace of mind and rapid access when you need it most.
We believe that customers who join our community deserve the highest level of protection. Therefore, we offer two distinct levels of warranty coverage. Both options are included with your purchase and are completely free of charge.
15.1 The Two Paths to Coverage
You automatically receive our Standard Warranty with every purchase. However, by taking a moment to register your device, you unlock Elite Status, upgrading your coverage to match and exceed industry standards at no cost to you.
| Coverage Feature | STANDARD (Unregistered) | Extended (Registered) |
|---|---|---|
| Cost | FREE | FREE |
| Requirement | Proof of Purchase (or, for Lifetime Status claims, registration record plus serial number and reasonable identity verification) | Register within 30 days of purchase |
| Electronics & Laser | 1 Year | 2 Years (Matches Industry Leaders) |
| Mechanical & Housing | 3 Years | Lifetime |
| Repair Service | Available (Cost + Labor) | Available (Cost + Labor) |
| Replacement Benefit | Discounted Retail Price | “Cost +” Pricing (No Markup) |
| Priority Support | Standard Queue | Priority Handling |
Defined Term: In this Manual, the registered owner program is referred to as Lifetime Status.
15.2 Path A: B.O.S. Lifetime Status (Recommended)
Warranty Claims Procedure: Before returning any product for warranty service, you must contact B.O.S. Lock to obtain a return authorization number (RMA) or other written return approval and return instructions. Any return made without an RMA or written return approval may be refused and returned to you at your expense. Required Documentation. When requesting warranty service, you must provide: (i) proof of purchase (unless waived for registered products enrolled in Lifetime Status); (ii) your name, return shipping address, email address, and phone number; (iii) the product model and serial number (if applicable); (iv) a description of the issue and the circumstances under which it occurred; and (v) any photos, videos, or other information reasonably requested by B.O.S. Lock to evaluate the claim. Inspection and Testing. All warranty claims are subject to B.O.S. Lock’s inspection and, where applicable, functional testing to verify the reported issue and determine whether the claim is covered. B.O.S. Lock may use new or refurbished parts or products for repair or replacement, and any repaired or replaced product will be covered for the remainder of the applicable warranty period. Shipping Responsibilities. You are responsible for properly packaging the product and for all shipping and insurance costs to send the product to B.O.S. Lock (or its authorized service provider) in accordance with the provided return instructions. If B.O.S. Lock confirms that the issue is a covered defect, B.O.S. Lock will pay the cost of standard return shipping back to you. If the issue is not covered, B.O.S. Lock may, before performing any non-warranty service, provide available options and applicable charges, and you will be responsible for return shipping and any such charges.
How to Qualify: Register your product at https://boslock.com/registration/ within 30 days of purchase. (Registration is free and takes less than 2 minutes).
By registering, you activate our maximum level of protection and loyalty benefits:
- Limited Lifetime Mechanical Warranty: The structural housing, mounting interface, and internal locking mechanisms are warranted to be free of defects for the lifetime of the original owner, meaning for so long as the original owner continuously owns the product and the product remains serviceable, including the availability of necessary parts and materials. If the original model is unavailable, we may, at our option, provide an equivalent replacement product.
- 2-Year Electronics Warranty: The laser diode, internal circuitry, and activation switches are covered for two (2) years from the date of purchase.
- “Cost +” Replacement Protection: If your unit is ever damaged beyond repair (even due to accidental uncovered damage), you are eligible, subject to verification and the limits below, to replace it with a new unit (or, if the original model is unavailable, an equivalent current model selected by us) at our Manufacturer’s Cost + Handling rate, as defined below.
- Eligibility Limits and Verification: This benefit is limited to one (1) replacement per product per twelve (12) month period, and requires proof of purchase and verification of the product and claimant (including the product serial number and a valid order number or receipt). We may deny any claim if we reasonably determine it involves fraud, attempted fraud, or a material misrepresentation.
- Priority Processing: Warranty claims for registered devices are fast-tracked in our service queue.
15.3 Path B: Standard Warranty
How to Qualify: Simply retain your original receipt or proof of purchase.
If you choose not to register, your product is still protected by our solid Standard Warranty:
- 3-Year Limited Mechanical Warranty: The core mechanical hardware is covered against defects for three (3) years from the date of purchase.
- 1-Year Comprehensive Warranty: All components, including electronics, lasers, and switches, are covered for one (1) year from the date of purchase.
- Exclusive Remedy: For any covered defect and subject to verification of eligibility (including Proof of Purchase, unless waived by enrollment in Lifetime Status), the customer’s exclusive remedy and B.O.S. LOCK’s entire liability shall be, at B.O.S. LOCK’s option, to repair the product, replace the product or defective component with a new or refurbished product or component, or refund the purchase price (or a reasonable portion of the purchase price attributable to the defective component).
15.4 Lifetime Repair & Replacement Policy (Post-Warranty Support)
We build our products to be serviced, not thrown away. If your B.O.S. Lock is damaged outside of the warranty period (or due to accidental uncovered damage), we offer two solutions:
Option 1: Cost + Labor Repair
For most issues, we offer a transparent repair service.
- No Parts Markup: You pay exactly what we pay for the replacement part.
- Fair Labor: You are billed a flat, transparent labor rate for the repair time.
Option 2: The “Cost +” Replacement (Elite Exclusive)
Sometimes, a unit is simply too damaged to save, or the model is obsolete (Legacy Products).
- If we cannot repair your unit, Elite Status members may purchase a brand-new unit (of the equivalent current model) at our Manufacturer’s Cost + Handling rate.
- The Definition: This price is calculated based on our raw manufacturing and shipping & operational handling costs, with zero retail markup.
15.5 Self-Defense Use Replacement Policy
If you are forced to use your firearm equipped with a B.O.S. Lock product in a self-defense situation, it is possible that your firearm and attached accessories will be taken into evidence and temporarily or permanently lost.
We stand by those who lawfully defend themselves.
- The Pledge: If your use of the firearm is determined to be legally justified by one or more of the following objective outcomes: (i) the prosecuting authority declines to file charges; (ii) the charges are dismissed; (iii) the user is acquitted at trial; (iv) a court or jury enters a finding of self defense in any related civil proceeding; or (v) the relevant law enforcement agency closes the matter as a lawful use of force, and you confirm that your product was not returned to you, we will, at our option, replace your B.O.S. Lock product with the same model or an equivalent model free of charge, limited to one replacement claim per incident, and we may deny any claim if we determine, in our reasonable discretion, that the claim involves fraud, misrepresentation, or unlawful conduct.
- Applicability: This policy applies to all civilian self-defense scenarios. It also extends to Law Enforcement Officers for any legally justified use of force, whether on-duty, off-duty, or at home, provided the product was personally purchased by the officer, and subject to the claim requirements and limitations stated in this policy.
- Process: Within 60 days after the applicable outcome described above (or, if later, within 60 days after you learn that the product will not be returned), submit a claim and provide a copy of the police report, prosecutor’s declination, dismissal order, acquittal, or comparable official documentation indicating the loss of the item during a lawful defensive encounter, documentation or written confirmation that the product was not returned to you, and sufficient information for us to verify the product and claimant (including the product serial number).
15.6 Terms & Conditions (Legal Liability)
Proof of Purchase: A valid order number or receipt is required for all claims. (For products enrolled in Lifetime Status, proof of purchase may be satisfied by a registration record plus the product serial number and reasonable identity verification.)
Eligibility Limits and Fraud: This benefit is limited to one (1) replacement per incident and one (1) replacement per product per twelve (12) month period. We may deny any claim if we reasonably determine it involves fraud, attempted fraud, or a material misrepresentation.
Original Owner: Warranties are non-transferable and apply only to the original purchaser.
Exclusions: This warranty covers manufacturing defects. It does not cover damage caused by theft (outside of Section 15.5), loss, normal cosmetic wear, battery leakage, abuse, misuse, or unauthorized modification.
- Specific exclusions include: (i) damage caused by careless or abusive handling; (ii) damage demonstrably caused by the installation of aftermarket components or by an alteration or modification of the device; (iii) cosmetic alterations that have caused or contributed to the failure complained of; and (iv) failure to perform proper maintenance in accordance with this Manual. This warranty is not voided by the mere installation of an aftermarket component or accessory unless that component or accessory is shown to have caused the failure complained of.
- Criminal misuse, negligence, or use while under the influence of drugs or alcohol.
DISCLAIMER OF IMPLIED WARRANTIES. EXCEPT AS EXPRESSLY PROVIDED IN THIS LIMITED WARRANTY, AND TO THE FULLEST EXTENT PERMITTED BY APPLICABLE LAW, B.O.S. LOCK DISCLAIMS ALL OTHER WARRANTIES, EXPRESS OR IMPLIED, INCLUDING WITHOUT LIMITATION THE IMPLIED WARRANTIES OF MERCHANTABILITY, FITNESS FOR A PARTICULAR PURPOSE, AND NON-INFRINGEMENT. TO THE FULLEST EXTENT PERMITTED BY APPLICABLE LAW, ANY IMPLIED WARRANTIES THAT CANNOT BE DISCLAIMED ARE LIMITED IN DURATION TO THE DURATION OF THIS LIMITED WARRANTY. TO THE FULLEST EXTENT PERMITTED BY APPLICABLE LAW, IN NO EVENT SHALL B.O.S. LOCK BE LIABLE FOR ANY INCIDENTAL, CONSEQUENTIAL, SPECIAL, EXEMPLARY, OR PUNITIVE DAMAGES, INCLUDING WITHOUT LIMITATION DAMAGES FOR LOSS OF USE, LOSS OF DATA, LOSS OF PROFITS, OR BUSINESS INTERRUPTION, ARISING OUT OF OR RELATED TO THE PRODUCT OR THIS LIMITED WARRANTY, WHETHER ARISING IN CONTRACT, TORT (INCLUDING NEGLIGENCE), STRICT LIABILITY, OR OTHERWISE, EVEN IF ADVISED OF THE POSSIBILITY OF SUCH DAMAGES. SOME STATES DO NOT ALLOW THE EXCLUSION OR LIMITATION OF INCIDENTAL OR CONSEQUENTIAL DAMAGES, OR LIMITATIONS ON HOW LONG AN IMPLIED WARRANTY LASTS, SO THE ABOVE EXCLUSIONS OR LIMITATIONS MAY NOT APPLY TO YOU. THIS WARRANTY GIVES YOU SPECIFIC LEGAL RIGHTS, AND YOU MAY ALSO HAVE OTHER RIGHTS THAT VARY FROM STATE TO STATE.
DISPUTE RESOLUTION; BINDING INDIVIDUAL ARBITRATION; CLASS ACTION WAIVER; OPT-OUT PLEASE READ THIS PROVISION CAREFULLY. IT AFFECTS YOUR LEGAL RIGHTS. Agreement to Arbitrate. Any dispute, claim, or controversy arising out of or relating to this Limited Warranty, the Product, or any warranty claim (including any dispute regarding the interpretation, applicability, enforceability, or formation of this provision) will be resolved by binding individual arbitration administered by the American Arbitration Association (AAA) under its Consumer Arbitration Rules then in effect. Governing Law. This arbitration agreement is governed by the Federal Arbitration Act (9 U.S.C. §§ 1–16) and, to the extent not inconsistent with the Federal Arbitration Act, the laws of the State of Florida. Small Claims Court Option. Either you or B.O.S. Lock may bring an individual action in small claims court instead of arbitration, if the claim is within that court’s jurisdiction and remains an individual action. No Class or Representative Actions. You and B.O.S. Lock agree that arbitration will be conducted only on an individual basis. Neither you nor B.O.S. Lock may bring, join, or participate in any class action, class arbitration, private attorney general action, or other representative proceeding, and the arbitrator may not consolidate more than one person’s claims or preside over any form of representative proceeding. Opt-Out Right. You may opt out of this arbitration agreement by sending a written notice within thirty (30) days of the date you first purchase the Product. Your notice must include your name, mailing address, email address, the Product model, and proof of purchase (or order number), and must clearly state that you are opting out of the arbitration agreement. You may send your opt-out notice by email to support@boslock.com or by mail to: B.O.S. Lock, Attn: Arbitration Opt-Out, 1497 Main St, Suite 197, Dunedin Florida 34698, United States. Opting out will not affect your warranty coverage or any other rights or benefits under this Limited Warranty.
15.7 Regulatory & Safety Warnings
Export Control Notice (ITAR/EAR)
B.O.S. Lock products may contain advanced laser and night-vision compatible technologies that are subject to the International Traffic in Arms Regulations (ITAR) or the Export Administration Regulations (EAR). Export of regulated products outside of the United States without a valid license or exemption from the U.S. Department of State or U.S. Department of Commerce is strictly prohibited. By purchasing this product, you agree to comply with all applicable export laws.
Battery Safety & Liability
Your device may utilize high-performance batteries (e.g., Lithium-Polymer, Lithium-Ion). Misuse, damage, or improper charging of these batteries can result in fire, explosion, or chemical burns.
- Disclaimer: B.O.S. Lock is not liable for any damage or injury resulting from the modification, puncture, or improper charging of the battery system.
- Requirement: Only use the provided charging cables or manufacturer-approved power sources. Never attempt to remove or replace internal non-user-serviceable batteries yourself.
California Proposition 65 Warning
WARNING: B.O.S. Lock products can expose you to chemicals including [Nickel (Metallic)], which is known to the State of California to cause cancer and birth defects or other reproductive harm. For more information go to http://www.P65Warnings.ca.gov.
15.8 Online 60-Day Return Policy
We want you to be fully confident in your purchase. We offer a 60-day money-back guarantee for all products purchased directly from B.O.S. Lock.
- The Terms: If you are unsatisfied, you may return the product within 60 days of the delivery date for a full refund of the purchase price.
- Condition: The product must be returned in its original, like-new condition, including all packaging and accessories.
15.9 How to Submit a Claim or Return
To initiate a warranty claim, self-defense replacement, or return, please contact our Customer Support Team.
- Email: support@boslock.com
- Subject Line: “Warranty Claim – [Order Number]”
Please include the following in your email:
- Your full name and order number.
- A detailed description of the issue.
- Preferred Contact Phone Number
16. Regulatory and Legal Notices
16.1 General Legal Notice
This product is a supplemental safety device only. It does not eliminate the inherent risks associated with firearms.
16.2 User Responsibility
The user remains solely responsible for safe firearm handling, lawful storage, lawful transport, lawful use, and compliance with all applicable local, state, and federal laws.
16.3 Laser Notice Expand
Do not point the laser at aircraft, vehicles, or persons except as permitted by law.
Avoid direct eye exposure.
16.4 Compliance Notice
Any state-specific certification, approval, testing result, or compliance claim should be published only after formal verification.
17. Standard of Care and User Responsibility
17.1 Performance and User Responsibility
The B.O.S. Lock Fusion is a precision-engineered biometric security system. To ensure the integrity and reliability of the device, the User must strictly adhere to the following operational requirements:
- Verified Fitment: Optimal performance is contingent on the device being mounted on compatible firearm rails using the provided hardware and specific torque values.
- Installation Integrity: The Company is not liable for performance issues or mechanical failures resulting from installation that deviates from the instructions in Section 7.
- Mandatory Safety Checks: Users must perform a manual verification of the locking mechanism and mounting stability while the firearm is unloaded after every installation, adjustment, or removal.
17.2 Access Management and Authorized Users
The B.O.S. Lock Fusion allows for the programming of up to 20 unique biometric profiles.
- Primary User Responsibility: The Primary User (owner) acts as the sole administrator of the device and is fully responsible for the selection, vetting, and programming of any additional authorized users.
- Assumption of Risk: By granting biometric access to another person, the Primary User acknowledges and accepts full responsibility for that individual’s conduct, firearm handling, and compliance with all safety protocols.
- Liability for Authorized Access: The Company disclaims responsibility for any injury, death, or misuse occurring as a result of actions taken by an individual who was granted authorized access by the Primary User.
17.3 System Integrity and Tampering
The B.O.S. Lock Fusion is an integrated security solution; its protective features rely on the physical and digital integrity of the unit.
- Unauthorized Modification: Any attempt to modify, alter, or service the Product using non-approved tools or hardware will compromise the system and void all performance expectations.
- Physical Tampering: The Company is not responsible for breaches or failures occurring as a result of intentional tampering or use of the Product beyond its intended design.
17.4 Supplemental Safety and Legal Status
The B.O.S. Lock Fusion is an advanced supplemental safety device.
- Not a Total Guarantee: While designed to restrict unauthorized operation via fingerprint authentication, it is not an absolute guarantee against unauthorized access or firearm discharge.
- Core Safety Rules: The device does not replace the fundamental rules of firearm safety. The User remains solely responsible for the safe handling, lawful storage, and compliance with all state and federal regulations regarding firearm safety devices.
- Data Hygiene: Users must follow the provided data-deletion and factory-reset (C Port) procedures when transferring ownership or returning the device to ensure biometric privacy.
You must be logged in to post a comment.